Ingredients
Scale
- 100 g corn flour
- 100 g hot water
- 400 g white wheat flour
- 230 g water
- 80 g active rye sourdough starter
- 10 g fine sea salt
Instructions
- In the evening (day before baking), first mix 100 g of corn flour with 100 g of hot water. Set aside to cool a little bit.
- When corn flour has cooled down, dissolve 80 g or your active rye sourdough starter into 230 g of water. Add 400 g of white wheat flour and cooled corn flour. Mix by hand until all ingredients come together. Cover the bowl with kitchen cloth and let the dough rest for 30 minutes. This rest is called ‘autolyse’. Observe how the dough becomes more extensible after the rest. Letting your dough to rest after mixing it is a great option if you don’t know how much water your flour absorbs. You can start with less water, let the dough rest and then see if you need to add more water.
- An active rye sourdough starter looks bubbly and it has risen (doubled in volume) since the last feeding. I fed my sourdough starter in the morning of that day.
- Add 10 g of salt and squeeze it well into the dough.
- Knead the dough for 5 minutes or until you see the dough is stretchy and it doesn’t tear and then transfer it to a clean bowl. Cover the bowl with a piece of cling film or a kitchen cloth and let it rise overnight until (almost) doubled in volume. It took 11 hours for my dough to double because my kitchen was quite cold. If you would like to speed up the fermentation, add more starter or place a bowl in the warm place (oven).
- In the morning, the dough looked like in the photo below.
- Next, use your plastic dough scraper and take the dough out of the bowl. Sprinkle it with flour and divide it into two parts or leave it as it is if making one big loaf.
- Pre-shape the dough into a ball, flour it and cover it with a piece of cling film. Let it rest for 10 minutes. If the surface is tearing, your dough is over-proofed.
- In the meantime, prepare your rising basket. I like to line my rising basket with a kitchen cloth. Make sure your basket is well floured so the dough will not stick to it when taking it out.
- After 10 minutes have passed, shape your loaf. Dust the dough again and turn it upside down. Spread it with your fingers a little bit and then first fold the upper part of the dough over the middle. Turn the dough for 180° and repeat. Then, fold the upper half over the lower half and pinch well. Make sure to create some tension while folding.
- Transfer your loaf to a rising basket and dust it with flour. Cover it with the rest of a kitchen cloth and let it rise until it gets large in volume and when it passes a poking test.
- You will know your dough is fermented if the indent you make with your finger springs back slowly and not all the way back. If the indent springs back quickly, leave the dough to rise longer. It took my bread 3 hours to be fully fermented.
- At least 30 minutes before baking preheat your oven to the maximum temperature of your oven along with Dutch oven or a baking stone. I used Dutch oven.
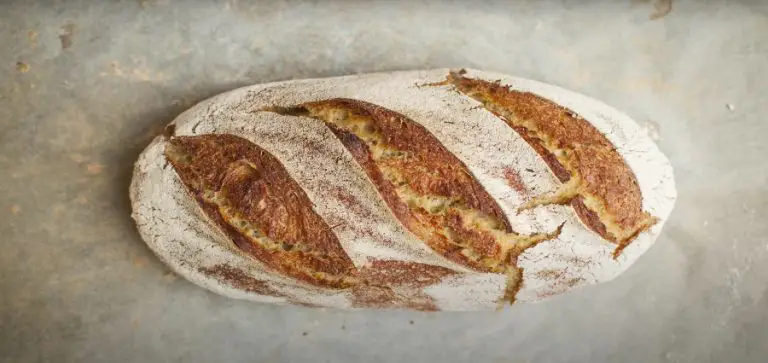
- When the oven is preheated, take the loaf out of the rising basket and transfer it to Dutch oven. Score the loaf and put your Dutch oven into oven.
- Bake the loaf for 20 minutes with the lid on at 240°C/465F°F and 20-25 minutes with lid off at 230°C/445°F and until bread gets nice golden color.
- Cool on a cooling rack before cutting for at least 1 hour – this is the hardest part.
- Prep Time: 14 hrs 45 mins
- Cook Time: 25 mins
- Category: bread