A sourdough starter acts as a raising agent, to provide your loaves with a wonderful rise. But for this to happen, your sourdough starter must be active, and ready for action. If you’re unsure about the status of your mature sourdough starter, and want to know whether it is ready to use for your sourdough bread, then perhaps it’s time to perform a float test!

Table of Contents
- What is a Sourdough Starter?
- What is the Sourdough Float Test?
- How to Perform Float Test for Sourdough Starter?
- What Happens if Sourdough Starter Does not Pass the Float Test?
- Factors that Affect Sourdough Float Test
- Is the Sourdough Float Test Accurate?
- The Float Test for Yeast Dough
- How to Make a Sourdough Starter?
- Does Your Starter Float?
- Sourdough Float Test FAQs
What is a Sourdough Starter?
A sourdough starter is a key component in sourdough bread baking. The starter is filled with good bacteria and wild yeasts that essentially help the dough rise.
Where most bread recipes use active dry yeast to ensure a good dough rise, sourdough bread uses a starter as a leavening agent.
What is a Mature Starter?
A mature sourdough starter will continuously double its volume, several hours after feeding. It will have lots of bubbles on the side of the jar, and on the surface of the starter. Your starter can take anywhere from 7 to 14 days till its ready to use.
It’s better to plan a bake 14 days after feeding your new starter. Patience is the key element to ensure happy baking.
What Does Sourdough Taste Like?
Sourdough bread tastes pretty similar to yeasted bread, but with a slight twang from the natural acids present in the starter, that is also very welcoming when eaten. You can pair this wonderfully nutritional bread with anything you like. The sour flavor is in no way over powering, in fact many prefer the tangy flavor over regular yeasted bread.
Benefits of Sourdough
Apart from the addicting flavors, sourdough has some additional health benefits, compared to regular white bread.
The lengthy fermentation process aids in breaking down phytic acid, which is a plant toxin that blocks the body’s ability to absorb nutrients found in whole grains. The reduction of phytic acid in sourdough bread, means that these incredible nutrients are available for us to take!
Furthermore, sourdough bread happens to help regulate blood sugar levels, and aids digestion, by breaking down some of the gluten, so those who suffer from gluten sensitivity can happily enjoy sourdough bread!

What is the Sourdough Float Test?
The float test is a method bakers use to judge whether their sourdough starter is ready to bake with. This involves dropping a glob of sourdough starter into a glass of water, to see whether it floats.
If the glob of sourdough starter floats, it is ready to bake sourdough bread. Now you’re probably wondering how this determines whether your starter is ready to use, and this relies on the age of the sourdough starter.
If your starter is less than 2 weeks old, it is not ready to bake with. However, once your starter is more than 2 weeks old, it is most likely ready to bake with, which is where float testing would come in to judge its level of preparedness.
Can You Stir Sourdough Starter Before the Float Test?
When doing the float test, you must refrain from stirring the starter beforehand. If you were to stir the sourdough starter, you will risk disorganising the gas bubbles emitted from the yeast, meaning that the starter will not float at all.
The starter will appear stretchy, but the absence of bubbles will prevent it from rising to the water’s surface.
To perform the test, take a spoonful of sourdough starter from the jar, ensuring that the bubbles remain intact so that the starter can float successfully.
What Happens if Sourdough Starter Floats then Sinks?
When performing the sourdough starter float test, a small glob of starter is dropped into the water and should float to the surface. If the starter floats for several seconds and then sinks, it can indicate that the starter does not have enough bubbles; meaning that you must feed your starter before it can be tested once more (in 6 to 12 hours).
How to Perform Float Test for Sourdough Starter?
Before performing a float test for your sourdough starter, it’s important to note that if your starter has not increased in size compared to what you had started with, then the starter is not mature enough to test. A mature starter doubles in size when fed, and produces lots of bubbles on the surface, with a consistency that is similar to a thick pancake batter.
The float test is a way of checking whether your starter is light and airy enough to make your bread rise when baking bread, ensuring an open crumb.
Here’s how the float test works:
- Fill a glass with room temperature water
- Take a spoon and gently scoop some sourdough starter and place it carefully onto the surface of the water
- Keep an eye on the starter in the glass of water, and wait for it to float
- Once it rises to the water’s surface, then your starter is ready to bake with
- However if the starter sinks, then it hasn’t developed enough bubbles, meaning that it requires another feed or two, before testing again.
What Happens if Sourdough Starter Does not Pass the Float Test?
Don’t panic if your starter does not pass the float test. There are a few things to consider before proceeding with the next steps in the process:
- If your starter is less than 2 weeks old, feed it twice a day for a few weeks and then you can judge whether it is ready to use. Tie a rubber band around the jar, or draw a line with a marker pen, to mark the initial height of the sourdough starter before feeding. The starter should increase in size over the next couple of weeks, indicating its readiness.
- If your starter is more than 2 weeks old but sinks when float testing, you should check the signs of readiness i.e. more bubbles, slightly domed shape, and thick consistency, which are all indicators that your starter is ready to use.
- If your starter is more than 3 months old but does not pass the float test, then I recommend feeding it with something that will strengthen it, such as whole wheat flour or rye flour. To do this, simply substitute your normal flour with wheat flour at each feeding for a couple of days, and you should notice a considerable difference.

Factors that Affect Sourdough Float Test
Some common factors may cause your sourdough starter to fail the float test, but this doesn’t necessarily mean that it’s not ready for baking. These factors involve:
- Hydration Level
- Gas
- Type of Flour
Hydration Level
The prime hydration level for your sourdough starters to pass the float test is 100%. Meaning that for every 100g of flour that is added, 100g of water must be added, ensuring a feeding ratio of 1:1.
Exceeding 100% hydration will leave you with a gloopy starter that will not be able to hold gas, and placing this in water will only disappoint you when you watch this break apart and sink to the bottom.
It’s also important to bear in mind that the kind of flour you use will determine the overall consistency of your sourdough starter. For instance, a sourdough starter that is fed equal parts all-purpose flour and water is going to be runnier than a starter that uses whole wheat flour.
Meanwhile, a sourdough starter that contains less water, is more likely to hold gas and float in the water with ease.
Gas
For your starter to float, you’ll need gas. This is why you should be extremely careful when scooping out your starter to test its readiness, as you can disturb the gas bubbles during this process.
Mature starters can easily be degassed when handling. Whether you stir or move a little too fast, it can lose its gas very quickly. However, this does not mean that it cannot leaven bread dough.
Type of Flour
The type of flour you opt for plays a significant role in the appearance and gluten development of your sourdough starter.
Any type of flour that contains a medium-high protein content is more likely to float than 100% wholemeal or rye starters, simply because it is able to trap more gas.
For instance, a starter that is made with white bread flour with a medium to high protein content, is more likely to float than a starter containing 100% rye flour. However, a rye starter is still able to raise bread.
Is the Sourdough Float Test Accurate?
The float test is accurate enough to work for some recipes, but it does have its limitations. The float test may not be reliable in some situations, and if you were to rely on the results of the float test, you may end up jeopardizing your bake, resulting in a flat or dense loaf.
While the float test can be reliable enough in certain aspects, it’s more than likely to produce a false positives or negatives. More often than not, the consistency of your starter plays a role in these results. Essentially, the float test is used to judge whether your starter can hold gas, determining that it is ready to bake and produce a perfectly fine sourdough bread with good oven spring.
That being said, a starter that sinks during the float test, may produce better bread than one that floated to the top.
The Float Test for Yeast Dough
Now that you know how to test your sourdough starter, how would you know whether your yeast dough has fully risen? The yeast in the dough produces tiny bubbles of carbon dioxide, therefore making the dough rise overnight. Yeast dough that has newly begun to rise, sinks like a pebble when dropped into water.
The longer the yeast dough rises, the more gas is trapped, till eventually the dough is light enough to float when dropped in water. Fully risen yeast dough will float to the water’s surface when plopped into water.
How to Make a Sourdough Starter?
Making a sourdough starter is very simple, the challenging part, however, is keeping up with the feedings, ensuring that you are remembering to feed your young starter regularly before it’s time to for baking.
Here’s how to make it:
Ingredients
- 3 1/2 cup Whole wheat flour
- 2 cups All purpose flour
- 4 2/3 cups Filtered water
Directions
- Making the Starter: In a clean jar measure 50 grams each of whole wheat flour and water. Mix well, and place a rubber band around the jar at the height of the starter to provide a visual representation of when the starter has risen. Cover the jar loosely with a plastic lid, or kitchen towel. Then set the jar aside on the kitchen counter, away from direct sunlight, for 24 to 48 hours.
- First Feeding: Check the starter after 24 hours, if there is no rise, but a little gray area at the top of the starter, then wait for another 24 hours. Once you notice bubbles, or an increase in volume, it’s time to feed your sourdough starter again. Combine a 50/50 blend of whole wheat flour and all-purpose flour. Discard half of the starter, then add 50 grams of the flour mix and combine this with 50g of water. Stir well, and cover loosely, remembering to adjust the rubber band to its new position.
- Second Feeding: After 12-24 hours, you should see some more activity in your starter, such as bubbles or an increase in volume. Discard most of the starter, with 50g remaining. Then add 50g of flour, and water, mix well and cover loosely. Adjust the rubber band if needed, then set this aside.
- Future Feedings: Feed the starter in exactly the same way as the second feeding. Continue to feed your starter every 12 to 24 hours, until it doubles in volume every 8 to 12 hours, emits a pleasant yeasty smell, and passes the float test. This is when your sourdough starter is ready to bake some sourdough loaves!
Does Your Starter Float?
Whether your sourdough starter floats or not, doesn’t entirely determine its readiness. You could find your starter floats successfully but produces a flat, dense loaf. Though the float test can be accurate, it’s important to remember that a starter can sink to the bottom of the glass and still produce delicious, risen loaves.
Sourdough Float Test FAQs
What is the Sourdough Float Test?
Essentially, the float test is a method used to test whether you starter is ready to bake with. Place a small portion of your starter into some water to see if it floats. If your starter sinks to the bottom it is not ready to use, and should be fed a couple times before testing again.
Is the Float Test Accurate for Sourdough Starter?
Though resourceful, the sourdough float test isn’t the most accurate way to measure the readiness of your sourdough starter. Sometimes, the test can reveal a false positive, or negative, as this test only shows whether the starter can hold gas.
Why Does My Starter not Pass the Float Test?
If your sourdough starter has a higher hydration than 100%, then it will most likely not pass the float test. Generally, it is better for your starter to be a little thicker than runny.
What Happens if Sourdough Leaven Doesn’t Float?
If your leaven floats or semi-floats to the top of the water, it’s ready to bake with. If it sinks to the bottom it has completely failed the float test, and should be fed a few more times before baking with.
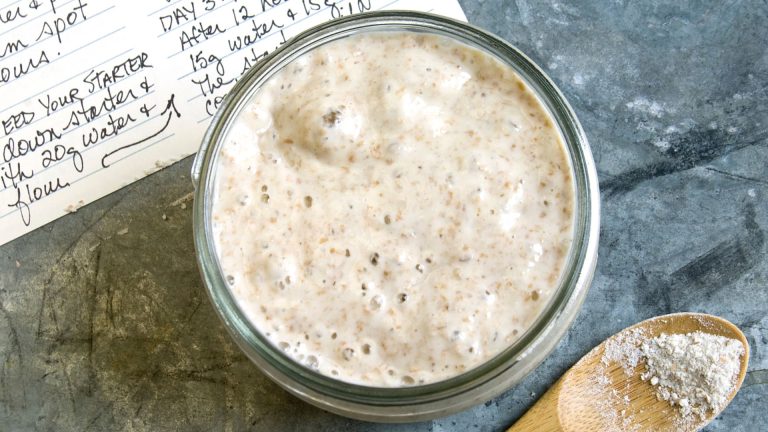
How to Make a Sourdough Starter
Ingredients
- 3 1/2 cup Whole wheat flour
- 2 cups All purpose flour
- 4 2/3 cups Filtered water
Instructions
- In a clean jar measure 50 grams each of whole wheat flour and water. Mix well, and place a rubber band around the jar at the height of the starter to provide a visual representation of when the starter has risen. Cover the jar loosely with a plastic lid, or kitchen towel. Then set the jar aside on the kitchen counter, away from direct sunlight, for 24 to 48 hours.
- Check the starter after 24 hours, if there is no rise, but a little gray area at the top of the starter, then wait for another 24 hours. Once you notice bubbles, or an increase in volume, it’s time to feed your sourdough starter again. Combine a 50/50 blend of whole wheat flour and all-purpose flour. Discard half of the starter, then add 50 grams of the flour mix and combine this with 50g of water. Stir well, and cover loosely, remembering to adjust the rubber band to its new position.
- After 12-24 hours, you should see some more activity in your starter, such as bubbles or an increase in volume. Discard most of the starter, with 50g remaining. Then add 50g of flour, and water, mix well and cover loosely. Adjust the rubber band if needed, then set this aside.
- Feed the starter in exactly the same way as the second feeding. Continue to feed your starter every 12 to 24 hours, until it doubles in volume every 8 to 12 hours, emits a pleasant yeasty smell, and passes the float test. This is when your sourdough starter is ready to bake some sourdough loaves!


![How To Reactivate Dehydrated Sourdough Starter [Your Easy Guide!] 51 How to reactivate dehydrated sourdough starter](https://www.mydailysourdoughbread.com/wp-content/uploads/2023/01/CD-blog-images-2023-01-05T220208.340-120x120.jpg)

![Sourdough Starter Temperature [Beginner'S Guide] 53 Sourdough starter temperature [a beginner’s guide]](https://www.mydailysourdoughbread.com/wp-content/uploads/2023/01/blog-images-48-120x120.jpg)
