There are few things in this world as universally beloved as garlic bread. That perfect combination of crusty bread, fragrant garlic, rich butter, and fresh herbs creates such an addictive side dish, there’s hardly anything above it. Garlic bread holds a special place in our hearts (and on our dinner tables).
Today, I’m sharing my ultimate guide to creating the perfect garlic bread at home, a classic recipe that will knock your socks off. Then we’ll explore ways to make that garlic bread even MORE epic. Let’s dive in!
The Classic: Ultimate Garlic Bread
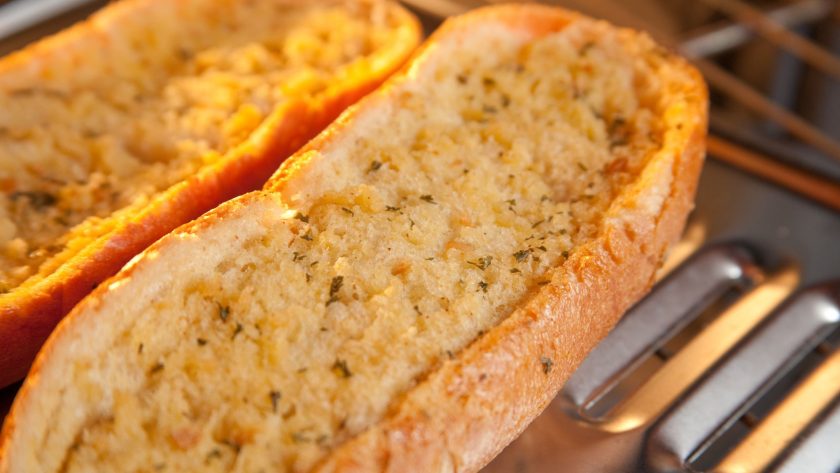
This is my go-to recipe that never fails me, ever. It strikes the perfect balance between buttery richness and garlic punch, with just the right amount of herbs to brighten everything up.
Ingredients
- 1 French baguette or Italian loaf
- 8 tablespoons (1 stick) unsalted butter, softened
- 6 cloves garlic, minced
- 2 tablespoons fresh parsley, finely chopped
- 1 tablespoon fresh chives, finely chopped (optional)
- 2 teaspoons fresh thyme leaves (optional)
- ½ teaspoon sea salt
- ¼ teaspoon freshly ground black pepper
- 2 tablespoons grated Parmesan cheese (optional)
Making the Bread
- Preheat your oven to 375°F (190°C).
- Slice the bread horizontally, cutting it in half lengthwise.
- In a medium bowl, combine the softened butter, minced garlic, parsley, chives, thyme, salt, and pepper. Mix until well combined.
- Spread the garlic butter mixture evenly over the cut sides of the bread. If using Parmesan, sprinkle it over the buttered surface.
- Place the bread halves, butter side up, on a baking sheet lined with aluminum foil or parchment paper.
- Bake for 10-12 minutes until the edges are crispy and golden, and the butter is melted and bubbling.
- For extra crispiness, switch the oven to broil for the final 1-2 minutes, but watch carefully to prevent burning.
- Remove from oven, let cool for 2 minutes, then slice into 2-inch pieces and serve immediately.
Tips for Perfect Garlic Bread
- Use room temperature butter for easier mixing and spreading.
- Fresh garlic is essential! Pre-minced garlic from a jar simply doesn’t deliver the same punch.
- For extra flavor, rub the cut sides of the bread with a raw garlic clove before spreading on the butter mixture.
- If your bread is very fresh and soft, consider toasting it slightly before adding the garlic butter to prevent sogginess.
- For make-ahead convenience, prepare the garlic butter mixture up to three days in advance and store it covered in the refrigerator. Just bring to room temperature before using.
Variation 1: Cheesy Garlic Pull-Apart Bread
This interactive, shareable version of garlic bread is always a crowd-pleaser at parties and family gatherings. The melty cheese between slices creates the perfect pull-apart experience.
Ingredients
- 1 round bread loaf (sourdough works wonderfully)
- 8 tablespoons (1 stick) unsalted butter, melted
- 5 cloves garlic, minced
- 1 tablespoon fresh parsley, chopped
- 1 teaspoon Italian seasoning
- ¼ teaspoon red pepper flakes (optional)
- ½ teaspoon sea salt
- 2 cups shredded mozzarella cheese
- ½ cup shredded provolone cheese
- ⅓ cup grated Parmesan cheese
How to Make
- Preheat your oven to 350°F (175°C).
- Using a serrated knife, cut the bread horizontally and vertically to create a crosshatch pattern, being careful not to cut all the way through the bottom crust.
- In a bowl, combine the melted butter, minced garlic, parsley, Italian seasoning, red pepper flakes, and salt.
- Gently open the cuts of the bread and drizzle the butter mixture between all the crevices, making sure to get some in every crack.
- Stuff the shredded mozzarella and provolone cheese between all the cuts, distributing evenly throughout the loaf.
- Wrap the entire loaf in aluminum foil.
- Bake for 15 minutes covered.
- Unwrap the top, sprinkle with Parmesan cheese, and bake for an additional 10 minutes until the cheese is melty and the top is golden.
- Serve hot, allowing people to pull apart the cheesy sections.
Tips for Perfect Cheesy Pull-Apart Bread
- Choose a sturdy, round loaf with a good crust to hold everything together.
- Use a combination of cheeses for the best flavor and melt factor.
- For extra indulgence, add small cubes of cream cheese along with the shredded cheese.
- Make sure your knife is really sharp to avoid crushing the bread while cutting.
- If the bread seems too soft to cut cleanly, refrigerate it for 30 minutes first.
Variation 2: Herb and Garlic Focaccia Bread
This version takes inspiration from Italian focaccia, creating a thicker, more substantial garlic bread that’s perfect as an appetizer or alongside pasta dishes.
Ingredients
- 1 pound store-bought pizza dough (or homemade)
- 6 tablespoons olive oil, divided
- 6 cloves garlic, thinly sliced
- 2 tablespoons fresh rosemary leaves
- 2 tablespoons fresh thyme leaves
- 1 tablespoon fresh sage, chopped
- 1 teaspoon flaky sea salt
- ½ teaspoon freshly ground black pepper
- ¼ teaspoon red pepper flakes
How to Make
- Allow the pizza dough to come to room temperature for at least 30 minutes.
- Preheat your oven to 425°F (220°C).
- Grease a 9×13-inch baking pan with 2 tablespoons of olive oil.
- Stretch and press the dough into the pan, creating dimples with your fingertips all over the surface.
- In a small saucepan, heat the remaining 4 tablespoons of olive oil over medium-low heat.
- Add the sliced garlic and cook gently for 1-2 minutes until fragrant but not browned.
- Remove from heat and stir in half of the fresh herbs.
- Drizzle the garlic and herb oil over the dough, making sure some slices of garlic settle into the dimples.
- Sprinkle with the remaining fresh herbs, flaky salt, black pepper, and red pepper flakes.
- Bake for 20-25 minutes until golden brown and crispy.
- Let cool slightly, then cut into squares and serve warm.
Tips for Perfect Herb and Garlic Focaccia
- Don’t rush the dough resting – room temperature dough is much easier to stretch without springing back.
- The dimples are crucial for catching the flavorful oil and garlic.
- For extra flavor, add some lemon zest to the garlic oil.
- This bread freezes beautifully – make a double batch and freeze half for later.
- Try using a blend of herbs based on what you have available – oregano, basil, and marjoram all work well.
Variation 3: Roasted Garlic and Caramelized Onion Bread
This sophisticated version takes more time but delivers incredible depth of flavor. The sweetness of roasted garlic and caramelized onions creates a more complex garlic bread experience.
Ingredients
- 1 large ciabatta loaf
- 2 whole heads of garlic
- 2 medium onions, thinly sliced
- 2 tablespoons olive oil, plus extra for roasting garlic
- 6 tablespoons unsalted butter, softened
- 1 tablespoon balsamic vinegar
- 1 tablespoon fresh thyme leaves
- ½ teaspoon sea salt
- ¼ teaspoon freshly ground black pepper
- 2 tablespoons grated Gruyère or Parmesan cheese (optional)
How to Make
- Preheat your oven to 400°F (200°C).
- Cut the tops off the garlic heads to expose the cloves. Place on a piece of aluminum foil, drizzle with olive oil, and wrap tightly. Roast for about 40-45 minutes until very soft and caramelized.
- Meanwhile, in a large skillet over medium-low heat, heat 2 tablespoons olive oil. Add the sliced onions and a pinch of salt. Cook, stirring occasionally, for about 25-30 minutes until deeply caramelized.
- Add the balsamic vinegar to the onions in the last minute of cooking, stirring to incorporate.
- Once the garlic is roasted, let it cool slightly, then squeeze the cloves out into a bowl.
- Mash the roasted garlic with a fork, then mix with the softened butter, caramelized onions, thyme, salt, and pepper.
- Cut the ciabatta loaf horizontally.
- Spread the garlic-onion mixture evenly over both cut sides of the bread.
- If using cheese, sprinkle it on top.
- Place the bread halves on a baking sheet and bake at 375°F (190°C) for 10-12 minutes until golden and crispy.
- Slice and serve warm.
Tips for Perfect Roasted Garlic and Caramelized Onion Bread
- The key to this recipe is patience – don’t rush the roasting garlic or caramelizing onions.
- For extra umami flavor, add a teaspoon of Worcestershire sauce to the onions while caramelizing.
- This mixture can be made up to 3 days ahead and refrigerated, making assembly quick before serving.
- For a bit of freshness to balance the rich flavors, add some chopped fresh parsley just before baking.
- This version pairs beautifully with red wine and is hearty enough to serve with soups as a complete meal.
Variation 4: Garlic Bread with Herb and Cheese Stuffing
This impressive stuffed garlic bread is perfect for special occasions. The creamy, herby filling hidden inside makes each bite a delightful surprise.
Ingredients
- 1 large French baguette
- 8 oz cream cheese, softened
- 4 tablespoons unsalted butter, softened
- 6 cloves garlic, minced, divided
- ½ cup fresh herbs (combination of parsley, basil, chives), chopped
- ½ cup shredded mozzarella cheese
- ¼ cup grated Parmesan cheese
- ¼ teaspoon red pepper flakes
- ½ teaspoon sea salt, divided
- 2 tablespoons olive oil
- ¼ teaspoon black pepper
How to Make
- Preheat your oven to 375°F (190°C).
- In a medium bowl, combine the cream cheese, 2 tablespoons butter, 4 cloves minced garlic, fresh herbs, mozzarella, Parmesan, red pepper flakes, and ¼ teaspoon salt. Mix until well combined.
- Cut diagonal slits into the baguette, about 1-inch apart, being careful not to cut all the way through.
- Gently open each slit and spread about 1 tablespoon of the cheese mixture inside.
- In a small bowl, mix the remaining 2 tablespoons butter and 2 cloves minced garlic with the olive oil, remaining ¼ teaspoon salt, and black pepper.
- Brush this mixture over the top of the stuffed baguette, making sure it drips down into the cuts.
- Wrap the baguette tightly in aluminum foil.
- Bake for 15 minutes, then unwrap and bake for an additional 5-7 minutes until golden and crusty.
- Serve hot, slicing at the pre-cut sections.
Tips for Perfect Stuffed Garlic Bread
- Make sure your cream cheese is properly softened for easy mixing and spreading.
- If you’re short on fresh herbs, you can substitute 2-3 teaspoons of dried Italian herb mix.
- For extra flavor, add a small amount of crumbled bacon or sun-dried tomatoes to the filling.
- Don’t rush the initial wrapped baking stage – this helps all the flavors meld together.
- For a spicier version, add a finely diced jalapeño to the cheese mixture.
Variation 5: Gluten-Free Garlic Flatbread
Everyone deserves to enjoy garlic bread! This version uses a gluten-free approach that delivers all the flavor without the gluten.
Ingredients
- 2 cups gluten-free flour blend (with xanthan gum included)
- 1 teaspoon salt
- 1 teaspoon baking powder
- 1 teaspoon instant yeast
- 1 tablespoon olive oil, plus extra for cooking
- ¾ cup warm water
- 6 cloves garlic, minced
- 4 tablespoons butter, melted
- 2 tablespoons fresh parsley, chopped
- 1 teaspoon dried oregano
- ½ teaspoon salt
- ¼ teaspoon black pepper
Instructions
- In a large bowl, whisk together the gluten-free flour, salt, baking powder, and yeast.
- Add the olive oil and warm water, mixing until a soft dough forms.
- Cover the bowl with a damp cloth and let rest for 30 minutes.
- Meanwhile, in a small bowl, combine the minced garlic, melted butter, parsley, oregano, salt, and pepper.
- Divide the dough into 4 equal portions.
- Heat a tablespoon of olive oil in a large skillet or griddle over medium heat.
- Roll or press each portion of dough into a thin round (about ¼-inch thick).
- Cook each flatbread for 2-3 minutes per side until golden spots form and it’s cooked through.
- Brush each flatbread generously with the garlic butter mixture while still hot.
- Serve immediately.
Tips for Perfect Gluten-Free Garlic Flatbread
- Different gluten-free flour blends behave differently – you may need to adjust the water slightly.
- Make sure your gluten-free flour blend contains xanthan gum; if not, add 1 teaspoon to the dry ingredients.
- The dough won’t rise much, but the resting time helps improve texture.
- For easier handling, roll the dough between two pieces of parchment paper.
- These flatbreads are best eaten fresh but can be reheated in a skillet to revive their texture.
Tips for Amazing Garlic Bread!
- Quality matters: Always start with good-quality bread. A fresh, artisanal loaf will elevate your garlic bread substantially.
- Fresh garlic is non-negotiable: Pre-minced garlic in jars simply doesn’t compare to freshly minced cloves. Take the extra minute to prepare fresh garlic.
- The butter blend: For extra flavor, make compound butter a day ahead to allow the flavors to meld.
- Temperature control: Room temperature butter spreads more easily, but cold butter slices can be tucked between bread slices for a different effect.
- Don’t burn the garlic: Raw garlic can become bitter when overheated. If you’re concerned about burning, mix a portion of the garlic into the butter and sprinkle some on after baking.
- Consider your audience: Adjust the amount of garlic to suit your diners’ preferences. Some people prefer a subtle hint while others want the full vampire-repelling experience!
- Make it ahead: Most garlic bread preparations can be made ahead of time and baked just before serving. This is especially useful for dinner parties.
- Storage solutions: Store leftover garlic bread in an airtight container at room temperature for up to two days. Reheat in a 350°F oven for 5-7 minutes to restore crispness.
- Freezer friendly: Unbaked garlic bread freezes beautifully. Prepare it up to the baking step, wrap tightly in foil, and freeze for up to 3 months. Bake from frozen, adding 5-7 minutes to the baking time.
- Perfect pairings: While pasta is the classic partner, don’t forget that garlic bread pairs wonderfully with soups, stews, salads, and grilled meats too!
Garlic bread is one of those simple pleasures that brings joy to the dinner table.
I hope I’ve helped you today to create irresistible garlic bread that your family and friends will rave about!
Happy baking!