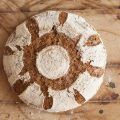
Maori potato bread, aka Parāoa rēwena, is a treasured part of New Zealand’s culinary heritage. I do not lie when I say it’s so delicious and versatile staple. It’s a must try, if you’re a curious baker and food enthusiast. Here’s a recipe for how to make Maori potato bread, with a soft, fluffy texture and a flavor that will transport you to the heart of Aotearoa!
![How To Make Maori Potato Bread [Rewena Bread] 96 How to make maori potato bread [rewena bread]](https://www.mydailysourdoughbread.com/wp-content/uploads/2024/04/Rewena-2-840x473.jpg)
Table of Contents
- Ingredients
- How to Make Maori Potato Bread
- What to Do When Something Goes Wrong
- Serving Suggestions
- Variations and Modern Twists to Try!
- Discover Maori Potato Bread Today!
- How to Make Maori Potato Bread: FAQs
Ingredients
To create your own delicious Maori potato bread, you’ll need
- Potatoes: The star of the show is, of course, potatoes. You can use any type of potato, but we recommend using starchy potatoes like Russets or Yukon Golds for the best texture.
- Flour: You’ll also need all-purpose flour to give your bread structure and help it rise. If you’re gluten-free, you can substitute the all-purpose flour with a gluten-free flour blend.
Tips for Ingredients
When it comes to the potatoes, you’ll want to choose ones that are firm and free of blemishes. Give them a good scrub under running water to remove any dirt or debris. You can leave the skins on for added texture and nutrition, or peel them if you prefer a smoother bread. Aim for about 2 cups of mashed potatoes, which is roughly equivalent to 3-4 medium-sized potatoes.
If you want to experiment with different flavors and textures, you can try substituting some of the all-purpose flour with whole wheat flour, rye flour, or even cornmeal. Just keep in mind that these substitutions may affect the overall texture and rise of your bread.
Ideally you should use an active sourdough starter for this. But if you don’t have any, you can use either active dry yeast or instant yeast in this recipe. If using active dry yeast, you’ll need to dissolve it in warm water before adding it to the other ingredients. Instant yeast, on the other hand, can be mixed directly into the dry ingredients. If you don’t have yeast on hand, you can still make potato bread using baking powder as a leavening agent, but the texture will be slightly different.
Equipment Needed
- First, grab some sturdy mixing bowls for combining ingredients. If you’re feeling traditional, look for Maori-style wooden bowls called “kumete.”
- Next, you’ll need rimmed baking sheets to provide a stable surface for your loaves in the oven. No baking sheets? Get creative with an oven-safe skillet or clean tin can.
- Of course, an oven is needed, but if you have access to a traditional Maori earth oven called a “hangi,” you could try baking your bread the old-fashioned way.
- While not essential, a kitchen scale, bench scraper, bread knife, and cooling rack can streamline the process. Remember, your hands are the most important tool in the kitchen.
How to Make Maori Potato Bread
In a large mixing bowl, combine the mashed potatoes, flour, sourdough starter, and salt. Gradually add in the warm water and mix until a shaggy dough forms. If the dough feels too sticky, add a bit more flour; if it’s too dry, add a splash more water. Once the dough comes together, turn it out onto a lightly floured surface.
Now it’s time to put some elbow grease into it! Knead the dough for about 10 minutes until it becomes smooth and elastic. This step is crucial for developing the gluten in the dough, which gives your bread its signature chewy texture. If you’re not sure if you’ve kneaded enough, try the windowpane test: stretch a small piece of dough between your fingers until it’s thin enough to see light through without tearing.
Once your dough is kneaded, place it in a lightly oiled bowl and cover with a damp towel or plastic wrap. Let it rise in a warm, draft-free spot for about an hour, or until it’s doubled in size. This is where the magic happens as the yeast works its way through the dough, creating those delightful air pockets that make your bread light and fluffy.
After the first rise, punch down the dough to release any excess air bubbles. Shape it into a round or oval loaf, depending on your preference. Place the shaped loaf on a baking sheet lined with parchment paper and cover it again for a second rise, about 30-45 minutes. This extra rise gives your bread an even better texture and flavor.
Preheat your oven to 425°F (220°C). Just before baking, slash the top of your loaf with a sharp knife to allow for expansion during baking. This also creates a beautiful, rustic look. Bake the bread for 35-40 minutes, or until it’s golden brown and sounds hollow when tapped on the bottom.
Let it cool slightly before slicing and enjoying your homemade Maori potato bread!
![How To Make Maori Potato Bread [Rewena Bread] 97 How to make maori potato bread [rewena bread]](https://www.mydailysourdoughbread.com/wp-content/uploads/2024/04/Rewena-473x840.png)
What to Do When Something Goes Wrong
Don’t let a few hiccups discourage you from making Parāoa rēwena. Here are some common baking issues you might encounter, and how to fix them.
The Dough is Too Sticky
If your dough is sticking to your hands and the kneading surface like glue, don’t panic. This is a common problem that’s easy to fix. Simply add a little more flour, a tablespoon at a time, until the dough becomes less sticky and more manageable. Be careful not to add too much flour, as this can make your bread dense and dry.
My Bread Isn’t Rising
There are a few reasons why your bread might not be rising. First, check the expiration date on your yeast. If it’s past its prime, it may have lost its leavening power. Next, make sure you’re using warm water (not hot) to activate the yeast. If the water is too cold, the yeast won’t wake up; too hot, and you’ll kill it.
Another culprit could be the temperature of your kitchen. Yeast thrives in warm environments, so if your kitchen is on the cooler side, try finding a warmer spot for your dough to rise, like on top of the fridge or in the oven with just the light on.
The Crust is Too Dark
If your bread is browning too quickly, tent it with a piece of foil during the last 10-15 minutes of baking. This will allow the inside to finish cooking without burning the crust.
The Bread is Dense and Heavy
Dense, heavy bread is often the result of not kneading the dough enough or letting it rise for too long. Make sure you’re kneading until the dough is smooth and elastic, and only let it rise until doubled in size. Over-proofed dough will collapse in the oven, leading to a dense texture.
![How To Make Maori Potato Bread [Rewena Bread] 98 How to make maori potato bread [rewena bread]](https://www.mydailysourdoughbread.com/wp-content/uploads/2024/04/Rewena-3-840x473.jpg)
Serving Suggestions
Time to enjoy the fruits of your labor!
Butter
One of the simplest and most satisfying ways to enjoy your freshly baked Maori potato bread is to slice it while it’s still warm and spread a generous amount of butter on top. The butter will melt into the soft, fluffy interior, creating a rich and indulgent treat.
For an extra burst of flavor, try using compound butter infused with herbs like rosemary or garlic.
Hearty Soups and Stews
Maori potato bread is the perfect accompaniment to a steaming bowl of soup or stew. Its sturdy texture holds up well when dipped into broth, making it an ideal choice for soaking up all those delicious flavors. Try serving it alongside a traditional Maori boil-up, a comforting dish made with pork bones, potatoes, and native greens like watercress or puha.
As a Base for Open-Faced Sandwiches
Slice your potato bread into thick pieces and use them as a base for open-faced sandwiches. Top with your favorite spreads, cheeses, meats, and vegetables for a quick and easy meal. The subtle sweetness of the potato bread pairs well with savory toppings like smoked salmon, avocado, and cream cheese.
Torn and Dipped in Olive Oil
For a rustic appetizer, tear your bread into bite-sized pieces and serve with a dish of high-quality extra virgin olive oil for dipping. The bread’s slightly chewy texture and mild flavor make it an excellent vehicle for showcasing the fruity, peppery notes of the oil. Add a sprinkle of flaky sea salt and freshly ground black pepper for an extra pop of flavor.
Variations and Modern Twists to Try!
While traditional Maori potato bread is a beloved classic, there’s always room for creativity in the kitchen. Try these ideas!
- Add herbs like rosemary or thyme to the dough for a savory note, or mix in some grated cheese for a tangy kick. For a sweet version, fold in some cinnamon, raisins, or even chocolate chips. The possibilities are endless!
- Use a stand mixer fitted with a dough hook to knead the dough, or let your bread machine do all the work for you. When it’s time to bake, a Dutch oven or even a slow cooker can create the perfect environment for your loaf to rise and develop a crispy crust.
- For those with dietary restrictions, sub out wheat flour with a gluten-free blend. Just be sure to add xanthan gum to help the bread hold together. Vegan versions can be made by replacing the butter with a plant-based alternative and using water instead of milk.
- King Arthur Measure for Measure Flour is gluten-free but also 1:1 substitute for wheat flour; an essential gluten-free pantry staple for bakers
Prices pulled from the Amazon Product Advertising API on:
Product prices and availability are accurate as of the date/time indicated and are subject to change. Any price and availability information displayed on [relevant Amazon Site(s), as applicable] at the time of purchase will apply to the purchase of this product.
Discover Maori Potato Bread Today!
Don’t be afraid to experiment with flavors, adapt the recipe to your needs, and enjoy the process of baking. With practice, you’ll soon be creating perfect loaves of Maori potato bread!
How to Make Maori Potato Bread: FAQs
What is Maori bread made of?
Maori bread, also known as Rewena bread, is a traditional sourdough bread made from fermented potato starter (bug). The main ingredients are potato, flour, sugar, and salt. The potato bug acts as a natural leavening agent, giving the bread its distinctive flavor and texture. Maori bread has a dense, chewy crumb and a slightly sweet taste.
What is potato bread made of?
Potato bread is a type of bread that incorporates mashed potatoes or potato flour into the dough. The main ingredients are typically wheat flour, mashed potatoes (or potato flour), yeast, salt, and water. Some recipes may also include milk, butter, or sugar for added flavor and texture. The potatoes help create a soft, moist bread with a subtle potato flavor.
How do you start a Rewana bug?
To start a Rewana bug (potato starter), mix grated raw potato, sugar, flour, and water in a jar. Cover the jar with a cloth and let it ferment at room temperature for several days, stirring daily. The mixture will start to bubble and develop a sour smell, indicating that the bug is active and ready to be used in Rewena bread.
Is Rewena Bread good for you to eat?
Rewena bread can be a part of a healthy diet when consumed in moderation. As a sourdough bread, it may be more easily digestible for some people compared to regular bread. However, it is still a source of carbohydrates and should be balanced with other nutrients. Homemade Rewena bread may be healthier than store-bought versions, as you can control the ingredients and avoid additives.
![How To Make Maori Potato Bread [Rewena Bread] 100 How to make maori potato bread [rewena bread]](https://www.mydailysourdoughbread.com/wp-content/uploads/2024/04/Rewena-2-768x432.jpg)
Parāoa Rēwena (Maori Potato Bread)
Ingredients
- 2 cups mashed potatoes (from about 3–4 medium-sized potatoes, preferably Russets or Yukon Golds)
- 3 1/2 cups all-purpose flour (or gluten-free flour blend if needed)
- 1 cup active sourdough starter
- 1 tsp salt
- 1 cup warm water, adjust as needed
Equipment
- Sturdy mixing bowls
- Rimmed baking sheets or an oven-safe skillet
- Oven (or a traditional Maori hangi if available)
- Kitchen scale, bench scraper, bread knife (optional)
- Cooling rack
Instructions
- In a large mixing bowl, combine the mashed potatoes, flour, sourdough starter, and salt. Gradually add warm water, mixing until a shaggy dough forms. Adjust with more flour or water as needed to get a manageable consistency.
- Turn the dough onto a lightly floured surface and knead for about 10 minutes until smooth and elastic. Use the windowpane test to check if the dough is well-kneaded: stretch a small piece thin enough to see light through without tearing.
- Place the dough in a lightly oiled bowl, cover with a damp towel or plastic wrap, and let it rise in a warm, draft-free spot for about 1 hour, or until doubled in size.
- After the first rise, punch down the dough to release air bubbles. Shape it into a round or oval loaf and place on a parchment-lined baking sheet. Cover and let rise again for 30-45 minutes.
- Heat your oven to 425°F (220°C).
- Just before baking, slash the top of your loaf with a sharp knife to allow for expansion. Bake for 35-40 minutes, until golden brown and hollow when tapped on the bottom.
- Let the bread cool slightly before slicing to enjoy the full texture and flavor.
Notes
- Enjoy warm with butter melting into the soft, fluffy bread.
- Serve alongside a hearty Maori boil-up or your favorite stew.
- Use thick slices as the base for sandwiches topped with smoked salmon, avocado, or cream cheese.
- Tear into pieces and dip in quality olive oil sprinkled with sea salt and pepper.
- Category: bread
- Cuisine: New Zealand

![How To Make Maori Potato Bread [Rewena Bread] 99 King arthur, measure for measure flour, certified gluten-free, non-gmo project verified, certified kosher, 3 pounds, packaging may vary](https://m.media-amazon.com/images/I/41EC1yykptL._SL500_.jpg)


