Scoring decorative slashes into sourdough bread loaves turns baking from bland to beautiful. But achieving those iconic masterpiece boules with winding wheat stalks and hypnotic spirals seems daunting for beginners. Take heart! With a few simple tools and techniques, anyone can unleash dramatic oven springs from basic breads to works of crust-cracked art.
Table of Contents
- Basic Techniques for Scoring Sourdough
- Patterns and Designs for Sourdough
- Advanced Techniques for Sourdough Scoring
- Tools and Equipment for Sourdough Scoring
- Dough Preparation
- Scoring and Baking Sourdough Bread
- Sourdough Scoring – Embrace Creativity and Imperfections!
- FAQs
Basic Techniques for Scoring Sourdough
Scoring designs may seem intimidating for novice bakers just getting started with sourdough bread, but have no fear – with a few basic tools and patterns, you can create beautiful slashed loaves. The most important thing is to have fun and get creative!
Scoring Techniques for Beginners
When you’re just starting out, focus on simple and achievable patterns and slashes. As your confidence grows, you can try more intricate designs.
A basic tool that every beginner baker needs is a lame – a double-sided blade used solely for the purpose of slashing bread dough. Investing in a decent breaad lame ensures clean, smooth cuts rather than ragged tears in the dough. Opt for one with a wooden handle and a blade length of around 4 inches.
Before scoring, dust the lame lightly with rice flour which prevents sticky dough from clinging to the blade. Then hold the lame at a 30° angle and swiftly slash the dough with a decisive, fluid motion. Slashing requires a gentle yet confident touch.
Classic starter slashes like the single slash down the center or cross hatch are perfect beginner patterns. The slash depth depends on the dough you are working with, but generally aim for around 1⁄4 to 1⁄2 inch deep. Take care not to cut all the way through to the bottom of the loaf.
Unleashing the Oven Spring
So why do we slash bread dough anyway? Scoring allows the dough to properly expand during that crucial oven spring – the initial rise when heat hits the loaf. This expansion is what gives artisan bread its signature ears and lift. Without slashing, loaves tend to tear randomly or in one spot, creating odd shapes and preventing even rise.
So in a way, slashing designs “guide” the direction of oven spring. Straight lines or squares “train” the dough to rise evenly upwards. Curves and circles promote all-around even expansion. Have fun playing with different patterns and visualize how you want your loaf to bloom!
Scoring on Sticky Dough
Working with wet, sticky dough (common with high hydration sourdough) makes scoring more challenging. If the dough keeps sticking to your bread lame, try chilling it in the fridge for 30 minutes prior to slashing to firm it up. Lightly dusting the top with rice flour also helps prevent sticking.
Alternatively, score the dough while still in the proofing basket before inverting it onto a baking sheet. This takes practice to swiftly score before transferring, but allows gravitation to keep dough from clinging to the lame.
The most foolproof method is the free hand slash. Instead of a lame, simply use kitchen shears. Make sure the blades are well-floured then snip 1-2 cuts across the top of the rounded loaf. While not as photogenic, it achieves the all-important steam venting goal.
Imperfections Add Character
View any funky slashes as adding “rustic character” rather than mistakes. Unless sliced completely through, tears and uneven patterns still allow for sufficient oven spring.
As you gain more dough slashing experience, your technique will improve. But at the beginner stage, don’t stress over imperfect slashes!
Patterns and Designs for Sourdough
Once you have mastered basic slashes, it’s time to step up your scoring game with fun patterns and artistic designs! Decorative slashes elevate your loaf from boring to beautiful.
Simple Designs to Start With
Here are some techniques of sourdough scoring for you to try:
The Single Slash
A long smooth deep slash from one end of the loaf to the other. This cut is what creates the ear of the dough, which is a raised crust that is super crunchy once it’s finished baking.
- Place your sourdough onto some parchment paper to make this process a little easier for you.
- Begin by holding the blade lightly in your hand with the blade poised at a 45 degree angle.
- Swiftly score the dough in a crescent moon shape from the top of the loaf to the bottom. The cut should be between ¼ inch and half inch deep.
With this sourdough bread scoring technique you’re more likely to achieve an ear and your loaf will expand beautifully.

The X Score
The X score is a basic, straightforward design that’s quite popular amongst professional bakers to use on loaves.
- Place your load on some parchment paper then slash at a 90 degree angel from one end of the loaf to the other between 1/4 to half inch deep across the centre.
- Make another slash perpendicular to the previous slash creating an X across the loaf
You’ll find your loaf opening up like a blossoming flower with this design in your oven.
The Square Cut
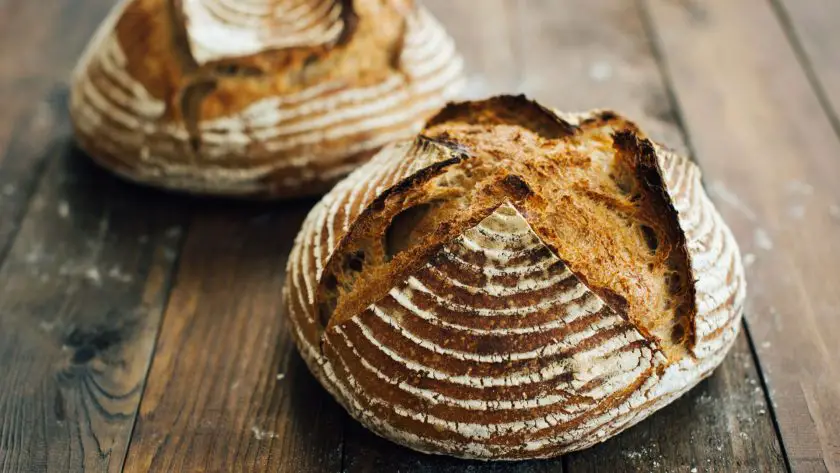
The square score helps provide your loaf with some height.
- Pop your dough onto some parchment paper and cut a square into the top of your bread dough and overlap each cut with the other.
- You can cut at an angle or straight on, and you can choose whether you’d prefer your square to be big or small
These four deep scores will allow the steam to escape while the loaf bakes complete with a hat on top of your finished loaf.
Popular Sourdough Scoring Patterns
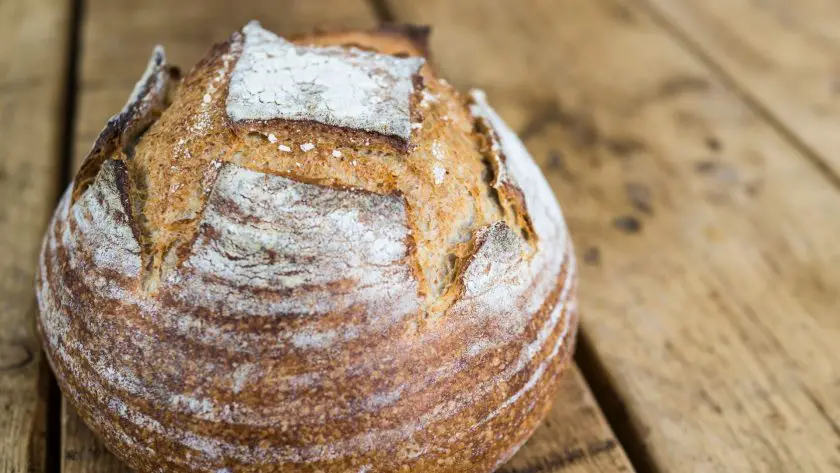
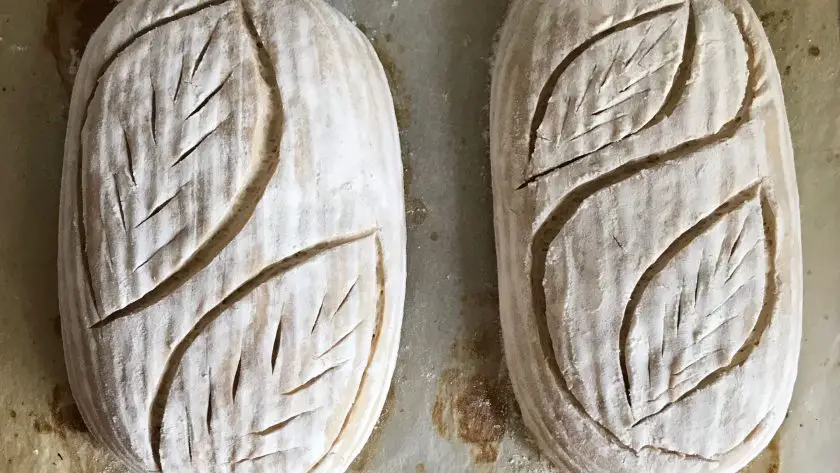
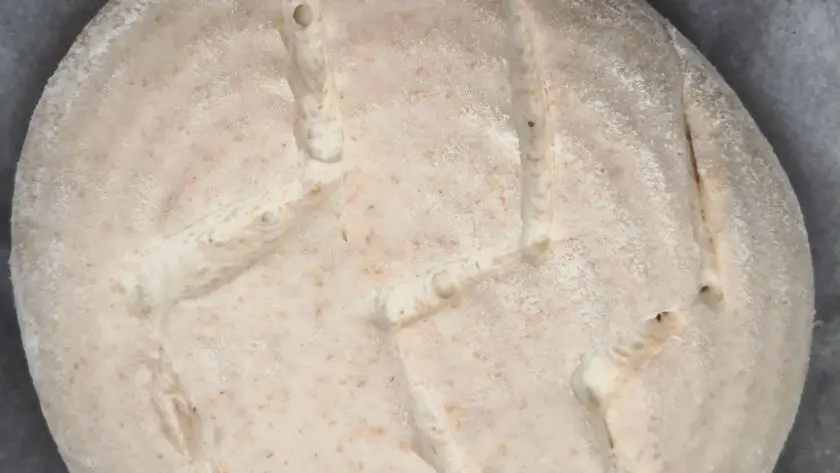
A classic design is the wheat stalk pattern – multiple diagonal lines emanating from a single stem slash down the center. This mimics the appearance of a wheat stalk and creates a rustic, artisanal look with dynamic oven spring.
To achieve cleanly defined stalks, chill dough for easier slashing. Keep diagonal lines close together at a 40° angle and 1⁄2 inch apart. Vary line length for visual interest.
For a modern twist, try a checkerboard pattern. This is achieved by first scoring grid-like lines on the horizontal and vertical axis, essentially dividing the round into equal squares. Then go over the grid again on the diagonal axis. The contrast of straight lines and angles creates eye-catching geometry once fully proofed.
You can get creative within the checkerboard squares by alternating slash directions or incorporating curved lines. Stack and stagger squares for a 3D effect. Let your imagination run wild!
Incorporating Artisan Design Elements
Think beyond basic lines and patterns – any design element can inspire your slashing creativity. Frame your loaf within slashes that mimic picture frames, ribbons, or wreaths.
Incorporate letters, numbers, or words by slashing the appropriate shapes freehand. Keep it simple with your name, initials or phrases like “Eat Me”. Consider fun holiday motifs like stars, hearts, or snowflakes.
Reflect hobbies and passions through related patterns – golf clubs and balls, music notes, flowers, etc. Kids especially delight in seeing characters or animals. Explore sunbursts, yin-yangs, mandalas, dreamcatchers…your options for custom designs are limitless!
Achieving Photogenic Aesthetics
Beautiful bread begins from the inside but should also look just as mouthwatering from the outside! Scoring designs provide the “wow factor” that makes loaves irresistibly Instagrammable.
Keep overall aesthetics in mind with scoring placement. Centered slashes foreground the beauty of interior holes and dough structure. Off-centered patterns create dynamic asymmetry. Frame the crown of the loaf or decorate just one side for teasers that entice slicing…and eating!
Vary line weights, angles and curves for visual interest while considering negative space as part of the overall design. Get creative with flourishes, braids, leaves and swirls. Contrast matte dough with shiny glazes, seeds or herbs pressed along the slash lines.
Have fun playing with dimensional illusions – partial lines that “disappear” around the loaf’s curvature or 3D cubes and diagonals that recede in perspective. Give plain loaves an artistic makeover!
Imperfections Embrace Rustic Charm
Much like handmade pottery with natural cracks and flaws, minor scoring mishaps add to the beauty and character of artisan bread. Wobbly lines, uneven spacing and irregular patterns impart a wonderfully imperfect rusticity.
Advanced Techniques for Sourdough Scoring
Once you feel comfortable with basic slashes and patterns, it’s time to step up your game with advanced precision scoring skills. These intricate techniques require practice but result in showstopping bread artistry.
Mastering Complex Sourdough Designs
While simple single lines and basic geometrics make excellent beginner slashes, more complex motifs better showcase expert-level finesse. Professional bakers wow with hypnotizing fractals, mesmerizing mandalas, and kaleidoscopic spirals morphing across the doughscape.
Such multifaceted designs rely on perfect execution – steadiness, razor-sharp cuts, and flawlessly straight lines or smooth curves. Arm yourself with a long lame, rice flour, and patience as you hone control and consistency. Plot out the sequence strategic prior to first slit, rehearsing the choreography in your mind.
Work swiftly and decisively before dough can relax and spread. Chilling firmed dough helps sustain definition despite sticky high hydration recipes. Stencil templates also aid precision for patterns with numerous fine details or challenging dimensions to freehand.
Specialized Scoring Tools and Techniques
Certain professional bakeries utilize unconventional tools tailored to specific decorative needs. For fine detail or custom motifs, many artisans opt for a lame palette knife. The curved blade allows for greater comfort and control when hand carving intricate designs across a dough canvas.
Smaller hobby lames and razor cutters suit tiny details like filigree, lace patterns or lettering. Alternate between different sized, angled and offset blades as needed without disturbing design foundations.
Lazy susan turntables enable rotating access, allowing flawless bands of geometric shapes. Sculpt dough into 3D coils, twists and braids before or after scoring with specialized molds and shapers. The options are unlimited for advanced artistry!
Developing an Artistic Eye
Approach scoring designs as a baker-artist merging visual creativity with utility. Masterpieces don’t solely rely on perfect technique but also grace, flow and intuitive style.
Study bread books and Instagram for inspiration on pleasing layouts, negative space, and graphical flourishes. Sketch concepts to visualize the end result. Photograph trials to analyze and improve.
Use contrast, continuity, emphasis and rhythm to lead the eye. Repeating motifs create movement while singular focal points highlight drama. Consider implied lines and directional tension for added dynamism once oven spring activates the design.
Tools and Equipment for Sourdough Scoring
Having the right tools makes scoring artisan bread dough easier and more precise. Investing in a few basic equipment essentials elevates your slashing prowess and creative potential.
Types of Scoring Lames
The lame is undoubtedly the baker’s best friend when it comes to slashing abilities. This thin, razor-sharp double edged blade specifically designed for dough allows clean, smooth cuts not possible with regular knives.
Classic lames feature a long metal blade with a wooden handle, available in varying lengths and angles to suit different needs. Offset lames work well for restricted spaces like round bannetons. Some bakers prefer a curved handle for ergonomic grip.
Double bevel blades sharpened on both sides ensure extra sharpness to slice through sticky dough. Opt for stainless steel over carbon steel for durability and rust resistance when washing.
For ultra-delicate scoring, try a ceramic lame praised for lasting sharpness. The brittle material requires careful handling but rewards with unparalleled precision on intricate designs.
Alternative DIY Scoring Tools
Lacking a lame doesn’t mean you can’t score your loaf! Household items like single edge razors, X-Acto knifes, scalpels, a sharp razor blade, and box cutter blades all work in a pinch. Some bakers even repurpose thin drywall taping knives.
Use a steady hand and quick confident slice before dough can stick. Chilling firmer dough helps these makeshift tools glide better. Just take care with the ultra-sharp edges.
If you bake often, invest in a proper bread lame for ease and safety. But otherwise, get creative with materials on hand to unleash those oven springs!
Beyond Lames: Useful Accessories
While a lame takes center stage, other handy tools support optimal dough slashing and creating bread scoring patterns.
Bench scrapers keep work surfaces and hands flour-free for control.
Dough whisks blend rice flour overstick powders over dough tops.
Bannetons lend pre-shaping support and those with built-in linen liners prevent sticky adhesion while scoring rounds. Stencils create perfect symmetry for intricate patterns.
Chilling inserts or platforms firm dough for cleaner definition.
Consider a rotating turntable for even bands of shapes around rounds. Sculpting tools add 3D braids and twists pre- or post-slash. Invest in a dough stamper or custom logo presses to brand loaves.
The options for slashing tools and accessories are endless when pursuing the craft. But all you truly need to create magic is a simple lame, an experimental spirit, and the willingness to enjoyably mess up!
Dough Preparation
Proper dough care from mixing to fermentation ensures the best results when it comes time to slash and score loaves. Paying attention to hydration levels, fermentation rise times, and making adjustments along the way will reward you with a smooth, evenly proofed canvas ready for your bread artistry.
Achieving the Ideal Dough Hydration
The moisture level of dough greatly impacts scoring ease and oven spring potential. Low hydration recipes under 60% create dense, stiff doughs that resist slashes. High hydration above 75% has sticky, slack doughs that lose shape.
Aim for an ideal hydration between 65-68% – wet enough to slash cleanly without sticking, but with enough structure to hold slashes and fully expand when baked. If your recipe is outside this range, tweak the flour to water ratio to land in this scoring sweet spot.
When using very wet, sticky doughs, additional steps like refrigeration, dustings and liners can firm up the exterior prior to slashing. Do not reduce overall hydration which ensures cakey crumbs – simply adapt handling and scoring to suit the dough.
Monitoring Fermentation
Properly fermented dough is key for both flavor and approriate proofing to accept decorative scores. Underproofed dough lacks the oomph for dramatic oven spring while overproofed deflates too quickly.
Follow recipe timelines as a guide. After initial rise, check dough periodically by gently poking – a dough ready for shaping will slowly fill in indentations but retain indentation outlines.
The final proof where scoring happens should have dough gently rounded at the edges but with a crown that still springs back when gently pressed. Leave dough longer or less time depending on ambient temperatures to achieve this pillowy peak readiness.
Preventing Sticking When Scoring
That glorious hydration providing taste and crumb can become your worst enemy when dough glues to your lame! But a few simple strategies combat sticky situations:
Lightly dust dough surface with rice flour which doesn’t absorbing into the dough. Alternatively, coat the lame blade itself. Both create “non-stick zones”.
Chill dough after shaping. Place in fridge on tray for 30 mins up to overnight. Cold dough firms up for better definition.
Score in banneton liner after inverting onto a sheet, allowing linen to prevent sticking as you slash then gently peel liner off.
Consider a water spray bottle. Mist dough just before slashing – water disrupts surface tension without affecting overall hydration.
Finally, have a bench scraper handy. Should dough cling, simply scrape residue off lame surface between slashes.
Be Adaptable Along The Way
Bread baking requires feeling out dough needs batch to batch. Weather, ingredients, schedules all affect outcomes – so remain flexible!
Add a splash more water if dough lacks stretchiness or is cracking during folds. Let it proof a bit longer if still tight and dense. Optionally chill or refrigerate to buy more time.
Learn when dough feels properly fermented for ideal gassiness, jiggle factor and poke test. Regularly assess its readiness rather than relying solely on elapsed time.
Scoring and Baking Sourdough Bread
When it comes to transforming your dough art into an edible masterpiece, the tasks of scoring and baking require finesse. Perfecting your process from slash to crumb will reward you with dramatically beautiful loaves.
Scoring Right Before Baking
For optimal oven spring, score bread immediately before loading into the oven while dough is at its peak proof. If slashing too far in advance, the delicate cuts can start closing up as dough relaxes or a skin forms.
Gently invert the dough onto a parchment lined baking sheet and quickly yet confidently execute your slashes. Work swiftly to prevent dough from spreading. Mist with water to prevent sticking.
When dealing with higher hydration sticky doughs, utilize liners when inverting to keep shape intact for scoring then gently remove. Alternatively, score rounds right in bannetons then transfer onto hot sheets.
Harnessing Steam for Explosive Oven Spring
That crucial early burst of heat evaporates moisture from the dough surface which gives rise to dramatic expansion as steam is created and trapped within. This is the moment when all your scoring and dough prep pays off in theatrical form!
Ensure your oven can hold steam in those first minutes. Dutch ovens with lids excel at this but even a covered baking sheet or water filled pan on the lowest rack helps keep moisture levels high. 30 seconds of initial steam is sufficient.
Be sure to score appropriately to allow this rapid ballooning. Shallow cuts prevent blowouts while deep 1⁄2 inch crosshatch slashes give the expansion direction. Visualize the rise path when slashing!
Getting the Perfect Oven Spring
An evenly proofed dough scored optimally right before hitting a steamy hot oven should reward you with a picture perfect oven spring. But occasionally things can go awry:
Underproofed dough lacks the “oomph” to dramatically expand at first heat. Overproofed begins collapsing too soon despite ample steam. Rein in your fermentation timing!
Insufficient steam fails to initiate a vigorous rise. Increase moisture levels and possibly oven temperature.
Cuts too shallow prevent needed expansion while too deep causes blowout tears. Adjust your lame angle and slash depth.
Uneven rise or odd shapes means inconsistent scoring depth or inadequate cut surface area. Ensure uniformity with each slash.
With practice, you’ll intuit perfect oven spring harmony every time! Just stay cool as a sourdough cucumber and learn from any funky outcomes.
Allowing for Proper Cooling and Settling After Baking
While hot from the oven, bread should be plump with an audible crackle when thumped on the bottom. Allowing loaves an hour or more to cool enables carryover cooking for maximum flavor development without overbaking the outside.
As it cools, moisture redistributes throughout the crumb while crust softens slightly. Let bread rest before slicing for clean cuts rather than crumbling. Admire how oven spring fixed your slashing designs into the crust permanently.
Now your loaf is finally ready to slices and photograph! Nothing beats cutting into artisan bread you scored yourself revealing the holes and texture within.
Sourdough Scoring – Embrace Creativity and Imperfections!
Scoring sourdough bread may seem daunting at first, but with the right tools, preparation, and mindset of embracing delightful imperfections, anyone can unleash beautiful oven springs from fun, creative dough canvases.
Approach every unique loaf as an opportunity for artistic expression through razor embellished dough. While flawless technique comes with practice, imperfect wobbly character marks the joyful path of any artisan baker.
With an experimental spirit and lighthearted willingness to laugh at the flops, scoring bread becomes a magical adventure. Simply grab a lame, cue the slasher flick soundtrack, and unleash your inner dough diva upon the world!
FAQs
How do you score sourdough patterns?
Scoring sourdough patterns involves creating shallow cuts on the dough’s surface with a sharp blade or lame. First, prepare your dough for baking. Then, using the lame, gently etch your chosen design onto the dough’s surface. Popular patterns include simple slashes, wheat stalks, or more intricate designs. Depth and angle of the cuts can vary, influencing the bread’s expansion and final appearance.
Should you freeze sourdough before scoring?
It’s not recommended to freeze sourdough before scoring. Scoring is best done when the dough is proofed and at its optimal state for baking. Freezing can alter the dough’s texture, making it too hard to score effectively. For the best results, score your sourdough just before baking, when it’s still at room temperature or slightly cool.
Why does my sourdough collapse when scoring?
Sourdough may collapse during scoring if it’s over-proofed, meaning the dough has fermented too long and lost its structure. When over-proofed, the dough becomes weak and cannot hold its shape once scored. To prevent this, ensure proper proofing time and score the dough when it still has enough tension and firmness to maintain its shape after scoring. Check out my tips for recusing overproofed sourdough on the blog.

![How To Stretch And Fold Sourdough [A Detailed Guide] 11 How to stretch and fold sourdough [a detailed guide]](https://www.mydailysourdoughbread.com/wp-content/uploads/2023/06/How-To-Stretch-And-Fold-Sourdough-120x120.jpg)
