The sourdough ear is pretty much a crucial feature of a sourdough loaf. Think of it as an actual ear for the bread, that requires perfected precision to be deemed edible. Although you shouldn’t feel disheartened if you haven’t managed to achieve a beautiful ear, because you can still bake the most delicious loaves with small ears! If you’re wondering what sourdough ears are, and how to get them, then stay tuned for the answers!
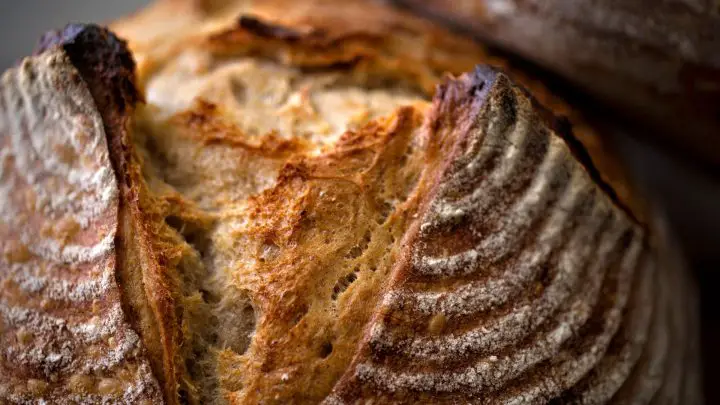
Table of Contents
- What is a Sourdough Ear?
- Why Are Ears So Popular in Sourdough Baking?
- How is a Sourdough Ear Formed?
- Tips to Achieve a Tall Sourdough Ear
- Why is Steam So Important For Sourdough Ears?
- Sourdough Ears
- FAQs
What is a Sourdough Ear?
Essentially, a sourdough ear is a portion of dough that sticks out while baking. This piece of dough becomes crisp while baking, indicating a good oven spring.
The ear is formed when the dough is pushed upwards and peels back while the dough bakes in a hot steamy environment, otherwise known as a Dutch oven. This raised, and a crusty portion of sourdough bread is the result of precise scoring, ensuring expansion with the help of a razor blade.
You can learn how to score sourdough bread before your next bake!
Why Are Ears So Popular in Sourdough Baking?
Ears are significantly popular in sourdough loaf baking for one of two reasons. And these are:
- Aesthetics: A sourdough ear essentially beautifies your loaves, making them incredibly appealing to serve and eat.
- Maximum Rise: A proper scoring technique determines the dough rise. The scoring pattern plays a huge role in all loaves, especially sourdough. The angle of slicing will result in the crust rolling up to form a beautiful ear.
How is a Sourdough Ear Formed?
Scoring your dough forces your bread to rise in the way you wish for it to do so. Meaning that you control the direction it rises, and how much it rises.
Some techniques can encourage your sourdough to produce the best ear. And these include:
- Creating good surface tension through planned shaping.
- Precise scoring
- Well, fermented dough to produce a good oven spring.
- Steaming your dough, i.e., baking bread in a Dutch oven.
Tips to Achieve a Tall Sourdough Ear
Although the process of creating a sourdough ear may seem simple, there are additional factors that must be considered to produce a wonderful loaf, with a crisp crust and perfect ear.
Here are some tips to help achieve a beautiful sourdough ear.
Ensure Your Dough Has Sufficient Strength and Gluten Development
If your dough is lacking sufficient dough strength and gluten development, then chances are your sourdough ear will not develop whilst baking.
A flatter dough is unable to rise during oven spring, and this is crucial to help split the cuts in the dough, as this is the only way a tall ear can develop.
When a weak dough is scored, the cut splits the essential gluten strands in the dough. The gluten strands provide strength, and with them gone, the dough collapses, unable to support its weight.
Perfect dough strength can be developed in many ways. Mixing the dough helps develop gluten strands, the acidity from bulk fermentation tightens the gluten structure, and folding the dough during bulk fermentation helps develop a good gluten structure.
The hydration levels of the dough play an important role in scoring. For instance, if you’re working with sourdough that is less than 75% hydrated, a scoring depth of ¼ to ½ inch deep should not flatter your dough. However, if it does flatten your dough, you can improve the dough’s strength by increasing its mixing time, and the number of folds.
On the other hand, doughs that are more than 75% hydrated will collapse if scored.
Do Not Over-Proof Your Sourdough
Oven spring is essential, as the dough expands and rises upwards, bursting the cuts in the dough, eventually hardening and developing into a tall and wonderful ear.
Oven spring refers to the quick expansion of the dough during the first 10 minutes of baking. As the dough heats in the oven, the trapped gasses inside the dough expand due to the increasing temperatures.
The sole purpose of final proofing or fermentation is so that the dough can achieve 90% of its rise before it is placed into the oven, where fermentation can continue to produce sufficient oven spring.
If the dough has over-proofed i.e., close to 100% of its rise, this would mean that the yeast and bacteria have used up their remaining food for fermentation and gas production, which will cause the dough to flatten inevitably.
Create Enough Steam for Sufficient oven spring
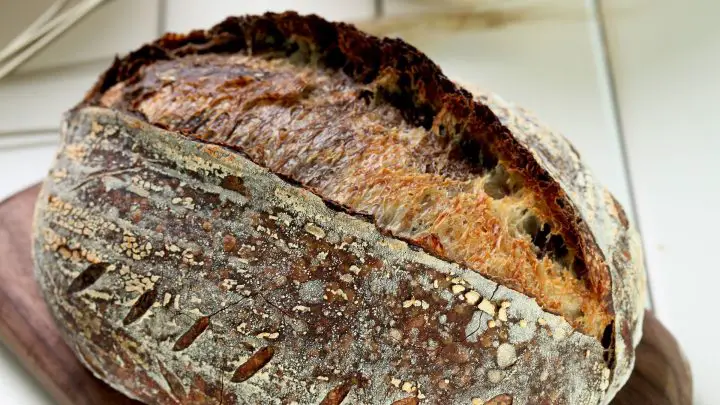
Steam plays an important role in sourdough baking. Your sourdough must bake in a perfectly steamed environment so that the dough can expand completely during oven spring. This process will then encourage the crust to harden, and spread into a long and tall ear.
The steam lowers the surface temperature of your dough. Without steam, the surface temperature can rise incredibly fast, causing the crust to harden too early. This hardened crust will then prevent further expansion, and this is why some home bakers have experienced baked loaves with cuts that do not expand.
If there is too much steam produced, then the surface temperature of the dough will remain extremely low, enabling the oven spring to set in too soon. the gradual increase in temperatures ensures a perfect crust formation, but with the rushed oven spring, and lack of crust to keep the dough shaped, it’ll collapse inevitably.
It’s important to remove steam from the loaf, once the dough has sufficiently browned so that it can finish baking in a dry environment.
Ensure Adequate Skin Tension During the Shaping
Shaping your dough is extremely important, as it ensures the dough has developed enough skin tension. This skin tension applies a pulling motion at the surface of the dough, which will enable the cuts to split open once the dough is scored.
When there is little to no skin tension, the cuts refuse to open. We shape the dough against a hardened surface to help develop the perfect skin tension, and this is a product of friction. The stickiness of the dough pressed against the hardened work surface, holds one side of the dough rigid, while your hands pull and prod at the dough from the other side.
The less flour you apply to your work surface, the better. We need all the friction we can get!
Scoring With a Sharp Razor Blade
The best tool to use when scoring your dough should be a razor blade, as it has the thinnest and sharpest edge, enabling you to slice the dough in one swift motion. If you’re using a knife to score the dough, the thick blunt blade can freeze, and become stuck as you attempt to slice deeper into the dough. This defeats the entire purpose of slicing and scoring your dough in a single slash.
Before scoring, make sure you’re using an extremely sharp knife or blade to avoid any mistakes. You can test the sharpness of your blade by holding up a piece of paper, and slicing in a swift downward motion. If the blade is sharp enough it should slice through the paper effortlessly.
However, if the blade is blunt, it will pause mid-cut and drag the paper while slicing.
Soak Your Knife in Water
If the blade sticks to the dough when scoring, cease all scoring, and soak the blade in some water. The soaked blade and droplets of moisture prevent the dough from sticking to it, meaning less resistance when scoring, and a flawless cut.
Use Scissors
Wetter doughs are often stickier, and your blade will undoubtedly get stuck in the dough, even if you were to soak your blade in water beforehand. If your razor blade is stubbornly sticking to the dough when scoring, use a pair of scissors instead. Cut the dough at a shallow angle, and perform small multiple cuts on the dough, so that they link together and form a tall shape when baking.
Why is Steam So Important For Sourdough Ears?
Steam is essential to sourdough because it keeps the dough soft while it bakes, ensuring that it continues to expand comfortably, resulting in the perfect oven spring.
Without steam, the crust will form quicker than needed, and the dough won’t rise as much, resulting in a flatter loaf.
Steam ensures that the loaf continues to expand until the loaf is uncovered and exposed to direct oven heat. The steam will also help your loaves achieve a beautifully caramelized crust. Always make sure that you have created a sufficient steam environment for your dough, whether that is through a Dutch oven, cast iron pan, or a simple glass of water in the oven.
Sourdough Ears
Don’t fret if you haven’t managed to produce the best sourdough ear. These things take time and practice, and with every loaf you bake, there is a perfect ear that awaits!
In the meantime, you can explore the best bread knife for sourdough bread to produce the perfect slice.
FAQs
How do You Put an Ear on Sourdough Bread?
Essentially, a sourdough ear is formed through precise scoring techniques of your dough before it is placed into the oven. The scored area creates a weak point in the dough, allowing it to collapse and crack open when it’s in a hot oven. But this will only occur if your dough has a good oven spring.
How do You Make Sourdough Ears Bigger?
The best way to form larger sourdough ears is by scoring it at an angle that pushes upwards so that the dough peels back. Use a sharp razor or lame to do this.
Why do People Score Sourdough?
Scoring controls the expansion of the dough once it is placed into the oven. Bakers score their loaves to help prevent them from cracking.
How do You Make Artisan Bread Ears?
Firstly, create a good surface tension through intentional shaping. Next, you’ll need to score confidently and precisely. Good fermentation ensures perfect oven spring. Remember to steam your dough!


