
Ever stared down a sourdough recipe full of words like “levain” and “hydration” and felt totally lost? You’re not alone. Sourdough explained for complete beginners really just means breaking things down into plain English—no jargon, no overwhelm. Once you understand how a starter actually works and what each step is doing, everything clicks fast.
That dense, gummy first loaf everyone talks about? Totally avoidable once you know what to look for. What’s ahead covers everything you need, step by step, so you can bake a loaf you’re genuinely proud of.
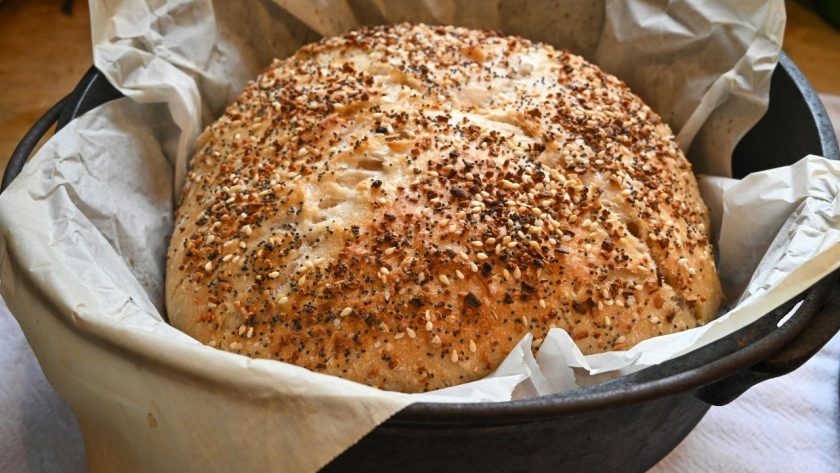
What Is Sourdough?
Sourdough bread gets its rise and tang from natural fermentation instead of a commercial yeast packet. A sourdough starter—a living culture of wild yeast and lactic acid bacteria grown from just flour and water—does all the work. The wild yeast produces carbon dioxide that makes the dough rise, while the bacteria create lactic acid, giving sourdough its signature sour flavor.
This process takes much longer than regular yeasted bread (hours instead of minutes), but that extra time is what builds a chewier crumb, a crisper crust, and deeper flavor. In practical terms: no starter means no rise, so keeping an active, well-fed starter is the foundation of every single loaf you’ll bake.
How Does Sourdough Starter Work?
A sourdough starter is a mix of flour and water that’s been colonized by wild yeast and bacteria from the air and the flour itself. Feeding it—adding fresh flour and water—gives that culture new food, which keeps it multiplying and producing the gas that makes bread rise. Skip feedings for too long, and the culture weakens and loses rising power.
Key points:
- Wild yeast produces carbon dioxide, which makes dough rise.
- Lactic acid bacteria produce the acids responsible for sourdough’s tangy flavor.
- Feeding = discarding most of the starter and mixing in fresh flour and water.
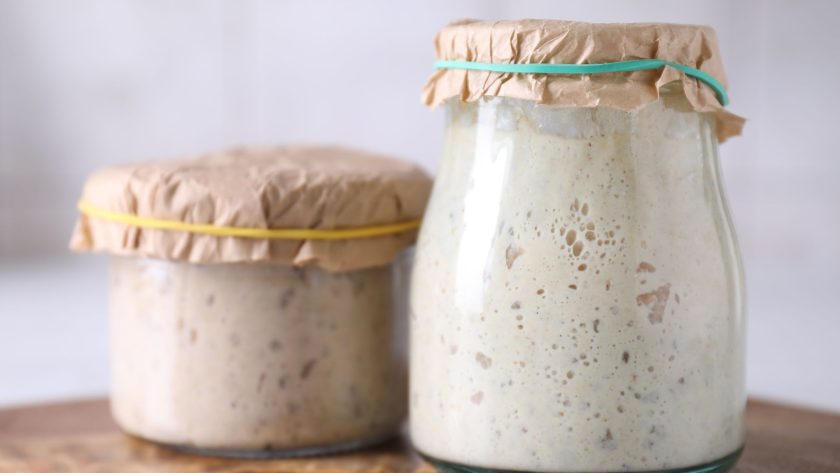
- An active starter roughly doubles in size within 4–8 hours of feeding.
- A hungry starter looks flat, sunken, and smells boozy rather than tangy.
- A ready starter is full of bubbles and smells pleasantly sour, like yogurt.
Related: Sourdough Starter Refrigeration Schedules
What Do You Need to Start Making Sourdough?
You don’t need much to get started. On the ingredient side, all you really need is bread flour, water, salt, and an active starter—no commercial yeast required. On the equipment side, a kitchen scale is the most important tool you’ll own, since sourdough relies on precise ratios and weighing beats measuring by cups every time. A mixing bowl and a Dutch oven (or any heavy, lidded, oven-safe pot) round out the essentials—the pot traps steam during baking, which gives you a crisp, well-browned crust.
What you need:
- Bread flour (whole wheat flour optional, for flavor and fiber)
- Water
- Salt
- An active sourdough starter
- Kitchen or digital scale
- Mixing bowl
- Dutch oven or other heavy, lidded, oven-safe pot
- Banneton or proofing basket (optional — a towel-lined bowl works too)
- Bench scraper (optional, makes handling sticky dough easier)
How to Make and Feed a Sourdough Starter
- Mix equal parts flour and water in a jar, stirring until no dry flour remains. Whole wheat or rye flour is a smart choice for the first few days, since whole grains carry more of the wild yeast and bacteria you’re trying to capture, helping the culture establish itself faster than all-purpose flour alone.
- Cover the jar loosely (a lid set on top, not sealed) and let it sit at room temperature. Check daily for the first signs of life — small bubbles on the surface and a slightly tangy smell mean wild microbes have moved in.
- Once you’re seeing consistent bubbling, switch to a regular feeding schedule. A 1:1:1 ratio — equal parts starter, flour, and water by weight — is the easiest to remember and works well for most home kitchens.
- At each feeding, discard most of the existing starter, keeping only a small amount behind. Stir in fresh flour and water to that remainder, which keeps the culture strong instead of overcrowded and sluggish.
- Feed once or twice a day at room temperature, using a kitchen scale rather than measuring cups to keep your ratios accurate and your results predictable.
- Watch for the starter to reliably double or even triple in size within four to eight hours of feeding — that consistency is the real sign of strength.
- Before baking, run the float test: drop a small spoonful into a glass of water. If it floats, it’s holding enough gas to raise a loaf.
How to Make Your First Sourdough Loaf
- Mix your active, bubbly starter with flour, water, and salt until you’ve got a shaggy, rough dough. Don’t worry about it looking neat at this stage — that comes later.
- Let the dough rest for 20 to 60 minutes, a step bakers call autolyse. This gives the flour time to fully absorb the water, making the dough noticeably easier to handle in the steps ahead.
- Over the next several hours, perform a handful of stretch and folds spaced about 30 minutes apart. Grab one side of the dough, stretch it upward, and fold it over itself, rotating the bowl as you go to build strength gently, without kneading.
- Let bulk fermentation continue after your last fold, watching the dough rather than the clock. It’s ready to move on once it looks visibly puffier, airier, and has grown by a noticeable amount.
- Turn the dough out and shape it into a tight round or oval, creating surface tension that helps it hold its form.
- Transfer the shaped dough into a floured banneton, seam-side up, for its final proof — often left overnight in the fridge to deepen the flavor.
- Right before baking, score the top with one clean, confident slash using a sharp blade.
- Bake covered in a preheated, hot Dutch oven to trap steam, then remove the lid for the final stretch to brown and crisp the crust — that trapped steam is exactly what drives dramatic oven spring.
Basic Sourdough Terms Explained
- Hydration: The ratio of water to flour in your dough, shown as a percentage. Higher hydration means wetter dough and a more open crumb.
- Levain: A small, freshly built offshoot of your starter, made for a single bake without disturbing your main culture.
- Bulk fermentation: The first rise, where the whole batch of dough ferments and builds strength before shaping.
- Proofing: The final rest after shaping, when the dough builds the gas it needs for oven spring.
- Scoring: The slash cut into the top of the loaf before baking, giving it a controlled place to expand.
- Discard: The portion of starter removed before each feeding — useful in recipes like pancakes or crackers rather than wasted.
How Long Does Sourdough Take?
Building a starter from scratch takes one to two weeks before it’s strong enough to bake with reliably. Once it’s established, an actual bake day involves mixing, several hours of bulk fermentation, shaping, and usually an overnight proof in the fridge. Temperature is the biggest variable — a warm kitchen speeds everything up, while a cooler one slows it down considerably.
- Starter development: 1–2 weeks
- Mixing and resting the dough: ~30 minutes
- Bulk fermentation: 4–8 hours at room temperature
- Shaping: a few minutes
- Final proof: 8–16 hours, typically overnight in the fridge
- Baking: 40–50 minutes covered and uncovered combined
Related: How Long To Let Sourdough Rise – Tips for Best Oven Spring
Common Beginner Sourdough Mistakes
- Baking with a weak starter: A sluggish starter can’t produce enough gas to lift the dough, leading to dense, gummy bread. Wait for consistent doubling and plenty of bubbles first.
- Skipping the kitchen scale: Measuring by cups instead of weight introduces inconsistency, since packed flour varies a lot scoop to scoop. Weighing ingredients keeps your hydration — and your results — consistent.
- Underproofing the dough: Baking too early usually results in a dense loaf with a tight crumb.
- Overproofing the dough: Letting the dough go too long weakens its structure, often causing it to collapse in the oven instead of rising.
- Fighting sticky dough with extra flour: High-hydration dough is naturally sticky. Adding more flour throws off your recipe — wet hands and a bench scraper work much better.
Ready to Bake Your First Loaf?
Sourdough really comes down to one thing: patience pays off. Once you get your starter humming along, everything else falls into place. You don’t need fancy gear or a culinary degree—just the basics, a little know-how, and a willingness to let time do its thing. Sure, your first loaf might come out a bit lopsided or denser than you hoped, and that’s totally normal.
Every baker’s starter has its own quirks, shaped by their flour, their kitchen, and a bit of trial and error along the way. The good news? You’re no longer starting from zero. You know what to expect, what to watch for, and what tends to trip people up. So grab your flour, feed that starter, and get baking—you’ve got everything you need.
FAQs – Sourdough Explained for Complete Beginners
How to start sourdough for dummies?
Start simple: mix equal parts flour and water in a jar, then feed it daily until it’s bubbly and doubling in size. Once it’s active, mix it with more flour, water, and salt to make dough. Let it rise, shape it, and bake it in a hot Dutch oven. No fancy skills needed—just patience and a scale.
How to understand sourdough starter?
Think of your starter as a living culture of wild yeast and bacteria feeding on flour and water. The yeast produces gas that makes dough rise, while the bacteria create that tangy flavor. Feed it regularly, and it stays active and strong. Watch for bubbles and doubling in size—that’s your starter telling you it’s ready to bake with.





