
Focaccia loaves covered in flower patterns made from veggies and herbs are all over social media right now, and they’re easier to pull off than they look. Learning how to decorate focaccia comes down to a few simple techniques — the right base, smart timing, and knowing how to arrange ingredients so they hold up in the oven.
Once those basics click, the creative part is all yours. From simple herb designs to full garden scenes, everything here focuses on practical tips that turn any loaf into something worth showing off.
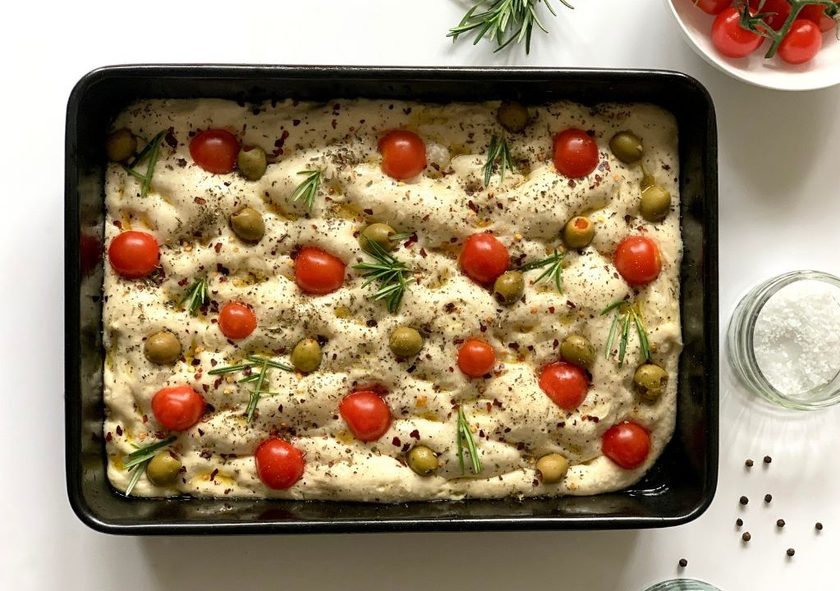
How to Decorate Focaccia
Focaccia decoration comes down to four things working together: toppings, color, texture, and arrangement. Start with a dough that’s been dimpled and brushed with olive oil — that’s your canvas. From there, you’re layering in fresh herbs, vegetables, seeds, and sometimes edible flowers to build a design rather than just scattering ingredients on top.
The key difference between “adding toppings” and “decorating” is intent. Tossing on olives and calling it done is topping your bread. Arranging sliced tomatoes into a flower shape, with herbs as stems and leaves, is decorating it. Everything needs to go on before baking — pressed gently into the dough after its final rise — so it bakes into the surface instead of sitting loose on top.
A few practical things to know before you start: wet vegetables like tomatoes should be patted dry first, or they’ll add excess moisture and make your dough soggy in spots. Cut ingredients thin and uniform, so they cook evenly. And always leave gaps in your design — a fully covered surface won’t dimple or bake the same way as one with breathing room. Sea salt and a final drizzle of olive oil right before the oven tie the whole thing together and give focaccia that shiny, bakery-style finish.
Related: Simple Sourdough Focaccia Recipe
Choose a Focaccia Shape and Base
- Shape sets the design: Rectangular sheet pan focaccia gives you a wide, even surface — good for repeating patterns or landscape-style scenes. Round focaccia, baked in a skillet or cake pan, suits single centerpiece designs or wreath-style arrangements around the edge.
- Dimple the dough first: Press your fingertips firmly into the dough right after it’s on the tray, going all the way to the bottom in spots. This isn’t optional — dimples hold pooled olive oil and keep toppings from sliding.
- Olive oil is your base coat: Brush a generous, even layer over the entire surface before adding any toppings. It helps ingredients stick, prevents herbs from burning, and gives the crust its color.
- Leave space between toppings: Don’t crowd the surface. Gaps let the dough rise and bake evenly, and negative space actually makes a design read more clearly once it’s baked.
- Pick your pan size to match the design: A 9×13 pan works well for detailed garden scenes; a smaller round pan is better suited to a single bold shape.
Use Vegetables to Create Pictures and Patterns
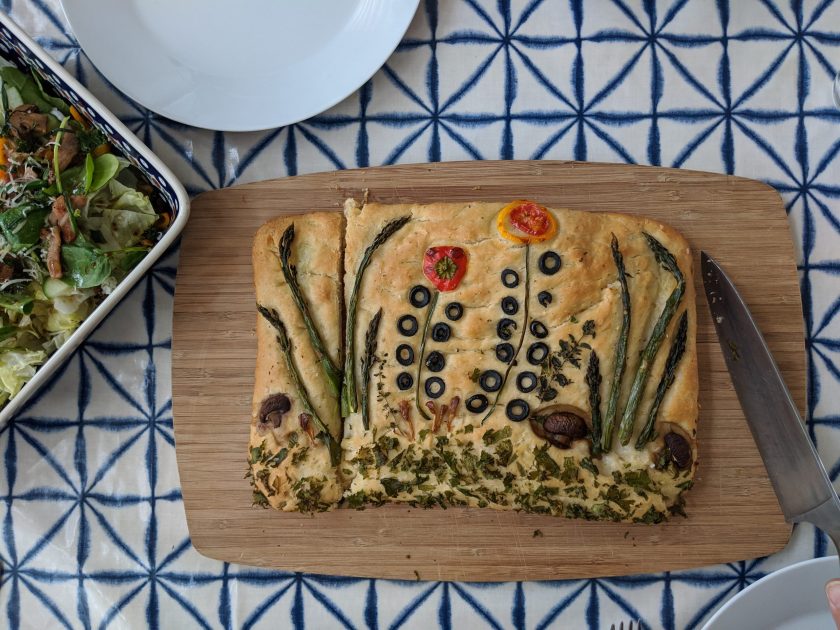
Vegetables are the main building blocks for any focaccia design. Bell peppers, sliced thin, work as petals or leaves depending on the angle of the cut. Cherry tomatoes, halved and arranged in a circle, form a flower center almost instantly. Red onion, separated layer by layer, curls naturally into petal shapes without any extra shaping needed.
For structural elements, zucchini ribbons and thin asparagus spears both hold up well as stems, connecting your “flowers” to the rest of the design. Olives are useful for outlining shapes or adding small, dark accent points — flower centers, borders, or simple dots.
Repetition is what makes a design look intentional rather than random. Placing the same flower shape three or four times across a rectangular loaf, evenly spaced, reads as a cohesive pattern. Mixing warm colors — red tomatoes, orange peppers — against the deep green of herbs creates contrast that holds up after baking, since colors mute slightly in the oven. Cut vegetables uniformly thin (about 1/8 inch), so they cook at the same rate and don’t burn before the dough finishes baking.
Make a Focaccia Garden
- Prep your dough through its final rise, then dimple it and brush on a generous layer of olive oil.
- Slice your vegetables — bell peppers and tomatoes for “flowers,” keeping pieces thin and uniform.
- Wash and pat dry your herbs — rosemary, parsley, basil, and chives — so they don’t add excess moisture.
- Sketch your layout mentally (or lightly mark the dough) before placing anything, deciding where each “flower” will sit.
- Place your largest vegetable pieces first to form the main flower shapes.
- Add rosemary sprigs and basil leaves around the flowers as foliage and greenery.
- Use chives as thin stems or grass, filling in the connecting lines between shapes.
- Fill any remaining gaps with smaller herb pieces or vegetable scraps, without covering the entire surface.
- Press everything gently into the dough so it stays in place during baking.
- Finish with a drizzle of olive oil and a sprinkle of sea salt before it goes in the oven.
Add Fresh Herbs for Detail
- Rosemary: Sturdy sprigs that hold their shape well and work best as branches or thicker stems in a design.
- Basil: Broad, flat leaves that work well as leaves or filler foliage in larger open areas.
- Parsley: Adds texture and bright green color, especially useful in smaller or tighter spaces where basil is too large.
- Chives: Thin and delicate, ideal for fine stems, grass, or detailed outlines that thicker herbs can’t achieve.
- Thyme: Small sprigs that add a softer, lacier texture when tucked between larger elements.
A useful timing tip: add delicate herbs when the focaccia has about ten minutes left to bake, rather than at the start. This keeps them from scorching or turning bitter in the oven. And use herbs with restraint — a few well-placed sprigs look deliberate, while too many can make the design look cluttered instead of clean.
Add Color With Edible Flowers and Other Toppings
Edible flowers bring colors that vegetables and herbs simply can’t — soft purples, pinks, and yellows that stand out clearly against golden-baked dough. Always confirm any flower is labeled food-safe before using it; not all flowers sold in stores are meant to be eaten. Sesame seeds and pumpkin seeds add texture and a speckled look, and work especially well scattered along the edges of a design to frame the center. Olives bring bold, dark contrast wherever the design needs it. Crumbled feta or shaved Parmesan adds creamy white patches that make the surrounding colors pop even more. Flaky sea salt, pressed in right before baking, finishes the loaf with a bit of crunch and that glossy, bakery-style shine.
How to Arrange Focaccia Toppings
- Start with your largest elements first, placing the main shapes before adding any detail work.
- Add stems and connecting lines next, using thin herbs or vegetable strips to link the larger shapes together.
- Fill remaining gaps with smaller ingredients like seeds or herb leaves, but avoid covering the entire surface.
- Repeat colors or shapes two to three times across the loaf to make the design feel cohesive rather than scattered.
- Leave visible dough between elements — a design with breathing room reads more clearly once baked.
- Press all toppings gently into the dough so nothing shifts when the tray goes into the oven.
When to Add Focaccia Decorations
Timing is the most important factor here. Decorations go on after the dough’s final rise, once it’s been dimpled and brushed with olive oil — never before. Adding toppings too early can deflate the dough and interfere with how it rises in the oven.
Once the dough is ready, press each ingredient in gently so it stays put during baking. Sturdier ingredients — olives, bell peppers, rosemary — can go on right before the loaf goes into the oven, since they hold up well under heat. More delicate ingredients, like thin herbs or some edible flowers, do better added partway through baking or right after the focaccia comes out, which keeps their color from fading and prevents burning.
Related: How to Make Sweet Focaccia Bread: A Complete Guide
Easy Focaccia Decoration Ideas
If you’re new to decorating focaccia, start simple. A classic herb focaccia — just rosemary sprigs and flaky sea salt over an oiled, dimpled loaf — takes almost no extra effort and still looks intentional. A tomato-and-rosemary design, with halved cherry tomatoes arranged in a simple grid and rosemary tucked between them, looks far more polished than the time it actually takes.
For something a little more eye-catching, try a single flower focaccia: one large pepper-and-tomato flower in the center with chive stems trailing outward. It’s a good first project if you’ve never tried focaccia art before, since it involves only one shape to focus on. A Mediterranean pattern — olives, feta, and thin pepper slices arranged in repeating rows — brings in bold flavor along with a clean, structured look.
If you want to go all-in, a full focaccia garden with multiple vegetable flowers, herb foliage, and a few edible flowers scattered throughout makes a genuine showstopper for a holiday table or special gathering. And on the other end of the spectrum, a minimalist design — just a handful of olives and a light scattering of basil leaves — proves that decorated focaccia doesn’t need to be complicated to still look and taste great. Pick whichever matches your time and confidence level; they all use the same core techniques.
Ready to Get Baking?
At the end of the day, decorating focaccia isn’t complicated — it’s just dough, a few fresh ingredients, and a bit of creativity. Once you’ve got the basics of shape, oil, and texture down, the fun part is picking whatever colors and patterns speak to you. Herbs and veggies do most of the work, and a little restraint goes a long way toward keeping things looking clean instead of cluttered. Timing counts too, so pay attention to what goes on when. Beyond that, there’s really no wrong way to do it. Grab what’s in your kitchen, get a little messy, and turn your next loaf into something you’re excited to show off.
FAQs
What can I put on top of focaccia bread?
Almost anything works: cherry tomatoes, bell peppers, red onion, olives, and fresh herbs like rosemary and basil are classic choices. Edible flowers, sesame or pumpkin seeds, and crumbled feta or Parmesan add color and texture too. Stick to thin, evenly cut pieces so everything bakes at the same rate, and don’t overload the surface—leaving gaps helps the dough rise properly.
How can I add inclusions to my focaccia?
Press ingredients gently into the dough after its final rise, once it’s dimpled and oiled. Larger pieces like sliced vegetables go in first, followed by herbs for detail. Keep everything thin and pat wet ingredients dry beforehand to avoid soggy spots. Light pressure is enough to keep inclusions in place without deflating the dough underneath.
When to put toppings on focaccia bread?
Always add toppings after the dough’s final rise, right before it goes into the oven—never earlier, or you risk deflating it. Sturdier ingredients like olives and bell peppers can go on immediately. Delicate herbs or edible flowers are better added partway through baking, or right after, so they keep their color and don’t burn.
![[video] from the seed to the peasant bakery with nicolas supiot](https://www.mydailysourdoughbread.com/wp-content/uploads/2022/11/image-16-120x120.jpeg "[Video – Part 2] Entering Into Peasant Bakery 7")
