
Last updated on July 28th, 2026
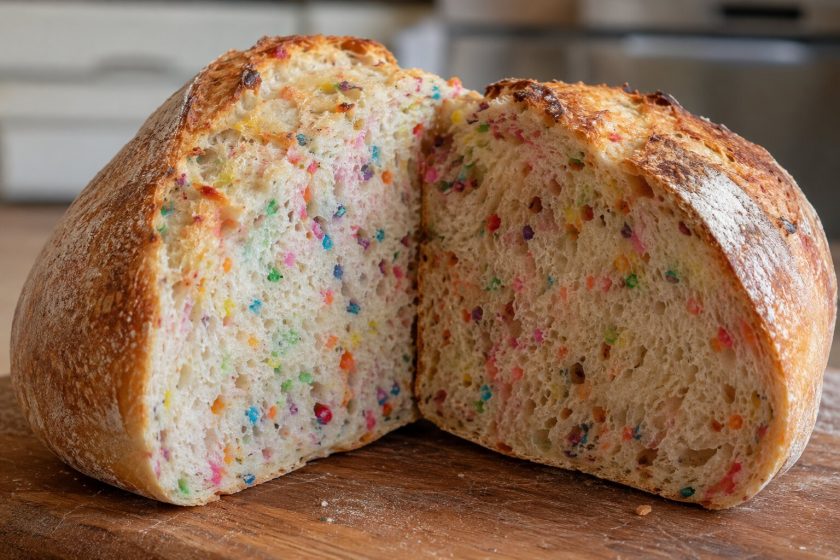
Funfetti sourdough is exactly what it sounds like — tangy sourdough bread loaded with rainbow sprinkles. The name “Funfetti” was trademarked by Pillsbury in 1989 with their rainbow sprinkle cake mix, and bakers have been running with it ever since.
The tang from long fermentation pairs really well with the sweetness of the sprinkles — it balances out more than you’d expect. The sourdough starter does its thing slowly, building flavor and lift while the sprinkles just sit there looking fun. Slice it open, and you get that confetti crumb that’s great for brunch or any time you want baking to feel like a little celebration.
Ingredients
- 450g bread flour
- 325g water (75% hydration)
- 90g active sourdough starter
- 9g salt
- 15g sugar
- 1 tsp vanilla extract
- 80g rainbow jimmies (sprinkles)
Equipment
- Dutch oven (5–6 quart)
- Kitchen scale
- Large mixing bowl (4+ quart)
- Dough scraper
- Banneton or proofing basket
- Bench scraper
- Lame or sharp knife for scoring
Preparing the Dough
- Autolyse: Combine flour and water (hold back starter, salt, and sugar). Mix until no dry flour remains, then rest for 45–60 minutes. This passive rest hydrates the flour and kick-starts gluten development without any kneading.
- Add starter and salt: After the autolyse, add your active starter, salt, and sugar. Use the pinch-and-fold method — pinching through the dough with your fingers — until everything is fully incorporated.
- Stretch and fold: Every 30 minutes over the first two hours, perform one set of stretch and folds. Grab one side of the dough, stretch it upward as far as it’ll go without tearing, and fold it over the opposite side. Rotate the bowl 90 degrees and repeat four times per set — four sets total.
- Add the sprinkles: During the second or third set of stretch and folds, laminate the rainbow jimmies into the dough. Press them onto the surface as you stretch and fold rather than mixing them in at the start — this keeps the colors vivid and prevents the crumb from going muddy.
- Check dough strength: By the final set, your dough should feel noticeably more elastic and hold its shape when you lift it. That’s your gluten doing its job.
Related: Sourdough Not Rising – What Went Wrong and How to Fix It
Bulk Fermentation
Bulk fermentation is where flavor develops, and the dough becomes airy — and patience is genuinely rewarded here.
Timing depends entirely on your kitchen temperature. Wild yeast and lactic acid bacteria move fast in the heat and slow in the cold. At 78°F, bulk fermentation might wrap up in 4–5 hours. In a cooler 68°F kitchen, expect 8–10 hours. There’s no universal countdown — your dough tells you when it’s ready.
Look for these cues: the dough has grown 50–75% in volume, the surface looks slightly domed and bubbly, and it feels airy and jiggly when you shake the bowl. Press a floured finger gently into the surface — it should spring back slowly. If it bounces back immediately, it needs more time. If the indent stays, you’ve gone too far.
One heads-up with this recipe: the added sugar slightly accelerates fermentation, so keep a closer eye on things than you would with a plain loaf.
Shaping and Proofing
- Turn out the dough: Gently tip your fermented dough onto an unfloured surface. Avoid degassing it — you want to preserve those air bubbles.
- Pre-shape: Using a bench scraper, fold the dough into a rough round and drag it toward you to build light surface tension. Let it rest uncovered for 20–30 minutes — this is called the bench rest, and it relaxes the gluten so the final shape is easier to achieve.
- Final shape: After the bench rest, flip the dough, fold the sides in toward the center, then roll it toward you tightly to create a tight surface. The key here is working on an unfloured surface — the slight friction is what builds tension. Too much flour and the dough won’t grip.
- Transfer to banneton: Place the shaped loaf seam-side up into a well-floured banneton or lined bowl. Dust the surface generously with rice flour or all-purpose flour to prevent sticking.
- Cold proof: Cover with a shower cap or plastic wrap and refrigerate overnight — 8 to 16 hours works well. This slow cold proof deepens flavor dramatically, makes the dough easier to score, and keeps those sprinkle colors bright and vivid right up until bake time.

Baking the Loaf
- Place your Dutch oven inside your oven and preheat to 500°F (260°C) for at least 45–60 minutes. The pot needs to be fully saturated with heat before the dough goes in.
- Remove your loaf straight from the fridge — cold dough scores more cleanly. Tip it onto a piece of parchment paper, then score the surface confidently with a lame or sharp knife at a 30–45 degree angle.
- Carefully lower the loaf (using the parchment as a sling) into the screaming-hot Dutch oven, put the lid on, and bake covered for 20 minutes. The trapped steam keeps the crust pliable and allows maximum oven spring.
- Remove the lid, reduce the temperature to 450°F, and bake for another 20–25 minutes to develop the crust. Watch closely — the sugar in this dough means it can brown faster than a plain sourdough. If it’s darkening too quickly, tent a piece of foil loosely over the top.
- Cool on a wire rack for at least 1–2 hours before slicing. Cutting in early gives you a gummy crumb — the loaf is still finishing internally as it cools.
Troubleshooting
- Dense or gummy crumb: Your starter likely wasn’t at peak activity. It should double within 4–6 hours of feeding before it goes into any dough. Also check that the loaf cooled fully before slicing — sourdough needs at least 1–2 hours to set internally.
- Burnt or discolored sprinkles: Sprinkles on the surface will burn. Make sure they’re fully folded into the dough, not sitting on top. If the exterior is over-browning, tent foil over the loaf during the second phase of baking.
- Muddy or discolored crumb: You added the sprinkles too early. Fold them in during the second or third stretch and fold, not at the mixing stage.
- Weak rise or flat loaf: Starter health is almost always the culprit. Feed it daily for 3–5 days and confirm it reliably doubles before using it in a full bake.
- Dough spreading in the oven: Under-fermentation or poor shaping. Make sure the dough has proper tension before proofing and that bulk fermentation went the full distance.
Serving and Storage
This loaf is a breakfast showstopper. Toast thick slices and spread generously with salted butter — it melts into the crumb, and the sweet-tangy combination is genuinely special. It also works beautifully with cream cheese and honey, or as the base for a show-stopping weekend French toast.
For storage, keep the loaf at room temperature in a bread box or wrapped in a clean kitchen towel for the first 2–3 days. Skip plastic bags — they trap moisture and turn the crust soft. After day three, slice whatever’s left and freeze it. Slices reheat straight from the freezer in a toaster or at 350°F for about 10 minutes, and freezer storage can extend your loaf up to 3 months without any real quality loss.
Related: How to Store Sourdough Bread
Your Next Loaf Just Got a Whole Lot More Fun
Funfetti sourdough is the proof that bread can be both an art form and a party. Nail the basics — a healthy, active starter, patient bulk fermentation, and a ripping hot Dutch oven — and you’re most of the way there. Fold your sprinkles in during the stretch and fold stage, cold proof overnight, and let the oven do the rest.
Got a dense crumb or a flat loaf? The troubleshooting section has you covered. Slice it thick, toast it golden, and hit it with salted butter. Trust us — it’s worth every hour of fermentation. Now go feed that starter: your most colorful loaf yet is calling.
FAQs – Funfetti Sourdough Recipe
What is funfetti sourdough bread?
Funfetti sourdough is a festive twist on classic sourdough bread made by folding rainbow sprinkles into a wild-yeast-leavened dough. The result is a tangy, slightly sweet loaf with a colorful, confetti-dotted crumb. It uses the same slow fermentation process as traditional sourdough, just with a whole lot more personality.
What does funfetti sourdough bread taste like?
It tastes like the best of both worlds — the deep, complex tang of a long-fermented sourdough paired with little pops of sweetness from the sprinkles. A touch of vanilla extract rounds everything out, giving it a subtle birthday-cake warmth without being overly sweet. It’s familiar, fun, and genuinely delicious.
How does funfetti sourdough compare to a classic loaf?
The structure and process are identical — same starter, same fermentation, same baking method. The difference is flavor and appearance. Funfetti sourdough is slightly sweeter, thanks to added sugar and sprinkles, and visually far more striking. If a classic sourdough is a little black dress, funfetti sourdough is the same dress covered in confetti.
Funfetti Sourdough
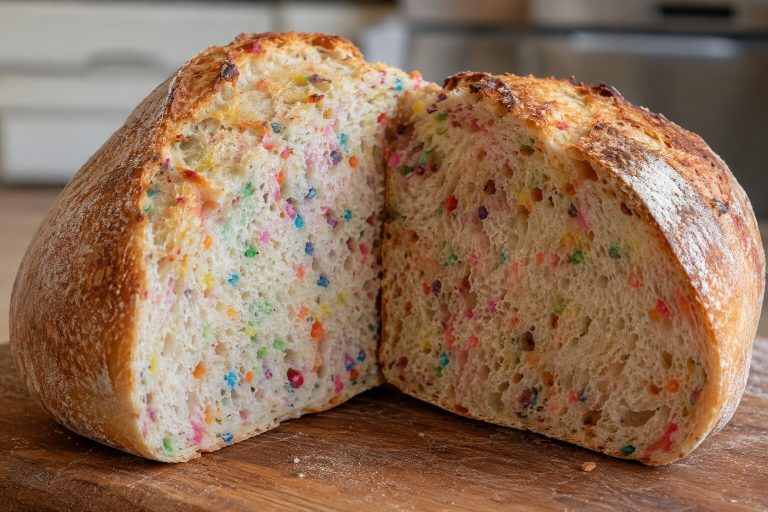
Funfetti sourdough is exactly what it sounds like — tangy sourdough bread loaded with rainbow sprinkles.
Ingredients
- 450g bread flour
- 325g water (75% hydration)
- 90g active sourdough starter
- 9g salt
- 15g sugar
- 1 tsp vanilla extract
- 80g rainbow jimmies (sprinkles)
Instructions
- Autolyse: Combine flour and water (holding back starter, salt, and sugar), mix until no dry flour remains, and rest 45–60 minutes.
- Add starter and salt: Work in your active starter, salt, and sugar using the pinch-and-fold method until fully incorporated.
- Stretch and fold: Every 30 minutes over the first 2 hours, perform a set of stretch and folds — four sets total.
- Laminate in the sprinkles: During the second or third set, press the rainbow jimmies onto the dough as you fold, keeping colors vivid.
- Bulk ferment: Let the dough rise at room temperature, 4–10 hours depending on kitchen warmth, until it’s grown 50–75% and feels airy and jiggly.
- Check readiness: Poke the dough gently — a slow spring-back with a slight indent means it’s ready to shape.
- Pre-shape: Turn the dough onto an unfloured surface without degassing it, fold into a rough round, and bench rest 20–30 minutes.
- Final shape: Fold the sides in, then roll tightly on an unfloured surface to build tension.
- Cold proof: Place seam-side up in a floured banneton and refrigerate overnight, 8–16 hours.
- Preheat: Heat your Dutch oven inside the oven to 500°F for 45–60 minutes.
- Score and bake covered: Score the cold dough confidently, then bake covered at 500°F for 20 minutes.
- Bake uncovered: Reduce to 450°F and bake 20–25 minutes, tenting with foil if it browns too fast.
- Cool: Rest on a wire rack for at least 1–2 hours before slicing.
Notes
Sprinkles on the surface will burn. Make sure they’re fully folded into the dough, not sitting on top. If the exterior is over-browning, tent foil over the loaf during the second phase of baking.





