
Last updated on December 10th, 2025
Unlike commercial yeast from grocery stores, sourdough starter houses multiple strains of wild yeast and bacteria working in harmony. The yeast produces carbon dioxide that makes dough rise and creates a beautiful, airy structure, while the lactic acid bacteria deliver a signature tangy flavor and act as natural preservatives by lowering the pH. Understanding how often do you feed sourdough starter is essential for keeping this fermentation process active. These microorganisms need regular meals of flour and water to stay alive and kicking, just like you need breakfast to function.

Why Feeding Your Sourdough Starter Matters
Your starter is a bustling microscopic city where billions of organisms are eating, reproducing, and creating the byproducts that make sourdough bread possible. When you feed your starter, the wild yeast ferments sugars from the flour, producing carbon dioxide gas that gets trapped in the gluten network. Meanwhile, bacteria create tangy acids that give sourdough its distinctive flavor. Without regular feeding, these organisms run out of fuel and decline.
Different flour types feed your starter in different ways. Whole grain flours like whole wheat and rye contain more nutrients and natural enzymes that break down starches into simpler sugars, making them easier for microorganisms to digest. That’s why many bakers use a portion of whole grain flour in their feedings.
The key is consistency. Your yeast and bacteria adapt to whatever feeding schedule you establish, adjusting their metabolism to match. Stick to a routine, and they’ll reward you with predictable, reliable fermentation every single time you bake.
Daily Feeding at Room Temperature
Setting Up Your Counter Routine
Keeping your starter at room temperature means committing to a twice-daily feeding schedule. If you’re baking frequently, it’s actually the most convenient approach since your starter’s always ready to go when inspiration strikes.
The standard routine involves feeding every 12 hours, though warmer kitchens might require feeding closer to every 8-10 hours, while cooler spaces can stretch to 24 hours. You’ll quickly figure out your starter’s rhythm based on how fast it rises and peaks.
The Step-by-Step Process
Here’s how I handle my daily feedings. First, I grab my kitchen scale – eyeballing doesn’t cut it when you want consistent results. I’ll spoon out what I need for the day’s baking (if I’m baking), then discard or set aside most of what’s left. Usually, I keep about 50 grams of starter in the jar.
Then comes the feeding. I add equal parts flour and lukewarm water by weight – typically 50 grams of each to match my 50 grams of starter, giving me a 1:1:1 ratio. Mix it thoroughly with a spoon until you’ve got a thick, smooth consistency – think pancake batter that’s slightly thicker than what you’d pour on a griddle.
Watching for Readiness
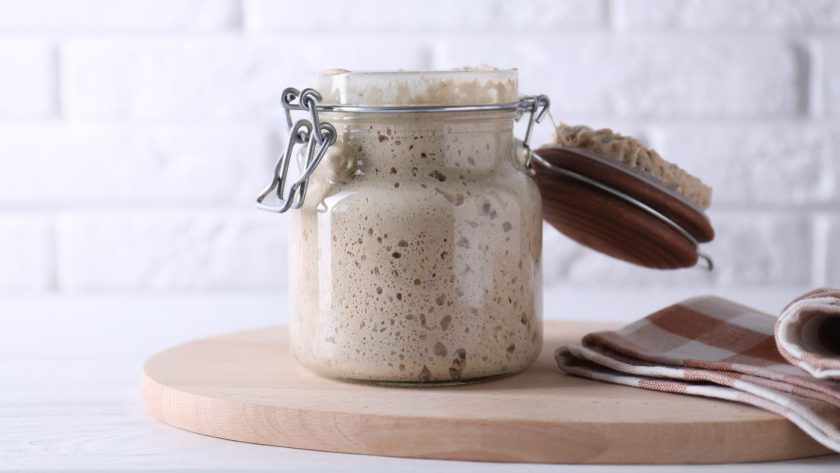
After feeding, I’ll mark the jar with a rubber band or piece of tape at the starter’s current height. This makes it easy to see when it’s doubled. At room temperature, most starters reach their peak around 4 to 6 hours after feeding, exhibiting numerous bubbles, a fluffy texture, and the characteristic sour aroma.
A higher ratio, like 1:4:4, means more food for the microbes, so they’ll take longer to peak – perfect if you want to feed at night and have it ready in the morning. Lower ratios, such as 1:1:1, mean faster fermentation, which is great for baking on the same day.
The room temperature method works beautifully if baking is part of your daily or every-other-day routine. You’ll develop an intuitive sense of your starter’s behavior, and there’s something satisfying about checking in on it morning and night, watching it bubble up like clockwork.
Related: How Soon After Feeding Sourdough Starter Can I Use it (Simple Guide)
Weekly Feeding in the Refrigerator
The fridge is perfect for weekend bakers or anyone who doesn’t want sourdough to run their life. Cold temperatures dramatically slow down fermentation, meaning you only need to feed your starter about once a week instead of twice daily. When you chill them, yeast and bacterial metabolism slow to a crawl. They’re still alive and active, just operating in slow motion, consuming their food supply much more gradually.
When feeding day rolls around, pull your starter from the fridge, and you might see some liquid on top – that’s normal separation. You can either pour it off or stir it back in. Let your jar sit on the counter for about an hour to take the chill off, then follow the same feeding process: discard most of it (or save that discard for pancakes or crackers), keep about half a cup, and feed with equal amounts of flour and lukewarm water.
After mixing, let your starter rest at room temperature for at least 2 hours before returning it to the fridge. This warm-up period lets the yeast get active and start feeding on that fresh flour. When you’re ready to bake, take your starter out and give it a feeding, then feed it every 12 hours until it doubles or triples within 6 to 8 hours – that’s when it’s in prime baking condition.
Signs Your Starter Needs Feeding
Your starter communicates through visual and sensory cues that tell you exactly when it needs attention. Learning to read these signals means you’ll never miss that crucial feeding window.
- Collapsed structure: right after it peaks, gas bubbles start escaping, which eventually causes the starter to collapse as bacteria break down the gluten network. A collapsed starter that’s sunken below your original marker line definitely needs feeding.
- Hooch formation: that dark liquid pooling on top is alcohol produced by yeast that’s consumed all available sugars. The darker and more plentiful the hooch, the hungrier your starter is. Pour it off for a milder flavor or stir it back in for more sour notes, then feed immediately.
- Acetone smell: nail polish remover or acetone smells mean your starter’s been hungry for too long and needs immediate attention. A properly fed starter smells pleasantly tangy, like yogurt with a hint of beer.
- Watery separation: when it starts to separate with watery liquid at the bottom and thicker paste on top, or becomes significantly runnier than when you fed it, those are hunger cues you shouldn’t ignore.
- Sparse bubbles: a healthy, well-fed starter shows bubbles of varying sizes throughout. When those bubbles look sparse or the whole thing goes flat, your starter’s running low on food.
How to Feed Your Starter Properly
Nailing the Ratios
The feeding ratio is your most powerful tool for controlling when your starter peaks. It’s written as three numbers representing starter:flour:water by weight. A 1:1:1 ratio means equal parts of each – if you have 50g of starter, you add 50g flour and 50g water.
Higher ratios like 1:4:4 or 1:5:5 give your microorganisms more food relative to their population, so fermentation takes longer. This is brilliant for fitting baking into your schedule. Feed before bed with a high ratio, and your starter peaks just as you’re ready to mix dough in the morning.
Water Temperature Matters
Temperature affects everything in sourdough. Lukewarm water – around 75-80°F – is the sweet spot. Too cold, and you’ll slow fermentation unnecessarily. Too hot, and you risk damaging your yeast. I usually just use water that feels slightly warm to the touch, nothing scientific about it.
Flour Choices and Hydration
While you can maintain a starter on any flour, most of us stick with unbleached all-purpose or bread flour for simplicity. Some bakers incorporate whole wheat or rye flour because the extra nutrients and enzymes make the starter more vigorous. I like adding about 20% whole wheat to my feedings – it keeps things lively without changing the character too much.
The standard hydration is 100%, meaning equal weights of flour and water, which gives you that thick but pourable consistency. You can play with hydration levels once you’re comfortable – stiffer starters (less water) ferment differently than looser ones, each with its own advantages.
The Actual Process
Grab your scale and place your clean jar on it. Tare to zero, then add your starter. Let’s say you’re keeping 50g. Tare again, add 50g of flour. Tare once more, add 50g of water. Mix thoroughly with a spatula or spoon until no dry flour pockets remain and everything’s smooth.
Some people get fancy with precise stirring methods, but honestly? Just mix it well. The key is making sure all that flour gets hydrated and distributed evenly so your yeast and bacteria have consistent access to food throughout the jar.
Troubleshooting Common Feeding Issues
Mold – The Dealbreaker
Let’s talk about the one thing that actually requires throwing out your starter: mold. Fuzzy growth in colors like pink, orange, or green means game over. Unlike hooch, which is harmless, mold sends roots down through your starter, and there’s no saving it. Toss the whole thing and start fresh.
Prevention’s easier than treatment. Always use clean utensils and jars, keep your starter covered (but not sealed airtight – it needs to breathe), and store it away from fresh produce or other foods that commonly develop mold.
Weak Rise and Low Activity
A sluggish starter that barely doubles is frustrating, but it’s fixable. Try increasing your feeding frequency or changing your feeding ratio – a 1:1:1 ratio is great for building up a weak starter because it keeps the food-to-microbe ratio low, forcing the yeast to stay active.
Temperature could be your culprit. Starters thrive between 75-82°F. If your kitchen’s cold, find a warmer spot – inside your oven with just the light on, on top of the fridge, or invest in a proofing box. Warmer temps speed up fermentation and help build stronger yeast colonies.
Off Smells Beyond Hooch
Vinegar or super sour smells usually mean your starter’s been going too long between feedings. When bacteria outpace yeast due to prolonged hunger, acidity spikes. Solution? Feed more frequently for a few days to rebalance the ecosystem.
Rotten or genuinely foul odors are different. If your starter smells like decay rather than fermentation, check carefully for mold. Sometimes a starter that’s been severely neglected can develop off-putting bacterial populations. You can try reviving it with several consecutive feedings, but if the smell persists after three rounds, starting over might be easier.
Revival Tactics
Got a starter that’s been languishing in the back of the fridge for months? Pour off any hooch, scoop out a small amount from the center where it’s usually healthiest, and place it in a clean jar. Feed it with a 1:1:1 ratio and let it sit at room temperature. Repeat this process every 12 hours.
It might take 2-4 feedings before you see vigorous activity return, but be patient. Those microorganisms are resilient little survivors. Once your starter is reliably doubling within 6-8 hours after feeding, it’s back in action.
Related: Forgot to Feed Sourdough Starter? Here’s What Happens
Tips for Feeding Frequency
Your starter should fit your life, not the other way around. The flexibility of sourdough is that it adapts to whatever routine you establish, whether that’s daily baking or weekend projects.
Match your baking schedule. If you’re baking 4-5 times a week, keep it on the counter and feed before each bake. Weekend baker? The fridge is your best friend. Feeding your starter right before mixing dough works beautifully since it’s at peak activity just when you need it.
Consider temperature. Temperature plays a massive role in how often you need to feed. In summer, when kitchens hit 78-80°F, counter starters need feeding twice daily. Come winter at 68-70°F, you can stretch that to once every 18-20 hours.
Use hybrid approaches. Keep your starter in the fridge and feed it with a higher ratio like 1:4:4 or 1:5:5 once a week. When you want to bake, pull it out, give it a feeding or two at room temperature, and you’re ready.
Adjust ratios for timing. The feeding ratio you choose affects how long your starter stays viable. A 1:10:10 ratio could keep your starter fed for days, perfect if you’re taking a baking break.
Track your starter’s pattern. Do that jar-marking exercise where you track how long it takes to double. Once you know your starter consistently peaks at 5 hours with a 1:1:1 ratio at 75°F, you can plan feedings strategically to have it ready exactly when you need it.
Keep It Simple, Keep It Alive
Your sourdough starter thrives on consistency more than perfection. Room temperature starters need feeding every 12-24 hours, depending on kitchen temperature, while refrigerated ones can go a week between feedings. Feeding ratios give you control over timing, with higher ratios extending the time between feedings. Keep your tools clean, use a scale for accuracy, and don’t stress about occasional missed feedings. These are resilient cultures that have been kept alive for generations and will reward you with countless loaves carrying your kitchen’s unique character.
FAQs – How Often Do You Feed Sourdough Starter
What is the best feeding schedule for sourdough starter?
The best feeding schedule depends on where you store your starter. Keep it at room temperature and feed every 12-24 hours (warmer kitchens need more frequent feeding). Store it in the fridge and feed once weekly. Use higher feeding ratios like 1:4:4 to extend the time between feedings. Match your schedule to your baking frequency for best results.
Do I have to feed my sourdough starter every day?
No, you don’t have to feed daily. Room temperature starters need feeding every 12-24 hours, but refrigerated starters only need weekly feedings. If you bake frequently (4-5 times weekly), counter storage works well. Otherwise, refrigerate it. The fridge dramatically slows fermentation, making sourdough fit your lifestyle instead of demanding constant attention.
How to tell if the sourdough starter is fed?
A freshly fed starter looks thick and smooth with no bubbles initially. Within 4-6 hours at room temperature, it doubles in size, develops lots of bubbles of different sizes, becomes fluffy in texture, and smells pleasantly sour. Mark your jar at feeding time to easily track when it’s doubled and ready for baking.
How long can a sourdough starter go without being fed?
Refrigerated starters can go up to two months without feeding, though weekly feeding is ideal. Room temperature starters shouldn’t go beyond 24 hours without food. Neglected starters develop hooch (dark liquid) and need revival through 2-3 consecutive feedings every 12 hours to restore vigor before they’re ready for baking again.
Related Articles:
![How to freeze sourdough starter [top tips for success]](https://www.mydailysourdoughbread.com/wp-content/uploads/2023/06/storing-starter-in-freezer-120x120.jpg "How To Freeze Sourdough Starter [Top Tips For Success] 3") How to Freeze Sourdough Starter [Top Tips For Success]
How to Freeze Sourdough Starter [Top Tips For Success]
![How to keep sourdough starter warm [best tips]](https://www.mydailysourdoughbread.com/wp-content/uploads/2023/07/a-bubbly-starter-on-a-cooling-rack-120x120.jpg "How To Keep Sourdough Starter Warm [Best Tips And Why You Need To] 4") How to Keep Sourdough Starter Warm [Best Tips and Why You Need To]
How to Keep Sourdough Starter Warm [Best Tips and Why You Need To]
 How to Discard Sourdough Starter – Tips For Disposing Of Your Starter
 How to Tell When Your Sourdough Starter is Ready for Baking
![Easy recipes using sourdough starter [with step by step guide]](https://www.mydailysourdoughbread.com/wp-content/uploads/2025/05/10-Recipes-Using-Sourdough-Starter-Beyond-Basic-Bread-120x120.jpg "10 Recipes Using Sourdough Starter (Beyond Basic Bread!) 7") 10 Recipes Using Sourdough Starter (Beyond Basic Bread!)
10 Recipes Using Sourdough Starter (Beyond Basic Bread!)
