
Last updated on May 18th, 2026
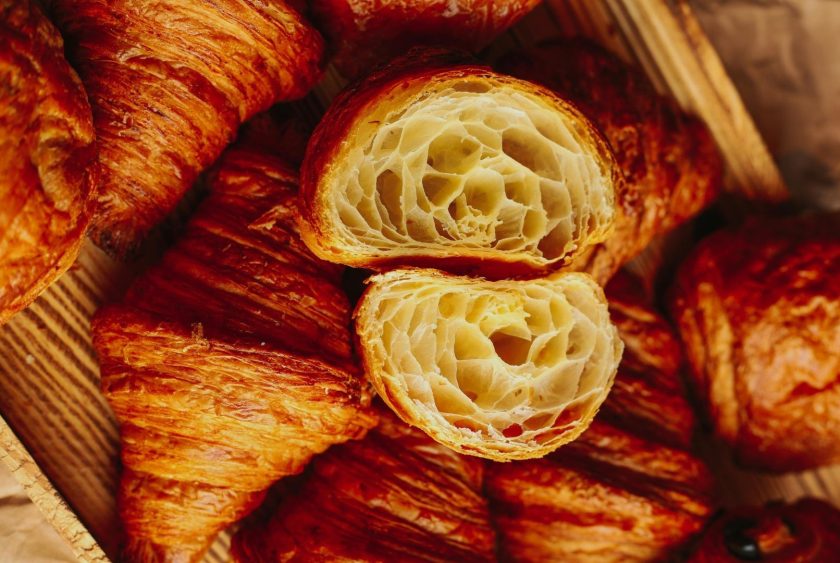
Knowing how to laminate dough unlocks some of the most satisfying bakes you’ll ever pull from your oven. Laminated dough is created by folding cold butter repeatedly into a base dough, building hundreds of distinct, alternating layers. When heat hits those layers, the water in the butter turns to steam and physically pushes each layer apart — giving you that signature flaky, almost honeycomb-like interior you find in croissants, puff pastry, and Danish pastry. Think of it like shuffling a deck of cards, except instead of cards, you’re interleaving sheets of butter and dough until you have something that bakes into edible architecture.
Ingredients
- Bread flour – 500g (about 4 cups)
- European-style butter (84%+ fat) – 280g (2½ sticks) for the butter block
- Unsalted butter – 30g (2 tbsp) for the dough
- Whole milk – 300ml (1¼ cups)
- Active dry yeast – 7g (2¼ tsp)
- Sugar – 50g (¼ cup)
- Salt – 10g (2 tsp)
Tools You Need
Having the right equipment makes lamination dramatically easier. Here’s what you’ll want on hand before you start:
- French rolling pin – gives you better pressure control than a handled pin
- Bench scraper – keeps edges clean and helps lift dough without stretching it
- Parchment paper – essential for shaping and wrapping the butter block
- Plastic wrap – for wrapping the dough during rest periods
- Ruler – helps keep your folds and dimensions consistent
- Baking sheet – doubles as a flat surface to slide into the fridge between folds
- Refrigerator – treat this as active equipment; cold temperatures are what make lamination work
Preparing the Dough (Détrempe)
The base dough — called the détrempe — needs to be smooth, slightly tacky, and developed without being overworked. Here’s how to get there:
- Combine your dry ingredients. Whisk together the bread flour, salt, and sugar in a large bowl until evenly mixed.
- Activate your yeast. Warm your milk to around 95°F (35°C) — just slightly warm to the touch. Stir in the yeast and let it sit for 5–10 minutes until foamy. If it doesn’t foam, your yeast is likely dead and needs replacing.
- Mix the dough. Pour the milk and yeast mixture into the dry ingredients along with the softened butter. Mix until a shaggy dough forms, then knead briefly — just enough to bring it together into a smooth ball. You’re not going for a fully elastic dough here; overworked gluten will fight back every time you try to roll it out during lamination.
- Shape and score. Pat the dough into a flat rectangle and score a shallow cross on top with a knife. This helps it expand evenly during the rest.
- Wrap and chill. Wrap the dough tightly in plastic wrap and refrigerate for a minimum of 1 hour, or overnight for best results. This rest relaxes the gluten so the dough stops springing back when you roll it, and brings everything down to the right temperature for lamination.
Preparing the Butter Block
The butter block is the heart of laminated dough — get it right and the rest of the process flows. Here’s how to prepare it:
- Start with cold butter. Cut your high-fat butter into tablespoon-sized pieces and arrange them slightly overlapping in the center of a large sheet of parchment paper.
- Fold and beat. Fold the parchment over the butter to enclose it, then use a rolling pin to firmly beat the butter into a flat slab — work quickly so the warmth from your hands doesn’t soften it too much.
- Roll to an even thickness. Roll the butter into a 6–7 inch square, using the parchment edges as guides to keep corners sharp and thickness even. Uniform thickness is critical — uneven spots create inconsistent layers.
- Check the consistency. Your butter should be around 60°F (15°C). Press a finger into it — it should leave a clean indent without feeling greasy or soft. It should bend without cracking. If it’s too firm, let it sit at room temperature for a few minutes. If it’s too soft, pop it back in the fridge for 10 minutes.
- Chill until needed. Refrigerate the butter block until you’re ready to lock it into the dough.
Locking in the Butter
This is where the lamination officially begins. Getting a clean seal here prevents butter from leaking during folding.
- Roll out the détrempe. On a lightly floured surface, roll your chilled dough into a rectangle roughly twice the size of your butter block — aim for even thickness throughout.
- Position the butter. Place the butter block in the center of the dough at a 45-degree angle, like a diamond centered on a square.
- Fold the corners over. Pull each corner of the dough up and over the butter, meeting in the center like you’re wrapping a package. The butter should be completely enclosed with no gaps.
- Seal every seam. Press firmly along every edge with the heel of your hand. Any open seam is an invitation for butter to escape during rolling — take your time here and make sure the seal is solid.
- Lightly roll to adhere. Give the package a few gentle rolls with your pin to help the dough bond around the butter and eliminate any air pockets.
- Chill before folding. Wrap the dough and refrigerate for 20–30 minutes before starting your first fold. The butter and dough need to be at the same temperature to roll evenly.
Folding Techniques (Turns)
Single Fold vs. Double Fold
There are two main folding methods, and the one you use determines how many layers you end up with. A single fold (letter fold) works by folding the dough into thirds — one end to the center, then the other end on top — creating three layers per turn. A double fold (book fold) folds both ends to the middle first, then folds the whole thing in half, creating four layers per turn.
Most croissant recipes use a combination of both. Puff pastry typically sticks with single folds throughout. The more turns you complete, the more layers you build — but beyond a certain point, too many folds compress the layers back together, and you lose definition.
How Many Turns?
For croissants, the standard is around 3 turns — a mix of letter and book folds — landing somewhere around 27 layers. Classic puff pastry goes for 6 single folds, reaching 729 layers. Each fold multiplies what came before, which is why clean, precise technique in the early turns matters so much. Mistakes compound right along with the layers.
Resting and Chilling
Between every fold, the dough needs to rest in the refrigerator for at least 20–30 minutes. The cold firms the butter back to the right consistency and relaxes the gluten that got worked during rolling. Skip this, and the butter softens, starts merging with the dough, and those clean, defined layers disappear entirely.
For best results, chill the dough after every single fold — not just every other one. If your kitchen is warm or you notice the butter starting to feel soft through the dough, don’t push through. Wrap it up and refrigerate immediately.
Letting the dough rest overnight in the fridge after the final fold is also worth doing when you have the time. The gluten fully relaxes, the flavor deepens — especially with yeast in the dough — and the dough rolls out far more cleanly the next day with noticeably less resistance.
One practical tip: mark each fold with a small indentation in the dough using your fingertip before wrapping. It’s easy to lose track of how many turns you’ve done, and starting over isn’t fun.
Common Mistakes to Avoid
- Butter is leaking out. Almost always a temperature issue — the butter got too warm, the kitchen is too hot, or you didn’t chill long enough between folds. Slow down, chill more often, and check butter consistency before each roll.
- Tearing the dough. Usually means the dough is too cold and stiff, the gluten is too tight from insufficient resting, or you’re rolling too hard. Use gentle, even pressure in one direction at a time. If the dough resists, refrigerate it for another 15 minutes before continuing.
- Skipping rest periods between folds. Each rest is doing real structural work — relaxing gluten and re-firming the butter. Skipping them leads to stiffer dough, smeared butter, and messy layers.
- Using low-quality butter. Low-fat butter contains more water, which creates steam at the wrong stage, weakens the layer structure, and dulls the flavor. Use high-fat European-style butter — the results are noticeably different.
- Uneven rolling pressure. Rolling thicker in some areas and thinner in others means uneven layers that bake inconsistently. Use a ruler periodically to check your dimensions and keep the dough as uniform as possible throughout.
Almost There — Your Laminated Dough Awaits
Laminating dough looks intimidating, but once you nail the basics, it’s totally doable. Temperature is everything — butter that’s too warm smears, under-rested dough tears, and rushed folds lose their definition. Respect the chill times, and you’ll dodge the most common mistakes before they happen.
Whether you’re chasing golden croissants, flaky Danishes, or classic puff pastry, the foundation is the same — and now you’ve got it locked down. Your first attempt might not be flawless, and that’s completely okay. Every fold teaches you something new. The more you practice, the more natural it feels — until laminating dough goes from nerve-wracking to genuinely fun.
FAQs – How to Laminate Dough
How do I laminate dough?
Laminating dough involves folding cold butter repeatedly into a base dough to build distinct, flaky layers. Start by preparing your détrempe and butter block, lock the butter inside the dough using the envelope method, then complete a series of folds — chilling between each one. Temperature control and patience are the two biggest keys to success.
How many times do you laminate dough?
It depends on the pastry. Croissants typically need around 3 turns — a mix of single and double folds — creating roughly 27 layers. Classic puff pastry goes up to 6 single folds, producing hundreds of layers. Going beyond the recommended turns can actually compress the layers back together, so more isn’t always better.
Is laminating dough difficult?
It’s more time-consuming than technically difficult. The process itself is straightforward once you understand the steps, but it does require patience and attention to temperature. Butter leaking and dough tearing are the most common frustrations for beginners, and both are easily avoided by chilling the dough properly between folds and using high-quality, high-fat butter.



![[video] from the seed to the peasant bakery with nicolas supiot](https://www.mydailysourdoughbread.com/wp-content/uploads/2022/11/image-16-120x120.jpeg "[Video – Part 2] Entering Into Peasant Bakery 6")
