
Last updated on January 19th, 2026
There’s something incredible about the sound of perfectly toasted sourdough—that satisfying crunch, the way warmth releases those complex tangy notes. Learning how to toast sourdough bread in oven changes everything. Your pop-up toaster just can’t handle sourdough’s dense, artisan crumb and thick crust. The oven gives each slice room to breathe while toasting multiple pieces at once. You get complete control over the final result, creating that beautiful contrast between crispy outside and warm, tender inside. Oven-toasting delivers even heat distribution that transforms your sourdough into golden-brown perfection with a slightly chewy center that toasters simply can’t achieve.
Choosing the Right Sourdough
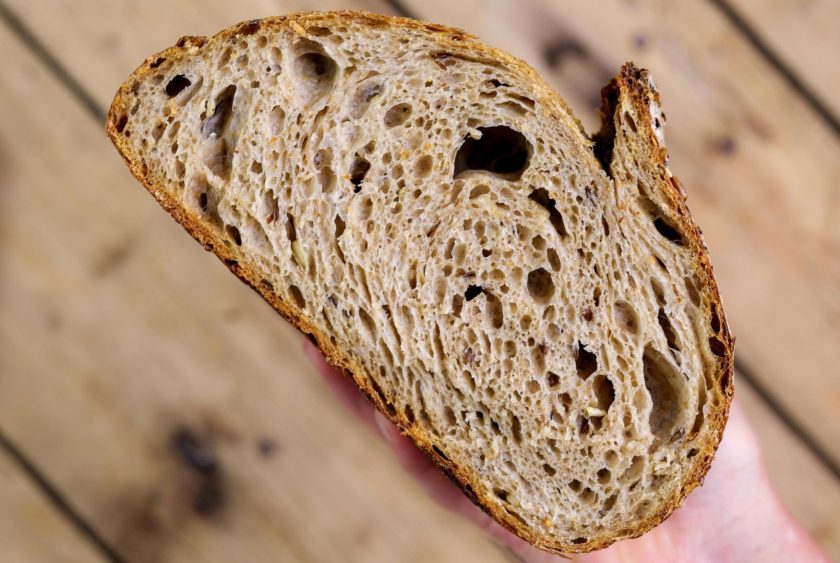
Day-old or two-day-old sourdough bread is your secret weapon for amazing toast. The moisture has redistributed throughout the loaf, making it sturdier and less likely to get gummy when heated. Fresh bread has too much internal moisture and can end up soggy in the middle.
Working with a whole sourdough loaf gives you total control over slice thickness. Pre-sliced bread works fine, but you’re stuck with whatever the bakery decided was standard. A well-developed, thick crust with an open, airy crumb structure creates the perfect foundation for toast that’s crispy outside and chewy inside.
Quick selection tips:
- Look for bread that’s 1-2 days old for the best texture
- Choose loaves with thick, well-developed crusts
- Check for visible air pockets in the crumb
- Whole loaves offer more versatility than pre-sliced ones
- Store-bought artisan sourdough works just as well as homemade
Preparing the Oven
Preheating is the difference between mediocre and magnificent toast. You need consistent heat from the moment your bread hits that rack for perfectly even, golden-brown results. Set your oven to 375°F (190°C) and give it 10-15 minutes to come up to temperature. If you’ve got an oven thermometer, use it—built-in thermometers can be unreliable.
Got a convection setting? The circulating air gives you even more uniform toasting, though you might want to drop the temperature by about 25 degrees to prevent over-browning. The moving air speeds up the process, so keep a closer eye on things. Conventional ovens work perfectly fine, too—just position that rack in the middle of the oven for the most even heat distribution.
Related: 13 Must-Try Sourdough Toast Ideas for Every Craving
Slicing the Bread
Slice thickness completely transforms your eating experience. Thicker slices (3/4 to 1 inch) give you that incredible chewy interior wrapped in a crispy shell—perfect for substantial toppings like mashed avocado. Thinner slices (around 1/2 inch) turn into crispy, cracker-like toast that’s ideal for dipping or maximum crunch. Whatever thickness you choose, keep it consistent for even toasting results.
You absolutely need a serrated bread knife for this job. That saw-tooth edge grips the crust without crushing the delicate crumb inside. Place your loaf on a sturdy cutting board and use a gentle sawing motion—let the knife do the work. If you’re cutting a round boule, slice it in half first, then work from the flat cut side. This gives you way more stability and control, resulting in more uniform pieces.
Arranging Bread on Baking Tray
Grab any standard baking sheet and give those slices some personal space. Overcrowding means uneven toasting because heat can’t circulate properly around each slice. Lay your sourdough slices in a single layer with at least half an inch between each piece. Skip overlapping or touching—if you’ve got more slices than space, work in batches.
Placing bread directly on the baking tray or right on the oven rack gives you maximum crispiness. Some folks place bread directly on the oven rack with a sheet pan underneath to catch crumbs—this method gets you ultimate all-around crispness since heat hits the bread from every angle.
Setup tips for perfect toasting:
- Use any standard baking sheet or cookie sheet
- Space slices at least 1/2 inch apart
- Never overlap or stack slices
- Skip the aluminum foil for maximum crispiness
- Place directly on the oven rack for all-around browning
- Put a pan underneath to catch falling crumbs
- Work in batches if needed rather than overcrowding
Toasting Time and Temperature
At 375°F, you’re looking at about 5-7 minutes for the first side, then flip and give it another 3-5 minutes on the second side. These are guidelines—your actual timing depends on slice thickness, how dense your particular loaf is, and how crispy you like your toast. Start checking around the 5-minute mark because ovens have personalities.
Thicker slices need more time to warm through and develop that crispy exterior. Thinner slices can go from perfect to burnt quickly. Want less crunch? Pull it out a minute or two early. Craving maximum crispiness? Let it go a bit longer, but stay close. After a few batches, you’ll know exactly what your oven needs for that perfect golden-brown toast with just the right amount of chew in the middle.
Related: Can You Make French Toast with Sourdough Bread?
Checking for Doneness
Your senses are your best tools here. That toasty aroma is your first indicator that things are happening—when you smell that warm, slightly caramelized scent, it’s time to take a peek.
Visual cues to look for:
- Golden-brown color across the surface
- Edges are slightly darker than the center
- No pale or white spots remaining
- Even color distribution on the visible side
Touch and texture signs:
- Feels firm and crispy on top
- Slight crunch when you tap it
- Interior still has some give
- Not soft or spongy to the touch
Sound and smell indicators:
- Toasty, caramelized aroma fills the kitchen
- Subtle crackling sound when pressed gently
- No burning or acrid smell
Remember that sourdough’s natural tang means it doesn’t brown quite as quickly as regular bread. If your toast looks pale but feels crispy, that’s just the nature of sourdough—the acidity slows down the browning process, so trust your other senses too.
Adding Flavor
Warm, melted butter soaking into freshly toasted sourdough is one of life’s simple pleasures. Brush it on before toasting for a richer, more golden result that’ll crisp up beautifully, or wait until after toasting and watch it melt into those nooks and crannies.
Olive oil before toasting creates amazing savory depth that pairs perfectly with sourdough’s tangy notes. Brush a light layer on each slice before it goes in the oven for subtle richness and even better crispiness—especially great if you’re planning to top your toast with tomatoes or cheese.
Mix softened butter with minced garlic and chopped fresh herbs like rosemary, thyme, or parsley for next-level flavor. Spread this mixture on your bread before toasting to create restaurant-quality garlic bread. The herbs get slightly crispy while the garlic mellows and caramelizes, creating something that’ll have everyone asking for your recipe.
Serving Suggestions
Breakfast favorites:
- Mashed avocado with sea salt and red pepper flakes for classic avocado toast
- Your favorite jam—the tang of sourdough plays beautifully against fruit preserves
- Cream cheese and smoked salmon for a luxurious morning
- Peanut butter and banana for sweet, satisfying energy
- Butter and honey for simple perfection
Lunch and dinner ideas:
- Open-faced sandwiches with roasted vegetables and goat cheese
- Leftover roast chicken with arugula and aioli
- Float a slice on French onion soup or tomato soup
- Top with melted cheese—sharp cheddar, creamy brie, or tangy blue
Cheese combinations:
- After toasting, top with your favorite cheese and pop back in the oven until melted
- The contrast between crispy bread and gooey cheese is absolutely unbeatable
- Try combinations like brie with fig jam or aged cheddar with apple slices
Storing Your Sourdough
Store your whole sourdough loaf in a linen or cotton bread bag at room temperature. These breathable fabrics maintain just the right moisture level, keeping the crust crispy while preventing the bread from drying out too quickly. A bread box works beautifully too—the slightly humid environment keeps sourdough fresh for 5-7 days. Skip plastic bags since they trap moisture and turn that gorgeous crispy crust soft and rubbery.
If you’ve sliced into your loaf, store it cut-side down on a cutting board with a clean kitchen towel covering the exposed end. This protects the crumb from drying out.
Freezing sourdough is a game-changer when you’ve baked more than you can eat fresh. Slice your cooled loaf completely, then wrap individual slices in parchment paper before placing them in a freezer bag. Frozen sourdough slices toast beautifully straight from the freezer—just add an extra minute or two to your toasting time. The bread maintains its texture and flavor for up to three months.
Storage tips for best results:
- Keep whole loaves in linen bags or bread boxes
- Store cut-side down with a towel over the exposed end
- Slice before freezing for easy portions
- Toast frozen slices directly from the freezer
- Use frozen bread within 3 months
Toast Like You Mean It
Once you’ve got the basics down, you can tweak and adjust to make it your own. Maybe 6 minutes at 375°F becomes your sweet spot, or a light brush of garlic butter before toasting becomes your signature move. The beauty of this method is that each slice gets even heat, every bite has that perfect crispy-chewy contrast, and you can make enough at once to feed everyone breakfast. So preheat that oven, slice that bread, and get ready to enjoy sourdough toast the way it was meant to be—golden, crispy, and absolutely delicious.
FAQs – How to Toast Sourdough Bread in Oven
What is the best way to toast sourdough bread?
The best way to toast sourdough bread is in the oven at 375°F. Arrange slices on a baking sheet with space between them, toast for 5-7 minutes, flip, then toast another 3-5 minutes until golden-brown. This method creates even crispiness with a chewy interior that pop-up toasters can’t achieve, plus you can toast multiple slices at once.
Can you put bread in the oven instead of toaster?
Absolutely! Toasting bread in the oven works beautifully and often gives better results than a toaster. Preheat your oven to 375°F, place bread slices on a baking sheet, and toast for 5-10 minutes total, flipping halfway through. You’ll get even browning, more control over crispiness, and can toast multiple slices simultaneously.




![[video] from the seed to the peasant bakery with nicolas supiot](https://www.mydailysourdoughbread.com/wp-content/uploads/2022/11/image-16-120x120.jpeg "[Video – Part 2] Entering Into Peasant Bakery 6")
