Last updated on July 26th, 2025
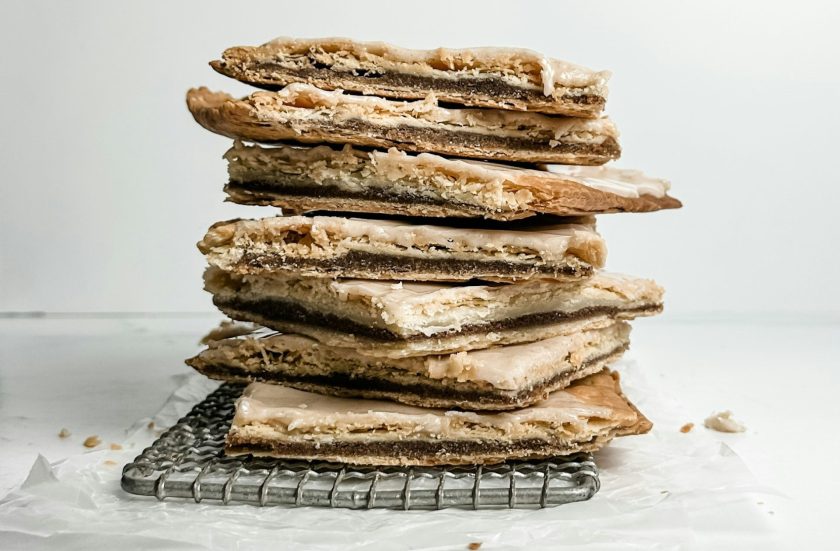
Those childhood mornings with foil-wrapped pop tarts are about to get a major upgrade. Homemade sourdough pop tarts blow away anything you can buy at the store – think flaky, buttery pastry with that amazing tangy sourdough twist. You probably have most ingredients in your pantry right now, plus that sourdough discard you’ve been wondering what to do with.
You’re getting real butter, quality jam, and incredible sourdough flavor that makes everything taste better. Ready to become the breakfast hero your family never knew they needed? Time to make these incredible treats that’ll have everyone begging for the recipe!
Ingredients
For the Pastry Dough:
- 2½ cups all-purpose flour
- 1 teaspoon salt
- 1 tablespoon granulated sugar
- 1 cup (2 sticks) cold, unsalted butter
- ½ cup sourdough discard
- 3-4 tablespoons ice water
- 1 egg + 1 tablespoon water (for egg wash)
For the Filling:
- ¾ cup strawberry jam or preserves
- 1 tablespoon cornstarch (optional, for thickening)
For the Glaze:
- 1 cup powdered sugar
- 2-3 tablespoons milk
- ½ teaspoon vanilla extract
- Sprinkles for decoration
This recipe makes 8-10 pop tarts (16-20 rectangles) using simple pantry staples. The key to success lies in ingredient temperature and quality – cold butter creates flaky layers through steam expansion, while sourdough discard adds tangy depth that balances sweet fillings perfectly. Quality jam makes all the difference in flavor, so choose preserves with visible fruit pieces and minimal added sugars. European-style butter with higher fat content will create even more impressive flaky layers, though regular unsalted butter works beautifully. Your sourdough discard should be relatively fresh – within a week of feeding works best, as it provides the optimal balance of tang without overwhelming sourness.
Step-by-Step Recipe
- Make the dough: Whisk flour, salt, and sugar in a large bowl, ensuring even distribution to prevent pockets of overly salty or sweet dough. Grate frozen butter directly into flour mixture – this technique distributes butter more evenly than cutting cold cubes and is crucial for creating those flaky layers we’re after. Cut in butter with a pastry cutter until mixture resembles coarse crumbs with pea-sized pieces, working quickly to prevent the butter from warming and melting into the flour.
- Add wet ingredients: Mix sourdough discard with 3 tablespoons ice water before adding to flour mixture – this prevents the discard from clumping and ensures even distribution throughout the dough. Add to flour mixture, stirring with a fork until the dough just comes together. The dough should look slightly shaggy; overmixing develops gluten and results in tough pastry. Add more water if needed, but do so gradually as too much moisture will make the dough sticky and difficult to work with.
- Chill dough: Form into a disk, wrap tightly in plastic, and refrigerate for at least 1 hour or up to 48 hours for better flavor development. This chilling period allows the flour to fully hydrate, the butter to firm up, and the gluten to relax, resulting in a more tender pastry. The longer resting time also allows the sourdough flavors to meld with the other ingredients.
- Prepare filling: Mix jam with cornstarch if using – this prevents runny fillings from leaking during baking and helps maintain the proper consistency. Beat egg with 1 tablespoon water for egg wash, which will help seal the edges and give your pop tarts that beautiful golden finish.
- Roll and cut: On a floured surface, roll dough to ⅛-inch thickness, working from the center outward and rotating the dough frequently to maintain even thickness. Cut into 3×4-inch rectangles using a ruler or template for consistency – uniform sizes ensure even baking and a professional appearance. You should get about 16-20 rectangles, depending on efficiency.
- Assemble: Place half the rectangles on parchment-lined baking sheets, spacing them about 2 inches apart. Brush these bottom rectangles with egg wash around the edges – this creates the seal that holds everything together. Add 1-2 tablespoons filling, leaving a ¼-inch border, being careful not to overfill as this will cause leakage during baking. Top with remaining rectangles and press firmly around edges.
- Seal and vent: Press edges firmly with fingertips, then crimp with fork to create the classic pop tart appearance while ensuring the filling stays contained. Poke 6-8 holes in the tops with a fork or toothpick – these vents allow steam to escape and prevent excessive puffing that could cause bursting. Brush tops with egg wash for a golden color. Chill assembled pop tarts for 20 minutes to help them maintain their shape during baking.
- Bake: Following the detailed baking instructions below.
- Glaze: Whisk powdered sugar, milk, and vanilla until smooth, starting with less liquid than expected, as you can always add more. Spread on completely cooled pop tarts, add sprinkles immediately while the glaze is wet.
Pro tip: Keep ingredients cold for flakiest pastry – warm butter will melt into the flour instead of creating steam pockets. Don’t overfill or the edges won’t seal properly, leading to messy leakage during baking.
Related: The Ultimate Sourdough Donut Recipe
Baking Instructions
Temperature and Timing for Perfect Results
Preheat your oven to 350°F – this temperature gives you golden perfection without scorching those delicate edges. Bake for 25-30 minutes, rotating your pan halfway through to ensure even browning. Your kitchen will start smelling like a bakery around the 20-minute mark.
Recognizing Doneness Like a Pro
You’re looking for that beautiful golden brown color across the entire surface. The edges should be set and lightly golden, and if you gently press the center, it should feel firm. The pastry should look completely set rather than soft or doughy.
Convection Oven Adjustments
For convection ovens, reduce the temperature to 325°F and start checking for doneness at 20 minutes. The circulating air cooks faster, so watch for those visual cues – golden tops and set pastry, rather than relying solely on timing.
Cooling
Cool completely on the baking sheet before glazing – this prevents the glaze from melting and ensures the pastry maintains its structure.
Filling Options
Classic strawberry jam offers familiar comfort and nostalgic appeal that reminds us of childhood mornings, while providing the perfect balance of sweet and tart that complements the tangy sourdough pastry.
Homemade berry compote provides fresh, vibrant flavors with natural sweetness that’s not overly cloying – mix fresh or frozen berries with a touch of sugar and lemon juice for bright, authentic fruit flavor.
Rich chocolate spread creates an indulgent breakfast treat that feels like dessert but is acceptable for morning consumption – add a pinch of sea salt to enhance the chocolate and provide sophisticated flavor contrast.
Apple butter delivers warm, spiced comfort in every bite with its smooth consistency and complex spice blend that pairs beautifully with the sourdough tang.
Nutella mixed with a pinch of sea salt combines sweet and savory for a dessert-like experience that elevates the humble pop tart into gourmet territory.
Scrambled eggs and cheese create a portable, protein-rich morning meal that transforms your pop tart into a complete breakfast – cook eggs until just set, as they’ll continue cooking in the oven.
Caramelized onions with goat cheese provide a sophisticated, savory option that showcases how versatile this pastry can be – the sweet onions balance the tangy cheese perfectly.
Ham and cheese combinations deliver a satisfying handheld breakfast that’s perfect for busy mornings when you need something substantial and portable.
Related: Crispy & Fluffy Sourdough Waffle Recipe
Assembling the Pop Tarts
- Roll out your dough to approximately 1/8-inch thickness, working from the center outward and rotating frequently to maintain even thickness throughout. This ensures the right balance between pastry and filling while preventing tears during handling and creating uniform baking results.
- Cut your rectangles using a ruler or paper template for consistency – uniform sizes ensure even baking and a professional appearance that looks like it came from a bakery. A pizza cutter or sharp knife works well for clean edges.
- Brush egg wash around the edges of your bottom rectangle before adding the filling. This creates a seal that will hold during baking and prevents the dreaded filling leakage that can ruin your beautiful pop tarts.
- Add your filling, using one to two tablespoons maximum and maintaining a quarter-inch border around the edges. This border is crucial – too much filling will cause leakage, while too little leaves you with mostly pastry.
- Place the top rectangle over the filling and press firmly around the edges with your fingertips to create a tight seal. Work systematically around the perimeter to ensure no gaps remain.
- Use a fork to crimp around all edges, creating the classic pop tart appearance while ensuring the filling stays contained. This also provides an attractive finished look that mimics commercial pop tarts.
- Poke six to eight holes across the top surface with a fork or toothpick. These vents allow steam to escape and prevent excessive puffing that could cause the pop tarts to burst open during baking.
Icing and Decoration
Mix powdered sugar, milk, and vanilla extract, starting with less liquid than expected – you can always add more, but removing excess is impossible. The perfect consistency should be thick enough to stay put yet thin enough to spread smoothly.
For extra flavor depth, whisk a spoonful of your filling jam into the glaze to add color and tie the flavor profile together. Let pop tarts cool completely before glazing, as hot pastry will melt the icing into a runny mess.
Key Decoration Tips:
- Work quickly when glazing – add toppings immediately while the glaze is wet
- Use sprinkles, crushed freeze-dried fruit, or toasted nuts for texture and visual appeal
- Apply glaze with a spoon or offset spatula, leaving small borders for an authentic look
- Consider healthier options like coconut flakes or cinnamon dusting
Storing & Reheating
These pop tarts are best enjoyed fresh, but will stay delicious in an airtight container at room temperature for up to three days. The key is preventing air exposure, which is the enemy of flaky pastry. After three days, the pastry loses its crisp texture as moisture from the filling gradually works into the crust.
Sourdough pop tarts are incredibly freezer-friendly. You can freeze them baked and unfrosted for up to 3-4 months. Flash freeze them first on a baking sheet, then transfer to airtight containers to prevent them from sticking together. For ultimate convenience, freeze them unbaked and assembled – just add a few extra minutes to the baking time.
To reheat properly, use a 350°F oven for about 10 minutes to restore that crispy exterior while warming the filling through. Avoid putting glazed pop tarts in a regular toaster as the icing will make a sticky mess. For quick reheating, the microwave works in a pinch using 20-second intervals, but you’ll sacrifice the crispy texture. The toaster oven offers the perfect balance of convenience and texture restoration – just remember to skip the toaster entirely if they’re glazed.
Pop Tart Perfection Unlocked!
There you have it – your ticket to breakfast greatness! These sourdough pop tarts blow the store-bought stuff out of the water. You’ve got all the tricks now: cold butter for flaky layers, that perfect 350°F bake, and how to seal those babies so they don’t leak. Whether you’re going classic with strawberry jam or getting fancy with savory fillings, you’re a pop tart wizard now.
The best part? You can make a bunch and freeze them for those crazy busy mornings. Once you taste these homemade beauties, you’ll never go back to the cardboard versions from the store. Time to get baking and show everyone what real pop tarts taste like!
Print
Homemade Sourdough Pop Tarts
Time to make these incredible treats that’ll have everyone begging for the recipe!
Ingredients
For the Pastry Dough:
- 2½ cups all-purpose flour
- 1 teaspoon salt
- 1 tablespoon granulated sugar
- 1 cup (2 sticks) cold, unsalted butter
- ½ cup sourdough discard
- 3–4 tablespoons ice water
- 1 egg + 1 tablespoon water (for egg wash)
For the Filling:
- ¾ cup strawberry jam or preserves
- 1 tablespoon cornstarch (optional, for thickening)
For the Glaze:
- 1 cup powdered sugar
- 2–3 tablespoons milk
- ½ teaspoon vanilla extract
- Sprinkles for decoration
This recipe makes 8-10 pop tarts (16-20 rectangles) using simple pantry staples. The key to success lies in ingredient temperature and quality – cold butter creates flaky layers through steam expansion, while sourdough discard adds tangy depth that balances sweet fillings perfectly. Quality jam makes all the difference in flavor, so choose preserves with visible fruit pieces and minimal added sugars. European-style butter with higher fat content will create even more impressive flaky layers, though regular unsalted butter works beautifully. Your sourdough discard should be relatively fresh – within a week of feeding works best, as it provides the optimal balance of tang without overwhelming sourness.
Instructions
- Make the dough: Whisk flour, salt, and sugar in a large bowl, ensuring even distribution to prevent pockets of overly salty or sweet dough. Grate frozen butter directly into flour mixture – this technique distributes butter more evenly than cutting cold cubes and is crucial for creating those flaky layers we’re after. Cut in butter with a pastry cutter until mixture resembles coarse crumbs with pea-sized pieces, working quickly to prevent the butter from warming and melting into the flour.
- Add wet ingredients: Mix sourdough discard with 3 tablespoons ice water before adding to flour mixture – this prevents the discard from clumping and ensures even distribution throughout the dough. Add to flour mixture, stirring with a fork until the dough just comes together. The dough should look slightly shaggy; overmixing develops gluten and results in tough pastry. Add more water if needed, but do so gradually as too much moisture will make the dough sticky and difficult to work with.
- Chill dough: Form into a disk, wrap tightly in plastic, and refrigerate for at least 1 hour or up to 48 hours for better flavor development. This chilling period allows the flour to fully hydrate, the butter to firm up, and the gluten to relax, resulting in a more tender pastry. The longer resting time also allows the sourdough flavors to meld with the other ingredients.
- Prepare filling: Mix jam with cornstarch if using – this prevents runny fillings from leaking during baking and helps maintain the proper consistency. Beat egg with 1 tablespoon water for egg wash, which will help seal the edges and give your pop tarts that beautiful golden finish.
- Roll and cut: On a floured surface, roll dough to ⅛-inch thickness, working from the center outward and rotating the dough frequently to maintain even thickness. Cut into 3×4-inch rectangles using a ruler or template for consistency – uniform sizes ensure even baking and a professional appearance. You should get about 16-20 rectangles, depending on efficiency.
- Assemble: Place half the rectangles on parchment-lined baking sheets, spacing them about 2 inches apart. Brush these bottom rectangles with egg wash around the edges – this creates the seal that holds everything together. Add 1-2 tablespoons filling, leaving a ¼-inch border, being careful not to overfill as this will cause leakage during baking. Top with remaining rectangles and press firmly around edges.
- Seal and vent: Press edges firmly with fingertips, then crimp with fork to create the classic pop tart appearance while ensuring the filling stays contained. Poke 6-8 holes in the tops with a fork or toothpick – these vents allow steam to escape and prevent excessive puffing that could cause bursting. Brush tops with egg wash for a golden color. Chill assembled pop tarts for 20 minutes to help them maintain their shape during baking.
- Bake: Following the detailed baking instructions below.
- Glaze: Whisk powdered sugar, milk, and vanilla until smooth, starting with less liquid than expected, as you can always add more. Spread on completely cooled pop tarts, add sprinkles immediately while the glaze is wet.
Pro tip: Keep ingredients cold for flakiest pastry – warm butter will melt into the flour instead of creating steam pockets. Don’t overfill or edges won’t seal properly, leading to messy leakage during baking.
Notes
- Preheat your oven to 350°F – this temperature gives you golden perfection without scorching those delicate edges
- Bake for 25-30 minutes, rotating your pan halfway through to ensure even browning
- Your kitchen will start smelling like a bakery around the 20-minute mark
- Look for that beautiful golden brown color across the entire surface
- The edges should be set and lightly golden
- Gently press the center – it should feel firm
- The pastry should look completely set, rather than soft or doughy
- Reduce the temperature to 325°F for convection ovens
- Start checking for doneness at 20 minutes
- The circulating air cooks faster, so watch for visual cues – golden tops and set pastry, rather than relying solely on timing
- Cool completely on the baking sheet before glazing – this prevents the glaze from melting and ensures the pastry maintains its structure