Last updated on May 18th, 2026
Crispy crust sourdough is one of those things that just hits differently. That deep amber shell, the satisfying shatter when you slice through it, the crackling sound fresh out of the oven — it’s the whole reason home bakers keep coming back to sourdough. The good news? That bakery-quality crust is absolutely achievable at home, and it comes down to understanding a handful of key techniques that make all the difference.

What Makes a Crust “Crispy”?
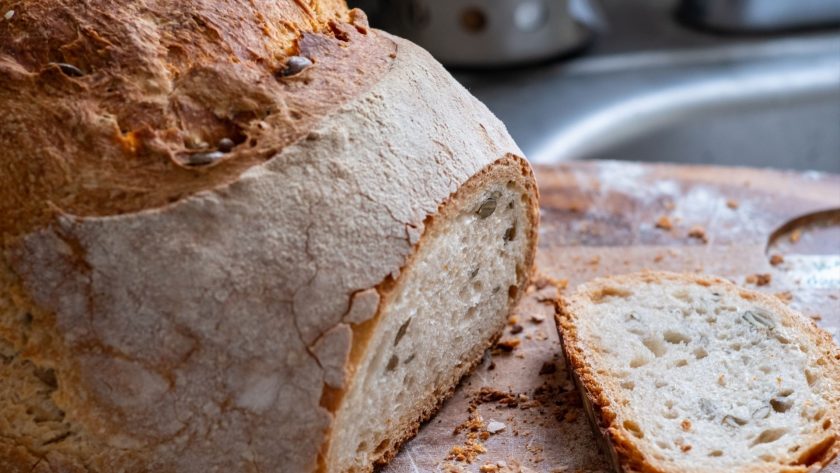
A crispy crust isn’t just about hardness — it’s a combination of texture, sound, and visual cues that tell you a loaf was baked right. You’re looking for a deep amber to mahogany-brown exterior, that gorgeous golden crust that catches the light. Knock on the bottom, and it should sound hollow. Slice into it, and it should shatter, not squish.
The Maillard reaction is the chemistry behind that signature color and complex flavor. It’s a reaction between amino acids and sugars that kicks in around 280–330°F, browning the surface of your sourdough bread and building layers of toasty, tangy depth. This is what separates a truly artisan bread crust from something pale and underwhelming.
A crunchy crust also creates contrast with the soft, open crumb inside. That interplay of textures is what makes every bite of a well-baked sourdough so satisfying — and once you nail it, you’ll never want to go back to a soft-sided loaf.
Why Sourdough Crust Gets Crispy
When sourdough bread hits a hot oven, the wild yeast and bacteria give one final burst of activity known as oven spring — the loaf expands rapidly before the crust sets, stretching the outer layer thin and taut. As the internal temperature climbs, moisture in the crust evaporates quickly, leaving behind that rigid, crackly shell.
At the same time, caramelization takes over. The natural sugars in the dough — from the flour and fermentation byproducts — begin to caramelize under high heat, adding sweetness, color, and a glossy sheen to the crust. This works in tandem with the Maillard reaction, and together they drive everything you love about a well-baked crust.
The combination of oven spring, moisture evaporation, caramelization, and Maillard browning is what makes sourdough crust uniquely crisp and flavorful. Every variable in your bake — temperature, steam, timing — either supports or undermines this process. Understanding the science means you can start troubleshooting with confidence rather than guessing.
Related: Sourdough Crust Too Hard: How to Soften Sourdough Crust
Key Ingredients That Affect Crust
Your crust starts long before the oven. The ingredients you choose directly shape the texture, color, and structure of the finished exterior.
Bread flour is the best starting point for a crispy crust sourdough. Its higher protein content (12–14%) builds a stronger gluten network, which supports better oven spring and a more structured, crackly crust. Whole wheat flour, mixed in at 10–20%, introduces extra sugars and bran particles that brown faster and deeper, adding color and a nuttier edge to the exterior.
Salt tightens gluten structure and controls fermentation speed, helping build flavor without overproofing. A well-fed, active starter brings the wild yeast needed for a strong oven spring — a sluggish starter means a weak rise and a softer, denser crust.
Key points at a glance:
- Bread flour = stronger gluten, better structure, crispier crust
- Whole wheat flour = faster browning, deeper color, added flavor
- Salt = tighter gluten, better fermentation control
- Active starter = strong oven spring, better crust development
- Avoid all-purpose flour as your sole flour — lower protein means less structure
Hydration and Dough Structure
Hydration is one of the most talked-about variables in sourdough, and for good reason — it directly affects both the crumb and the crust.
High hydration doughs (75–85%+) produce an open crumb with those large, irregular holes. During baking, the extra water in the dough generates more steam internally, which keeps the crust extensible longer and allows for better oven spring. Once that steam escapes, the crust dries out quickly and firms up into a satisfying crunch.
Lower hydration doughs are easier to shape but can produce a tighter crumb and a thicker, chewier crust rather than a shattery one. For maximum crispiness, a higher hydration percentage is generally the better path.
Gluten development is just as important as hydration. A well-developed gluten network holds the dough’s shape during baking, supports even oven spring, and helps the crust form a tight, unified shell. Without strong gluten, the crust can crack unevenly or come out dense and dull.
Stretch and folds during bulk fermentation build both gluten strength and dough elasticity — two things that directly impact how well your crust develops in the oven.
The Role of Steam in Baking
Steam is one of the most underrated variables in achieving a crispy sourdough crust, and understanding when you want it — and when you don’t — changes everything.
In the first 15–20 minutes of baking, steam actually keeps the crust soft and pliable on purpose. This allows the dough to keep expanding freely during oven spring before the exterior sets. Without steam, the crust hardens too quickly, restricting the loaf’s rise, and you end up with a dense crumb and a thick, dull exterior.
Dutch oven bread baking is the most reliable way to manage steam at home. Baking with the lid on traps moisture released by the dough, creating a self-steaming environment. When you remove the lid around the 20-minute mark, that steam escapes, and the crust is free to dry out, brown, and crisp up dramatically.
Without a Dutch oven, a pan of boiling water on the oven floor or a quick water spritz before closing the door can replicate the effect. It takes a bit more effort but delivers the same result — a crust that’s extensible early in the bake and fully crisp by the end.
Baking Temperature and Timing
High heat is non-negotiable for a crackly, deeply browned crust. Starting at 475–500°F jumpstarts oven spring and gets the Maillard reaction and caramelization firing fast. Once the Dutch oven lid comes off, crust browning accelerates — and this is where many home bakers make the mistake of pulling the loaf too early.
A pale crust almost always means a chewy, soft exterior. A deep mahogany loaf — even one that looks a little dark — delivers the crunch and flavor you’re after. The internal temperature should hit 205–210°F before you pull it.
Key points for getting temperature and timing right:
- Preheat to 475–500°F — don’t rush this step, the oven needs to be fully saturated with heat
- Use an oven thermometer — most home ovens run 25–50°F off, which wrecks crust development
- Bake covered for 20 minutes, then uncovered for another 20–25 minutes
- Don’t fear dark color — deeper brown means more flavor and more crunch
- Check internal temp — 205–210°F confirms the loaf is fully baked through
- Extend the bake if needed — an extra 5 minutes makes a noticeable difference
Cooling and Crust Development
Getting the bake right is only part of the equation. What happens in the hour after the loaf leaves the oven matters just as much for crust quality.
As soon as the bread comes out, the crust starts evolving. That crackling, singing sound is moisture escaping from the interior through the crust. This process finalizes the crust’s texture and snap, and it’s a sign that things went right in the oven.
Always cool your bread on a wire rack. Cooling on a solid surface traps steam underneath the loaf, which softens the bottom crust and creates a chewy, dense underside. A wire rack lets air circulate all the way around, so moisture escapes evenly, and the entire crust stays crisp from top to bottom.
Give your loaf at least one hour before slicing — two hours is even better. Cutting too early lets steam rush out through the crumb, which softens the crust rapidly and leaves you with a gummy interior. The loaf is still actively cooking as it cools, and the crust is still setting during this time.
If you’ve ever baked what looked like a perfect loaf, only to end up with a soft, leathery crust an hour later, this is usually why. The bake was solid, but the cooling step wasn’t given the time it needed. Cooling bread properly isn’t passive; it’s the final stage of crust development, and it deserves the same attention as everything that came before it.
Related: How to Make Perfect Sourdough Pie Crust Every Time
Common Mistakes
If your crust keeps coming out soft, dull, or chewy, one of these is almost certainly the cause:
- Oven temperature too low — A cool oven slows browning, weakens oven spring, and prevents caramelization from fully developing. Always preheat thoroughly and verify the temp with a thermometer.
- Skipping steam — No steam means the crust sets before the loaf has expanded. The result is a restricted rise, dense crumb, and a thick, soft exterior instead of a crackly one.
- Underbaking — Pulling the loaf too early is one of the most common mistakes. If the crust looks pale or feels soft fresh out of the oven, it needs more time. Aim for 205–210°F internally.
- Cooling on a flat surface — Trapping steam under the loaf softens the bottom crust quickly. Always use a wire rack.
- Slicing too soon — Cutting into a hot loaf lets interior steam escape rapidly, softening the crust and making the crumb gummy. Wait at least an hour.
- Weak or underfed starter — A sluggish starter means poor oven spring, which leads to a flatter loaf with a thicker, chewier crust rather than a crackly one.
Quick Tips for Better Crust
A few small adjustments that consistently make a big difference:
Score with a bread lame. A razor-sharp bread lame gives you a clean, confident cut that controls where the loaf expands during oven spring. Scoring bread properly directs energy upward, producing a better ear, more even expansion, and a crispier overall crust.
Extend the uncovered bake. After removing the Dutch oven lid, add an extra 5–10 minutes to the bake — especially if you want a deeper color. The longer the crust stays in dry heat, the crispier it gets.
Vent the oven in the final stretch. Cracking the oven door slightly in the last few minutes lets residual moisture escape, which accelerates crust drying and adds extra crunch.
Bake straight from the fridge. If you’re cold-proofing overnight, try baking directly from cold rather than letting the dough warm up first. The temperature contrast can sharpen oven spring and contribute to a more defined, crispier crust.
Flour your scoring line. A light dusting of flour along the score before baking helps the cut open up cleanly and creates a more dramatic, defined crust edge.
Your Best Crust Is One Bake Away
Crispy crust sourdough comes down to a handful of variables — and now you know exactly what they are. Nail your flour choice, keep your starter active, manage your steam, and crank that oven heat. Cool your loaf on a wire rack, resist the urge to slice early, and don’t be scared of a deep, dark crust.
The mistakes that lead to a soft, dull exterior are all fixable — and the tips in this post give you everything you need to fix them. Make the adjustments, trust the process, and get ready for that satisfying crackling sound fresh out of the oven.
FAQs
How to get a crispier crust on sourdough?
Bake at 475–500°F, use a Dutch oven with the lid on for the first 20 minutes, then uncover for the remaining bake time. Steam early, dry heat late — that’s the winning combo. Cool your loaf on a wire rack for at least an hour before slicing, and don’t pull it from the oven until it hits 205–210°F internally.
How do I make my bread crust crunchy?
Start with bread flour for a stronger gluten structure, bake in a preheated Dutch oven, and don’t rush the bake. A pale crust is almost always an underbaked crust — go for deep amber to mahogany. Always cool on a wire rack to prevent steam from softening the bottom, and give it a full hour before cutting in.