Last updated on January 26th, 2026
That jar of sourdough discard sitting in your fridge? It’s about to become your secret weapon for the best sourdough pie crust you’ve ever made. Forget store-bought cardboard—this crust comes out flakier, more flavorful, and way more impressive than anything from the freezer aisle. The fermentation does the heavy lifting, creating tender layers with a subtle tang that works beautifully for both sweet and savory pies. No complicated techniques or fancy equipment needed, just a smarter way to use what you’ve already got. From mixing to baking to troubleshooting those tricky moments, you’re about to master the art of sourdough pie crust that’ll have everyone asking for seconds.

What Makes Sourdough Pie Crust Different
Here’s what sets sourdough pie crust apart from the regular stuff: when you add sourdough starter to your dough, you’re introducing wild yeast and beneficial bacteria. The acidity from lactic acid in the starter actually tenderizes gluten, giving you a crust that’s tender without being fragile. The natural fermentation creates a subtle tang that pairs beautifully with both sweet and savory fillings—not overpowering, just enough depth to make people wonder what makes your crust so good.
Texture-wise, the wild yeast creates just a tiny bit of lift as it bakes, adding extra airiness between those flaky layers. The fermented dough also handles more easily than regular crust—it’s more forgiving if you need to patch a tear or reroll. Plus, that fermentation breaks down some harder-to-digest compounds, making it easier on your stomach than conventional pie crust.
Ingredients
- 2½ cups all-purpose flour
- 1 cup cold butter, cubed
- ½ cup cold sourdough discard (100% hydration)
- 1 tablespoon sugar
- 1 teaspoon salt
- 2-4 tablespoons ice water (as needed)
Related: Shepherd’s Pie Recipe Using Sourdough: A Comfort Food Twist
Choosing the Right Sourdough Starter
Sourdough discard is the best option—it’s already fermented, bringing flavor and tenderness without extra rise. You’re not trying to make bread; you want flakiness and flavor, not loft. An active starter works too, but it might give you a slightly airier, puffier dough. For best results, use cold, mature sourdough discard straight from the fridge—this keeps your butter solid while mixing, which is crucial for flaky texture.
Most home bakers keep their starter at 100% hydration (equal parts flour and water by weight). This ratio is reflected in pie crust recipes, which is why some people find they need to add a little ice water when bringing the dough together. If your starter’s thicker or thinner, adjust accordingly—add extra flour for a wet starter, or more water for a stiff starter.
Here’s a fun variable: the age of your discard affects flavor. Older discard adds a stronger tang that works great for savory pies, while younger discard is milder and pairs beautifully with sweet fillings. Keep a jar in your fridge where you collect discard throughout the week—by the time you’re ready for chicken pot pie, that discard’s got serious flavor.
Step-by-Step Instructions
The key to great sourdough pie crust is keeping everything cold and handling the dough minimally. Here’s how to get it right:
- Combine dry ingredients. Whisk together flour, salt, and sugar in a large bowl until evenly mixed.
- Cut in the butter. Add cold, cubed butter and cut it into the flour mixture with a pastry cutter or your fingers until you’ve got pea-sized pieces. Don’t aim for uniform crumbs—those larger butter chunks create dramatic flaky layers.
- Add the starter. Pour in your cold sourdough discard and use a fork to toss everything together. Mix just until the dough starts to come together—it should still have visible butter pieces and look somewhat shaggy.
- Add water if needed. If the dough’s too dry to hold together when squeezed, add ice water one teaspoon at a time until it becomes cohesive without being wet.
- Shape and chill. Divide the dough in half and shape each portion into a flat disk. Wrap each disk tightly and refrigerate for at least 2 hours, preferably overnight. This rest time lets the flour fully hydrate, the gluten relax, and flavors meld. The dough keeps in the fridge for up to 4 days.
- Roll it out. Let the dough sit for 10 minutes after removing it from the fridge. Dust your counter lightly with flour and roll from the center outward, rotating a quarter-turn after each pass. Aim for about 1/8-inch thickness and a 12-inch round.
- Final chill. After fitting the dough into your pie plate and crimping the edges, chill the prepared shell for at least 15 minutes before baking. This solidifies the fats for maximum flakiness.
Baking Methods
Par-baking is what you do when your filling needs oven time, like pumpkin pie or custard. Preheat your oven to 375-425°F with a rack in the lower third. Line your chilled crust with parchment or foil, pressing it against the sides and edges. Fill with pie weights, dried beans, or rice. Bake for 15-20 minutes until the edges are set and very lightly golden. Remove the weights and parchment, then prick the bottom with a fork to prevent bubbling. Reduce the oven to 375°F and bake for another 2-3 minutes until the inside looks set but barely golden.
For full blind-baking with no-bake fillings like chocolate cream or lemon meringue, follow the same initial steps. After removing the weights, continue baking until the bottom crust is golden brown, about 14-15 minutes longer. The crust should have a matte appearance and be turning tan. This is your only chance to fully cook the crust.
For double-crust pies like apple or cherry, skip the blind-baking. Roll out your bottom crust, add filling, top with the second crust, seal edges, and cut vents. Position your oven rack in the lower third so the bottom gets direct heat. Some bakers place the pie on a preheated baking stone or sheet pan for concentrated heat that sets the bottom crust before filling, which can make it soggy.
Texture & Flavor Tips
Keep everything cold for maximum flakiness. Cold butter, sourdough discard, and water help create flaky layers. When butter stays solid during mixing and melts in the hot oven, it creates steam that lifts the dough into layers. Some bakers chill their flour and mixing bowl before starting.
- Try lamination for extra layers. After the initial chill, roll the dough into a rectangle, fold it into thirds like a letter, turn 90 degrees, and repeat. This optional step creates long streaks and pockets of butter that triple the layers.
- Control your hydration carefully. Too much water makes dough tough and prone to shrinking; too little makes it crumbly. Mix just until the dough comes together with visible butter pieces. Add ice water one teaspoon at a time only if needed.
- Adjust fermentation for the desired tang. Ferment your dough at room temperature for 7-12 hours for a more pronounced sourdough flavor, or skip room-temperature fermentation and chill immediately for a milder taste.
- Handle minimally. Overworking the dough develops gluten, leading to a tough, chewy crust instead of a light, crisp one. Keep mixing to the bare minimum.
Common Mistakes
Shrinking crusts usually happen when you don’t chill the pie crust before baking or when you overwork the dough, developing too much gluten. Always make chilling non-negotiable, and handle dough gently. Don’t stretch the dough when fitting it into the pan, or it’ll spring back when it bakes.
Soggy bottoms happen when wet filling soaks into raw dough before it has a chance to set. Blind-bake when recipes call for it, use a metal pie pan (conducts heat better than ceramic or glass), and position your oven rack low. Sprinkle a mixture of equal parts flour and sugar on the bottom before adding filling to absorb moisture, or brush the crust with egg white to create a moisture barrier.
Baking at too low a temperature causes butter to melt before the crust sets, resulting in shrinkage and greasiness. Most pie crusts need an initial hot temperature—375-425°F—to set the structure. If your crusts consistently come out pale or underbaked, your oven might be running cooler than indicated.
Related: Red Date Sourdough Recipe
Storage & Make-Ahead Tips
- Refrigerator storage: Wrap mixed dough tightly in plastic wrap and refrigerate for up to a week. After about 4 days, the sourdough flavor becomes more pronounced. Let the dough sit at room temperature for 10 minutes before rolling. Partially blind-baked crusts can be stored covered in the refrigerator for up to 3 days.
- Freezer storage: Freeze pie crust as disks wrapped in parchment and placed in zip-top bags, or already rolled and fitted into disposable pie plates covered with foil. Both methods work for up to 3 months. Let the crust thaw slightly before blind-baking to prevent glass or ceramic plates from cracking.
- Make-ahead timeline: Make your dough on Tuesday, parbake the crust on Wednesday, then fill and bake on Thursday. This spreads out the work for holiday baking. Store parbaked shells at room temperature for up to 3 days or freeze them in an airtight bag for up to 3 months.
You’re Ready to Crush This Sourdough Crust
Look, sourdough pie crust isn’t just some trendy thing—it actually makes your pies taste better and come out flakier than anything from the store. That jar of starter you’ve been hoarding? It’s about to become your secret weapon for crusts that’ll have people asking for your recipe. You’ve got everything now: why that fermentation does the heavy lifting, how to keep your butter cold for maximum flakiness, and the exact steps to nail it every time. The game plan’s simple—stay cold, don’t overwork it, and let time do its thing. Worried about shrinking or soggy bottoms? We covered all those fixes. Plus, you can make this dough weeks ahead and stash it in the freezer, so you’re always ready to bake without the stress. Time to put that discard to work and show off a little.
Print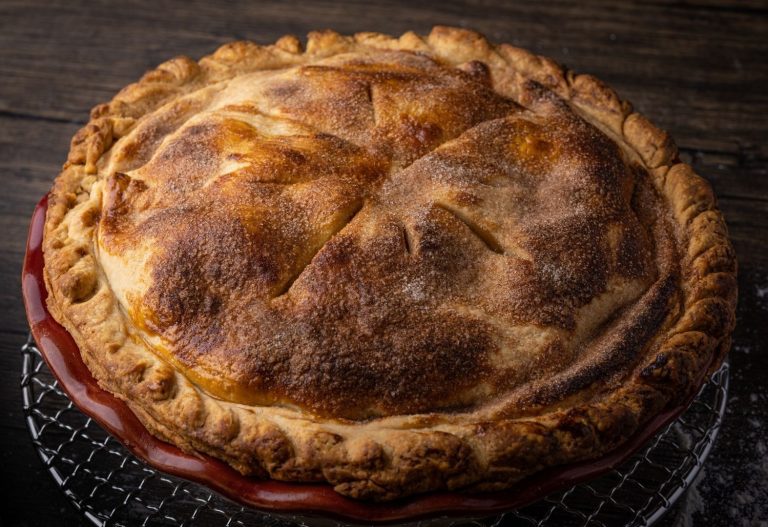
Sourdough Pie Crust
Forget store-bought cardboard—this crust comes out flakier, more flavorful, and way more impressive than anything from the freezer aisle.
Ingredients
- 2½ cups all-purpose flour
- 1 cup cold butter, cubed
- ½ cup cold sourdough discard (100% hydration)
- 1 tablespoon sugar
- 1 teaspoon salt
- 2–4 tablespoons ice water (as needed)
Instructions
- Combine dry ingredients. Whisk together flour, salt, and sugar in a large bowl until evenly mixed.
- Cut in the butter. Add cold, cubed butter and cut it into the flour mixture with a pastry cutter or your fingers until you’ve got pea-sized pieces. Don’t aim for uniform crumbs—those larger butter chunks create dramatic flaky layers.
- Add the starter. Pour in your cold sourdough discard and use a fork to toss everything together. Mix just until the dough starts to come together—it should still have visible butter pieces and look somewhat shaggy.
- Add water if needed. If the dough’s too dry to hold together when squeezed, add ice water one teaspoon at a time until it becomes cohesive without being wet.
- Shape and chill. Divide the dough in half and shape each portion into a flat disk. Wrap each disk tightly and refrigerate for at least 2 hours, preferably overnight. This rest time lets the flour fully hydrate, the gluten relax, and flavors meld. The dough keeps in the fridge for up to 4 days.
- Roll it out. Let the dough sit for 10 minutes after removing it from the fridge. Dust your counter lightly with flour and roll from the center outward, rotating a quarter-turn after each pass. Aim for about 1/8-inch thickness and a 12-inch round.
- Final chill. After fitting the dough into your pie plate and crimping the edges, chill the prepared shell for at least 15 minutes before baking. This solidifies the fats for maximum flakiness.
Notes
Try lamination for extra layers. After the initial chill, roll the dough into a rectangle, fold it into thirds like a letter, turn 90 degrees, and repeat. This optional step creates long streaks and pockets of butter that triple the layers.