
Last updated on January 28th, 2026
Here’s what nobody mentions enough: you don’t need a proofing box. Incredible sourdough has been around for generations, using nothing more than bowls, warmth, and patience. Your kitchen already contains everything required to proof dough successfully. The difference between mediocre and exceptional bread has far more to do with technique and observation than equipment.
Let’s cover practical proofing methods that work in real kitchens with regular appliances. You’ll learn how to create warm environments for faster rises, use cold proofing to build flavor and flexibility, and most importantly, how to read your dough instead of relying on rigid timing. Because once you understand what’s actually happening during fermentation, the specific tools become far less important than the knowledge you bring to each bake.
Jump to the Good Stuff
You don’t need specialized equipment to proof sourdough successfully.
Use your oven with the light on (75-80°F), a cooler with warm water, or your microwave with boiling water for a warm environment. For cold proofing, your regular refrigerator works beautifully at 38-40°F.
The real game-changers are monitoring dough temperature, adjusting timing based on ambient conditions, and learning to read fermentation signs rather than watching the clock.
Reference: Proofing Methods Compared
| Method | Temperature Range | Best For | Setup Time |
|---|---|---|---|
| Oven + Light | 75-80°F | Bulk fermentation, first rise | 2 minutes |
| Cooler + Warm Water | 75-85°F | Maintaining steady warmth | 5 minutes |
| Microwave + Boiling Water | 80-85°F | Quick warmth, small batches | 3 minutes |
| Heating Pad | 70-75°F | Overnight rises | 5 minutes |
| Refrigerator | 38-40°F | Final proof, flavor development | Instant |
Understanding What Your Dough Actually Needs
Sourdough starter and dough are living ecosystems. The wild yeast and bacteria work at different rates depending on temperature. Between 75-82°F, fermentation happens at a predictable, moderate pace. Go warmer and things speed up (sometimes too much). Colder temperatures slow everything down, which can actually improve flavor and structure when done intentionally.
Your kitchen probably sits between 68-72°F most of the year. This works fine for sourdough, but you’ll need longer proofing times. Understanding this relationship between temperature and time lets you adapt any recipe to your actual conditions.
The Oven Method: Simple and Reliable
Turn on your oven light and close the door. That’s it. Most oven lights generate enough warmth to bring the interior to 75-80°F, which sits right in the sweet spot for sourdough fermentation.
Place your dough in a covered bowl or container on the middle rack. Check the temperature with an oven thermometer first. Some oven lights run hot and might push past 85°F, which can stress your starter and create overly acidic, weak dough. If yours runs warm, crack the door slightly or use a different method.
This approach works brilliantly for bulk fermentation (the first rise after mixing). For the final proof after shaping, you can still use the oven, but you’ll need to remove your dough before preheating. Set a loud timer so you don’t forget and accidentally bake your banneton.
Timing adjustments: At 78°F, bulk fermentation typically takes 4-5 hours for most recipes. At room temperature (70°F), expect 6-8 hours. Your dough will tell you when it’s ready, but temperature gives you a reliable framework.
The Cooler Method: Steady and Spacious
A cooler creates a mini proof box using basic physics. Here’s the setup:
- Fill 2-3 mason jars or heat-safe containers with hot tap water (not boiling)
- Place them in opposite corners of your cooler
- Add your dough in its bowl or banneton
- Close the lid
- Replace the water every 2-3 hours if needed
This method maintains temperature better than the oven because coolers are designed to prevent heat exchange. You can fit multiple loaves or a large batch of dough. The humidity from the water also prevents surface drying, which can happen during long rises.
For consistent warmth, aim for water around 120°F. The cooler environment will settle to about 80-85°F. Test this with a thermometer before adding your dough the first time.
The Microwave Method: Compact and Controlled
Your microwave is a well-insulated box. Boil a cup of water, place it in the back corner, and add your covered dough. Close the door. The steam creates humidity and warmth.
This works best for smaller amounts of dough or your starter jar. You can’t fit a full-size mixing bowl in most microwaves, but it’s fantastic for final proofing in a banneton or for feeding your starter.
The temperature drops faster than in a cooler, so you may need to reheat the water every 90 minutes. Set reminders. Don’t microwave your dough by accident (yes, this happens).
Cold Proofing: Your Actual Secret Weapon
The refrigerator might be the most underrated sourdough tool. Cold proofing (retarding) the shaped dough overnight or up to 72 hours does several things:
- Develops deeper, more complex flavor
- Makes scoring easier (cold dough holds its shape)
- Fits baking into your schedule
- Reduces the risk of overproofing
Shape your dough, place it in a banneton or bowl, cover it well to prevent drying, and refrigerate. The dough continues fermenting, just much slower. You can bake straight from the fridge, which actually helps with oven spring.
Most bakers use cold proofing for the final rise, not bulk fermentation. The cold temperature after shaping gives you a flexible time window. Your dough is ready any time between 8-48 hours, letting you bake when convenient.
Reading Your Dough Instead of the Clock
Time ranges in recipes assume specific temperatures. Your conditions differ. Learn these fermentation signs:
During bulk fermentation:
- Dough increases 50-100% in volume
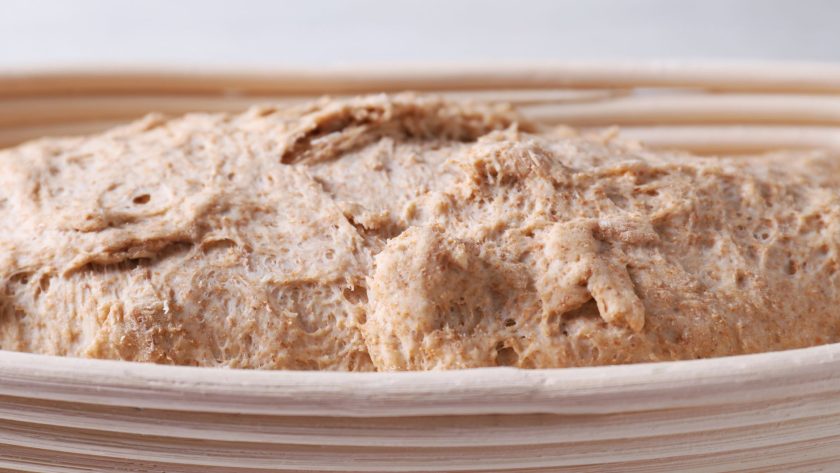
- Surface shows bubbles and dome shape
- Dough feels airy, not dense
- Gentle poke leaves a slow-filling indentation
During final proof:
- Dough looks puffy and slightly wobbly
- Poke test: indentation springs back slowly but not completely
- Dough holds its shape but feels light
Underproofed dough is dense and tight. Overproofed dough spreads out and feels soupy. The window between the two is wider than you think, especially with cold proofing.
Temperature Monitoring Tools You Already Own
You don’t need fancy equipment, but basic temperature awareness helps:
Instant-read thermometer ($10-15): Check dough temperature directly. Aim for 75-78°F during bulk fermentation. This tells you more than ambient temperature alone.
Oven thermometer ($5-8): Verify your oven-light method actually reaches the right range. Hang it from a rack.
Stick-on thermometer strips ($3-5): Stick one on your proofing container to monitor without opening and disturbing the dough.
Room temperature varies throughout the day. Your dough sitting on the counter at 8 AM experiences different conditions than at 3 PM. Checking actual temperature removes guesswork.
Seasonal Adjustments
Summer baking: Warm kitchens (75°F+) mean faster fermentation. You might not need any proofing assistance. Watch for overproofing. Consider using cooler water when mixing dough (65-70°F instead of 80°F).
Winter baking: Cold kitchens (65°F or below) slow everything down dramatically. The oven-light method becomes almost mandatory for reasonable timing. Or embrace long, slow fermentation and adjust your schedule.
Spring and fall: Variable temperatures require flexibility. Check your dough condition more than the clock. You might need warmth some days and not others.
Dealing with Common Proofing Problems
Dough dries out during long rises: Cover your bowl with a damp towel under the plastic wrap, or use a shower cap. In the oven or cooler, the enclosed environment helps, but a cover is still smart.
Inconsistent results: You’re probably experiencing temperature fluctuations. Start monitoring dough temperature directly. Consistency comes from consistent conditions.
Dough proofs too fast: Lower your water temperature when mixing, use less starter, or move to a cooler spot. Faster isn’t better if it sacrifices flavor development.
Dough barely rises: Check your starter vitality first. Then verify your proofing environment actually reaches 70°F minimum. Very cold conditions require much longer times or active warming.
Building Your Proofing Schedule
Here’s a realistic timeline using home methods:
Morning bake schedule (no proof box):
- Day 1, 6 PM: Feed starter
- Day 1, 10 PM: Mix dough
- Day 2, 6 AM: Stretch and fold (bulk fermentation in oven with light)
- Day 2, 10 AM: Shape and cold proof in refrigerator
- Day 3, 7 AM: Bake from cold
Weekend bake schedule:
- Saturday 9 AM: Feed starter
- Saturday 1 PM: Mix dough (bulk fermentation in cooler)
- Saturday 6 PM: Shape and proof at room temperature or in warmed oven
- Saturday 10 PM: Cold proof in refrigerator
- Sunday morning: Bake when ready
Both schedules work around life without specialized equipment. The cold proof gives you flexibility.
Maintaining the Right Humidity
Sourdough dough shouldn’t dry out during proofing. Dry surfaces create a skin that restricts rise and makes scoring difficult. In arid climates or heated homes, this happens fast.
Solutions:
- Always cover your dough (plastic wrap, shower cap, or damp towel)
- The cooler method naturally adds humidity from the water
- Lightly oil your container to prevent sticking
- For cold proofing, seal your banneton in a plastic bag
You want the dough surface to stay soft and slightly tacky, not crusty.
What About Heating Pads and Seedling Mats?
These work but require more attention. Seedling mats designed for plant propagation generate gentle, consistent warmth. Place your dough container on the mat with a folded towel as a buffer.
Problems: They heat from below only, which can create uneven fermentation. The bottom warms faster than the top. Some run too hot (90°F+) without a thermostat.
If you use this method, get a mat with temperature control and check your dough temperature frequently. Rotate the container occasionally for even warmth.
Making Peace with Imperfection
Professional bakeries use proof boxes because they bake hundreds of loaves daily and need identical results. You’re making 1-2 loaves at a time in changing conditions. Your bread will vary batch to batch, and that’s fine.
Some of the best sourdough comes from home bakers working with simple setups. You’ll develop an intuition for your dough that transcends any single method. Pay attention, take notes on what works, and adjust.
The goal isn’t perfect temperature control. The goal is understanding how temperature affects your dough so you can work with what you have. A $200 proof box won’t make you a better baker. Practice and observation will.
Equipment-Free Proofing
Your oven light, a cooler, or your refrigerator provides everything you need. The learning curve isn’t about acquiring gear. It’s about understanding fermentation and how your specific environment affects it.
Start with one method that fits your kitchen and schedule. Master that before experimenting. Keep notes on timing, temperature, and results. After 5-10 bakes, you’ll develop instincts that make proofing feel natural, proof box or not.

![[video] from the seed to the peasant bakery with nicolas supiot](https://www.mydailysourdoughbread.com/wp-content/uploads/2022/11/image-16-120x120.jpeg "[Video – Part 2] Entering Into Peasant Bakery 6")
