
Last updated on January 28th, 2026
Cold weather changes everything about sourdough starter maintenance. Your feeding schedule that worked perfectly in September suddenly produces sluggish results in January. The surface develops a crusty film overnight. Rise times stretch from predictable hours into uncertain waiting periods.
Winter creates a specific set of problems: plummeting temperatures that slow fermentation to a crawl, heating systems that suck moisture from the air, and temperature swings between your warm kitchen during dinner prep and the chilly space at 3 AM. Each of these factors stresses the wild yeast and bacteria that make your starter work.
The good news? Winter starter care isn’t complicated once you understand what’s happening and how to respond. Most solutions involve simple adjustments to location, water temperature, and feeding timing rather than elaborate techniques or expensive equipment.
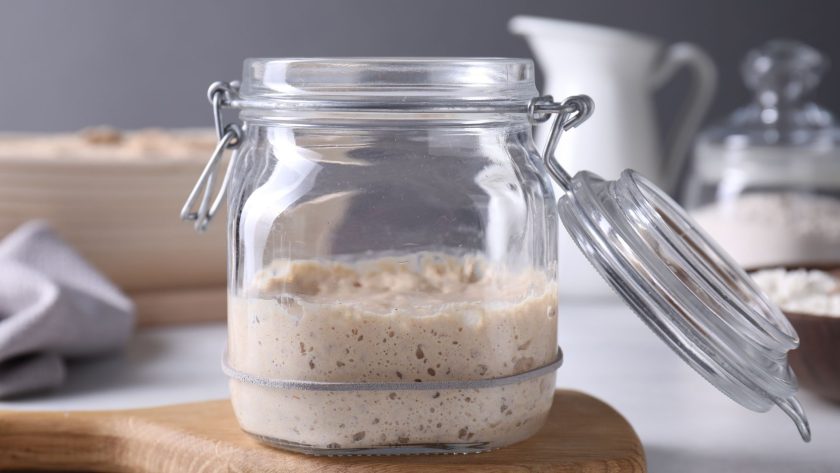
Quick Overview: Winter Sourdough Starter Care
Temperature Management
- Maintain starter between 70-75°F for regular feeding
- Use warm water (80-85°F) for winter feedings
- Find warm spots: top of refrigerator, near (not on) heating vents, inside oven with light on
Feeding Adjustments
- Expect slower rise times in cold conditions
- Reduce feeding frequency if room temperature drops below 65°F
- Increase flour-to-water ratio slightly to counteract dry indoor air
Storage Solutions
- Refrigerate if room temperature falls below 60°F consistently
- Keep starter away from drafty windows and exterior walls
- Use a proofing box or seedling heat mat for consistent warmth
Hydration Monitoring
- Watch for crusty tops indicating low humidity
- Stir in small amounts of water if starter becomes too thick
- Cover container with plastic wrap instead of breathable cloth
Understanding Winter’s Impact on Sourdough Starters
Sourdough starters are living ecosystems containing wild yeast and lactic acid bacteria. These microorganisms are highly sensitive to environmental conditions, particularly temperature and humidity. Winter affects both in ways that directly impact fermentation.
Cold air slows metabolic activity in yeast and bacteria. A starter that doubles in 4-6 hours at 75°F might take 8-12 hours at 65°F. Below 60°F, activity becomes so sluggish that the starter may appear dormant. This isn’t necessarily harmful, but it requires adjusting your maintenance routine.
Indoor heating creates another problem: low humidity. Most heating systems dry out indoor air significantly, which can cause the surface of your starter to form a crust or become overly stiff. This protective layer can inhibit proper fermentation and make it difficult to judge your starter’s readiness.
Temperature fluctuations present the third challenge. Your kitchen might be warm during cooking hours but drop significantly overnight. These swings stress the microbial community and create inconsistent feeding patterns.
Finding the Right Winter Location
Your starter’s location matters more in winter than any other season. The goal is finding a spot with stable temperature between 70-75°F and protection from drafts.
Top of the Refrigerator
The area above your refrigerator often maintains consistent warmth from the appliance’s compressor. This spot typically stays 3-5 degrees warmer than ambient room temperature. Place a thermometer here for a day to verify the temperature stays within range. If it’s too warm (above 80°F), your starter will ferment too quickly and develop overly acidic flavors.
Oven with Light On
An unlit oven with just the interior light bulb turned on creates a stable microclimate. Most oven lights generate enough heat to maintain 75-80°F inside. This method works well for overnight rises or when you’re away from home. Always label your starter clearly and develop a habit of checking the oven before preheating. Many bakers have accidentally destroyed starters this way.
Microwave as Insulated Box
Your microwave makes an excellent insulated chamber even when not in use. Place your starter inside with a mug of hot water (replaced every few hours) to create consistent warmth. This method requires more attention but works well if you’re home during the day.
Proofing Box or Heating Mat
For serious winter baking, consider investing in equipment designed for consistent warmth. Bread proofing boxes maintain precise temperatures, while seedling heat mats (designed for starting plants) provide gentle bottom heat. Heat mats cost $15-30 and work well under a cardboard box or cooler containing your starter.
Adjusting Your Feeding Schedule
Winter feeding schedules need flexibility based on your starter’s actual activity rather than clock time. The standard twice-daily feeding rhythm might not match your starter’s needs when temperatures drop.
Reading Visual Cues
Learn to judge readiness by appearance rather than time elapsed. A starter ready for feeding shows these signs:
- Doubled or tripled in volume from last feeding
- Bubbly surface with dome shape at peak
- Pleasant yeasty or mildly tangy smell
- Falls when jar is tapped gently
In winter, these signs might take 8-12 hours to appear instead of the typical 4-6. Feed based on these visual cues rather than forcing a schedule.
Temperature-Based Feeding Frequency
| Room Temperature | Feeding Frequency | Expected Rise Time |
|---|---|---|
| 75-78°F | Every 12 hours | 4-6 hours |
| 70-74°F | Every 12-18 hours | 6-8 hours |
| 65-69°F | Every 24 hours | 8-12 hours |
| 60-64°F | Every 24-48 hours | 12-16 hours |
| Below 60°F | Refrigerate | N/A |
Ratio Adjustments
Winter conditions may call for modifying your feeding ratios. A typical 1:1:1 ratio (starter:flour:water) works well in moderate conditions, but winter might require changes.
For cold conditions, try a 1:2:2 ratio. The increased food supply sustains the culture through longer, slower fermentation. This prevents the starter from becoming overly acidic while waiting to peak.
For very dry indoor conditions, consider a 1:1:1.1 ratio, adding slightly more water than usual. The extra hydration compensates for moisture loss through evaporation.
Water Temperature Matters More in Winter
Water temperature directly impacts fermentation speed. In summer, you might use cool water to prevent overheating. Winter requires the opposite approach.
Optimal Winter Water Temperature
Aim for 80-85°F water when feeding your starter. This warmth gives the microorganisms a boost without shocking them. Water this temperature feels slightly warm to the touch but not hot.
Mix your flour and water first, then add the starter. This technique ensures the temperature moderates before incorporating the culture. Very hot or very cold water can stress or kill beneficial bacteria.
Testing and Adjusting
Use an instant-read thermometer to check water temperature until you develop a feel for it. Tap water in winter often runs quite cold (40-50°F in some regions), which can chill your starter significantly if used directly.
If you forget to warm the water, don’t discard the feeding. The starter will still ferment, just more slowly. Place it in one of your warm spots and give it extra time.
Managing Hydration in Dry Winter Air
Heating systems can reduce indoor humidity to 15-20%, compared to comfortable levels of 30-50%. This affects starters in ways you might not immediately notice.
Preventing Surface Crusting
A dried-out surface prevents proper gas exchange and can harbor mold spores. Several strategies prevent this:
- Switch from a breathable cloth cover to plastic wrap or a loose lid. This traps moisture while still allowing some airflow.
- Smooth the top of your starter after feeding and spray lightly with water before covering.
- Store the starter jar inside a larger container with a damp towel nearby (not touching the starter jar).
Recognizing Dehydration
A dehydrated starter becomes stiff and difficult to stir, develops a thick skin on top, and may separate with a layer of liquid (hooch) on top more quickly than normal. These signs indicate you need to increase hydration.
Add water in small increments—1 teaspoon at a time for a 100g starter—stirring thoroughly between additions. You want pancake batter consistency: thick enough to hold bubbles but thin enough to pour slowly.
Refrigeration as a Winter Strategy
If your home consistently stays below 65°F in winter, refrigeration might be your best option. This seems counterintuitive (why make it colder?), but controlled cold is better than unpredictable cold.
Proper Refrigeration Method
Feed your starter as usual, let it sit at room temperature for 30-60 minutes to start fermentation, then refrigerate. This brief warm period activates the culture before cold storage slows it down.
In the refrigerator, your starter will stay viable for 1-2 weeks without feeding. The cold (typically 35-40°F) slows metabolism dramatically without killing the microorganisms.
Reviving from Refrigeration
Remove your starter from the refrigerator, discard all but 50g, and feed with 50g flour and 50g room-temperature water. Let it sit at room temperature until it doubles, which might take 12-24 hours for the first feeding after cold storage.
After this initial revival, resume your regular feeding schedule. Most starters return to normal activity within 2-3 feedings.
Troubleshooting Winter Starter Problems
Starter Won’t Rise
Check the temperature first. Below 65°F, rise times extend significantly or stop entirely. Move to a warmer location or use one of the warming methods described above. Give it 24 hours in warmth before deciding it’s truly inactive.
If temperature isn’t the issue, your starter may need refreshing. Do a series of daily feedings using warm water and placing in your warmest spot. Most sluggish starters revive within 3-5 days of consistent care.
Excessive Hooch Formation
Hooch (the dark liquid that forms on top) indicates hunger. In winter, this might form because your starter is too cold to consume its food efficiently or because you’re feeding too infrequently for the temperature.
Pour off the hooch, feed the starter with warm water, and increase your feeding frequency slightly. If hooch returns within 12 hours, move the starter to a warmer location.
Mold Development
Mold appears as fuzzy spots in colors other than the cream/beige of healthy starter—typically green, pink, or black. This usually results from contamination combined with cold conditions that prevent the starter’s acid from protecting itself.
If you see mold, discard the entire starter. Don’t try to save it. The mold has sent filaments throughout the culture even if you can only see surface growth. Begin a new starter or request some from a friend.
Separation and Watery Consistency
A starter that separates into liquid and solid layers has either been neglected too long or has hydration imbalances from evaporation. Stir it back together, discard most of it, and feed with a slightly thicker ratio (equal parts flour and water by weight, not volume).
Maintaining Starter Health Long-Term
Think of winter maintenance as a marathon, not a sprint. Consistency matters more than perfection.
Keep Notes
Track your feeding schedule, room temperature, and rise times for a few weeks. Patterns will emerge showing when your starter performs best. These notes become invaluable for troubleshooting and planning baking sessions.
Smell Check
A healthy starter smells pleasantly yeasty with notes of yogurt or mild vinegar. Sharp, acetone-like smells indicate too much acidity from underfeeding or cold conditions. Rotten or foul odors suggest contamination.
Backup Your Starter
Maintain a small amount of dried starter as insurance. Spread a thin layer of active starter on parchment paper, let it dry completely at room temperature (1-2 days), then crumble and store in an airtight container. This dried starter remains viable for months or years and can revive your culture if something goes wrong.
Baking Bread in Winter Conditions
Winter affects not just starter maintenance but bread-making itself. Cold kitchens slow bulk fermentation and final proofing.
Bulk Fermentation Timing
Expect bulk fermentation to take 6-8 hours in a 65°F kitchen, compared to 3-4 hours at 75°F. Use the same warm spots you identified for starter storage.
The dough should increase by 50-75% in volume and show visible bubbles through the container walls. Don’t rush this stage or you’ll end up with dense bread.
Final Proofing Strategies
For overnight cold proofing in the refrigerator, you can proceed normally. For same-day baking, create a warm environment for the final rise. Place shaped dough in a turned-off oven with boiling water in a pan underneath. Replace the water if it cools before the dough is ready.
The poke test works regardless of temperature: press gently with a floured finger, and the dough should spring back slowly, leaving a slight indentation.
When to Take a Winter Break
If maintaining your starter feels like a burden during winter, refrigeration offers a solution for occasional bakers. You can keep a healthy starter in the refrigerator for weeks with minimal attention, pulling it out and refreshing it only when you want to bake.
This approach reduces stress and still gives you access to fresh sourdough when desired. Feed it once before returning to the refrigerator after baking to ensure it has food for storage.
Some bakers dry their entire starter for winter and restart it in spring. While this works, you’ll lose some of the unique flavor profile developed in your specific culture. The microbial balance shifts slightly each time you dry and rehydrate.
Building Cold-Weather Resilience
Starters adapt to their environment over time. A culture maintained through multiple winters becomes more resilient to temperature fluctuations and develops cold-tolerant strains of yeast and bacteria.
This adaptation happens gradually, over months or years. Don’t expect immediate resilience, but trust that consistent care through challenging conditions strengthens your starter’s robustness.
Winter sourdough maintenance requires observation and adjustment rather than rigid adherence to schedules. Pay attention to your starter’s signals, respond to its actual needs, and accept that winter rhythms differ from summer ones. Your starter will reward this attentiveness with reliable performance even when temperatures drop.
Related:
Related Articles:
 10 Simple Sourdough Dinner Ideas: Beyond the Basic Loaf
 Delicious Sourdough Rolls From Starter
![Easy recipes using sourdough starter [with step by step guide]](https://www.mydailysourdoughbread.com/wp-content/uploads/2025/05/10-Recipes-Using-Sourdough-Starter-Beyond-Basic-Bread-120x120.jpg "10 Recipes Using Sourdough Starter (Beyond Basic Bread!) 4") 10 Recipes Using Sourdough Starter (Beyond Basic Bread!)
10 Recipes Using Sourdough Starter (Beyond Basic Bread!)
 Sourdough Cinnamon Coffee Cake Recipe: 9 Steps to Irresistible Bakery-Style Results
 Strawberry Cinnamon Rolls Recipe: A Sweet Twist on a Classic Favorite
