
Last updated on July 13th, 2026
Good sourdough starter care is the foundation of every great loaf — and keeping one alive is a lot simpler than most people think. This covers everything you need to know: daily feeding routines, the right flour to use, how to read your starter’s signals, and what to do when things go sideways. Whether you’re just getting started or working with an established culture, you’ll find straightforward answers here. Stick to the basics, stay consistent, and your starter will take care of the rest.
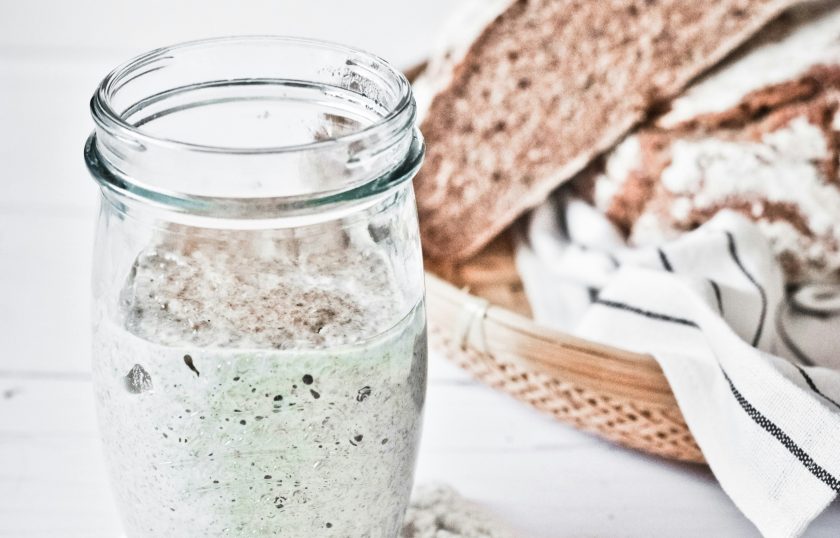
Daily Sourdough Starter Care Routine
Morning Feeding
First thing in the morning, discard all but 20–50 grams of your starter, then feed it with equal parts water and flour by weight. A 50/50 blend of bread flour and whole wheat flour works great — the bread flour provides structure while the whole wheat contributes extra nutrients to keep fermentation lively. Stir thoroughly until no dry flour remains, cover loosely, and let it ferment at room temperature.
Pro tip: Use a fresh, clean jar at every feeding to prevent residue buildup from skewing your smell and texture readings.
Evening Feeding
If you’re baking daily, an evening feed keeps your starter consistently active. Once it’s peaked and started to fall, discard and feed again at the same ratio. You’ll wake up to a bubbly culture that’s ready to work.
Pro tip: If you only bake a few times a week, one feeding per day is enough — no need to feed twice.
Countertop Maintenance
Room temperature starters ferment faster and need feeding once or twice daily. After each feeding, mark the jar with a rubber band or tape at the starter’s current level — this lets you track exactly how much it rises without any guesswork.
Pro tip: Lower shelves in your kitchen tend to run cooler, which can be useful during warmer months to slow fermentation slightly.
Consistency Is Your Secret Weapon
Feed your starter at the same time every day. Inconsistent timing stresses the culture and leads to off smells or sluggish activity. Lock in a routine and stick to it.
Pro tip: Set a phone reminder for feeding times until it becomes second nature — your starter will reward the consistency.
Related: How Soon After Feeding Sourdough Starter Can I Use It?
Peak Tracking: Knowing When It’s Ready
Your starter is at peak activity when it’s at its highest point and just beginning to dome. This is the ideal moment to bake. Depending on the kitchen temperature, peak can happen anywhere from 4 to 12 hours after feeding.
Pro tip: Track peak timing over several consecutive days to learn your starter’s personal rhythm — consistency here is the clearest signal of a healthy culture.
Sourdough Starter Feeding Ratios Explained
Feeding ratios describe the relationship between your existing starter (the inoculation) and the fresh flour and water you add. A 1:1:1 ratio means 1 part starter, 1 part flour, 1 part water. The ratio you choose directly affects how your starter behaves — its speed, strength, and acidity.
1:1:1 is the everyday ratio for daily bakers. Fermentation moves quickly, with peak activity hitting in 4–6 hours at room temperature. It produces a more acidic starter over time, since the culture isn’t heavily diluted between feedings.
1:2:2 slows fermentation slightly and gives the culture more food to work through, which helps moderate acidity. Most home bakers find this ratio strikes the best balance — active enough to peak reliably, mild enough to stay versatile.
1:5:5 dilutes the starter significantly and pushes peak timing out — useful when you need to shift peak to a more convenient window or reduce sourness in the final loaf. This ratio can be difficult to manage in cold kitchens where fermentation is already slow.
Your inoculation percentage directly affects starter strength and acidity. Baking daily? Use 1:1:1 or 1:2:2. Baking two or three times a week? A 1:2:2 or 1:3:3 gives the starter more food to sustain itself between sessions.
Best Flour Choices for a Stronger Starter
Flour is more than just food for your starter — it’s the entire ecosystem. Different flours carry different levels of wild yeast, bacteria, and nutrients, which directly shape how active, flavorful, and reliable your starter becomes.
- Bread flour (12–13% protein) creates a strong gluten network and gives your starter reliable structure. It ferments consistently, peaks predictably, and produces a clean, mildly tangy flavor. Unbleached bread flour is the best foundation for any starter.
- Whole wheat flour is loaded with wild yeast, bacteria, and minerals like phosphorus and zinc that accelerate fermentation. Adding just 10–20% whole wheat to your bread flour blend noticeably increases microbial activity and produces a more complex, earthy flavor.
- Rye flour is exceptionally rich in fermentable sugars and nutrients. Even a tablespoon mixed into a regular feeding can dramatically increase activity in a sluggish starter. It’s especially useful during cold months when fermentation naturally slows.
- Flour blends give you the best of multiple flours. A common go-to is 80% bread flour and 20% whole wheat — you get structure from the bread flour and microbial richness from the whole wheat. Some bakers rotate rye in periodically for an extra fermentation boost. Experimenting with blends is one of the most effective ways to fine-tune your starter’s performance.
Temperature Management and Seasonal Adjustments
Temperature controls the speed of fermentation more than almost any other variable. The same starter that peaks in 6 hours in summer may need 10–12 hours in winter. Learning to adjust for your kitchen’s temperature keeps your starter performing consistently year-round.
The ideal range for most starters is 74–78°F. Outside that range, adjustments are necessary.
Summer (above 78°F):
- Use cooler or refrigerator-temperature water when feeding to slow fermentation
- Store the starter on lower shelves, which tend to run cooler
- Shift to a higher feeding ratio, like 1:3:3, to extend the time before peak
- Check the starter more frequently — peak can arrive hours earlier than expected
Winter (below 68°F):
- Place the starter on top of the refrigerator, which is typically a few degrees warmer than the surrounding room
- Use a turned-off oven with just the light on to create a 75–80°F environment
- Use warm water (around 80°F) when feeding to jumpstart activity
- A seedling heat mat set on low provides steady, gentle warmth
Adjusting your approach by season — rather than expecting your starter to behave the same year-round — makes a significant difference in consistency and bake results.
Weekly Refrigerator Maintenance Schedule
Refrigerating your starter slows yeast and bacterial activity dramatically, allowing you to go days or even weeks between feedings without harming the culture. For most home bakers who bake once or twice a week, a weekly fridge feeding is all that’s needed.
Pull the starter out, let it warm up for 30–60 minutes, discard most of it, feed with your usual ratio, allow it to sit at room temperature until you see some bubble activity — a couple of hours is fine — then return it to the fridge. It doesn’t need to fully peak before going back in.
If life gets busy, feedings can stretch to every two weeks. The starter will survive, though it may develop a gray liquid layer (hooch) on top and smell more pungent than usual. Pour off the hooch, feed right away, and plan on two or three room-temperature feedings to bring it fully back to strength.
Use a clean glass jar with a loose-fitting lid — tight lids trap gas and cause pressure buildup. Straight-sided jars make it easy to see rise levels at a glance.
Before baking, give your refrigerated starter at least two back-to-back feedings at room temperature to fully reactivate it. It’s ready to bake when it doubles reliably and smells pleasantly tangy.
Sourdough Starter Feeding Schedule Cheat Sheet
| Baker Type | Storage | Feeding Frequency | Recommended Ratio | Notes |
| Daily baker | Countertop | Once or twice daily | 1:1:1 or 1:2:2 | Feed at consistent times; track peak timing |
| Weekend baker | Fridge (weekdays) | Thursday/Friday evening + twice Saturday morning | 1:2:2 | Two room-temp feeds before baking Saturday afternoon |
| Occasional baker | Fridge | Once weekly | 1:2:2 or 1:3:3 | Feed, let sit 1–2 hours, return to fridge |
| Vacation (up to 2 weeks) | Fridge | Before leaving only | 1:2:1 (stiffer) | Less water slows fermentation; no feeding needed while away |
| Long hiatus (1+ month) | Freezer or dried | Before storing only | 1:2:2 | Freeze or dry after peak; revive with 2–3 feedings on return |
Signs Your Starter Is Healthy
A healthy, active starter shows several clear indicators that it’s ready to leaven bread. Here’s what to look for:
- Reliable doubling — Consistently doubles in size within 4–12 hours of feeding at room temperature, depending on ratio and kitchen temperature
- Active bubble structure — Bubbles of varying sizes visible throughout the starter, not just at the surface; an open, webby texture indicates strong fermentation
- Pleasant smell — Tangy and mildly sour, similar to yogurt, mild vinegar, or a light beer; should smell alive without being sharp or harsh
- Consistent peak timing — Peaks at roughly the same time each day under the same conditions, indicating a well-established, stable culture
- Domed top at peak — Surface domes slightly before falling; a flat or concave top means it’s past peak
- Float test (supplementary) — A small spoonful dropped in water floats when the starter is sufficiently gassy; useful as a quick check but not definitive on its own
Signs Your Starter Needs Attention
- Slow or absent rise — If your starter isn’t doubling after multiple consistent feedings, the culture is struggling. Low kitchen temperature, over-refined flour, or extended neglect are the most common causes.
- Weak or surface-only bubbles — Bubbles appearing only at the surface indicate weak fermentation. This usually pairs with a slow rise and responds well to warmer conditions and consistent feeding.
- Excess acidity — A sharp, harsh smell means bacteria have outpaced the yeast, tipping the culture toward over-acidification. Increase feeding frequency or use a larger ratio to dilute the acid.
- Hooch (gray liquid on top) — A watery, grayish layer pooling at the surface signals a hungry starter. Pour it off or stir it in, then feed immediately. Regular hooch formation means your feeding schedule needs adjustment.
- Liquid pooling at the bottom — More severe than hooch, this indicates a very hungry or neglected starter. Discard most of it and feed with fresh flour and water right away.
Why Your Starter Smells Like Acetone, Alcohol, or Vinegar
Your starter’s smell reflects its internal chemistry. Each odor maps to a specific stage of fermentation or imbalance.
Acetone (nail polish remover) indicates starvation. When yeast exhausts its available sugars, it produces ketone compounds. Feed immediately and increase feeding frequency going forward. If this smell appears every time you open the jar, your ratio or schedule isn’t providing enough food.
Alcohol (beer-like) means the starter fermented past peak, and the yeast produced excess ethanol. Discard and feed fresh. Prevent it by catching the peak earlier or using a larger feeding ratio to extend the fermentation window.
Sharp vinegar points to acetic acid buildup — bacteria are producing more acid than the yeast can balance. This commonly happens with infrequent feedings or in cold environments where yeast activity slows, but bacteria continue producing acid. Two to three consecutive room-temperature feedings at a slightly warmer location typically restore balance within a day or two.
Why Your Starter Is Not Rising
A starter that won’t rise is almost always fixable. Here are the most likely reasons:
- Low temperature — The most common cause. Below 68°F, fermentation slows dramatically. Move the starter somewhere warmer before drawing any other conclusions.
- Weak or bleached flour — Bleached all-purpose flour, low-protein flour, or old flour doesn’t provide adequate nutrition. Switch to unbleached bread flour, or add a small amount of whole wheat or rye.
- Underfeeding — An acidic, exhausted culture can’t rise effectively. Increase feeding frequency and ensure you’re discarding enough before each feed.
- Overfeeding — Too much fresh flour dilutes the yeast population too far and stalls activity just as much as underfeeding.
- Chlorinated tap water — Chlorine can inhibit yeast. Switch to filtered water, or leave tap water in an open container overnight before using.
- Immature starter — Starters under 10–14 days old may not have established a stable yeast population yet. Continue feeding consistently — it takes time.
How to Strengthen a Weak Starter
The most effective method for strengthening a weak starter is peak-to-peak feeding: feed the starter, wait until it peaks, then feed again immediately at that peak before it falls. Repeating this two or three times in a row rapidly rebuilds the yeast population and restores predictable activity.
For a sluggish culture, adding a small amount of rye flour to one or two feedings can spark noticeably increased activity within 24 hours. Rye is dense with fermentable sugars and microbial nutrients — even a teaspoon or two mixed into your regular flour blend makes a difference. You don’t need to switch entirely to rye; use it as a targeted boost.
Warmth accelerates recovery. A consistent environment of 74–78°F — an oven with just the light on works well — speeds up yeast multiplication during the recovery period.
If the starter consistently smells too sour or acidic, switch temporarily to a larger ratio such as 1:3:3 or 1:5:5 for several consecutive feedings. This dilutes excess acid and gives fresh yeast more food to work through. Once activity picks back up and the smell mellows, return to your usual ratio.
Mold, Kahm Yeast, and Contamination Guide
Not all unusual growth in a starter is dangerous, but knowing the difference between mold and harmless surface growth is essential.
Mold appears as fuzzy, raised growth — typically pink, orange, red, black, or green — with a powdery or textured surface and a musty smell clearly distinct from normal fermentation. If you see fuzzy, colored growth, discard the entire starter, thoroughly sanitize the jar, and start fresh. Contamination runs deeper than the visible surface, and the starter cannot be saved.
Kahm yeast is a flat, smooth, white or cream-colored film on the surface. It’s not dangerous but signals an imbalance — often caused by excess warmth, inconsistent feeding, or too much residual sugar. Scrape it off, feed the starter, and adjust conditions. It typically won’t return once the culture is back in balance.
Prevention is straightforward: use a clean jar at every feeding, keep utensils washed, avoid fully airtight lids that trap moisture, and feed regularly enough that the starter’s natural acidity stays high. That acidity is the culture’s built-in defense against unwanted growth. Most contamination issues trace back to infrequent feeding or poor jar hygiene.
Sourdough Discard Management
Discard is the portion removed from your starter before each feeding. It’s not active enough to leaven bread on its own, but it’s a flavorful fermented ingredient — not waste.
- Store discard in a separate jar in the refrigerator; it keeps well for up to two weeks and gets more sour over time as bacteria continue producing acid, which works well for certain recipes
- Freeze discard in ice cube trays or small containers, transfer to a zip-lock bag, and thaw in the refrigerator overnight before using — it retains full flavor and performs well in recipes
- Use discard in baked goods that don’t require starter leavening: pancakes, waffles, crackers, pizza dough, banana bread, muffins, and pasta all benefit from its natural tang
- Keep a smaller starter (20–30 grams) and feed proportionally to reduce the discard amount per feeding — you still maintain a healthy culture with minimal waste
- Older, more acidic discard works particularly well in recipes where a pronounced tang is desirable
Preparing a Starter for Bake Day
Timing your starter to peak at the right moment on bake day directly impacts how well your dough ferments and rises. Mix your dough when the starter is at or just past peak — lively, active, and still climbing or freshly domed.
- The evening before baking, feed your starter at a larger ratio (1:3:3 or 1:5:5). This extends the fermentation window so peak arrives closer to when you need it — typically 8–12 hours later in a moderate kitchen.
- Adjust based on your kitchen temperature and your starter’s known peak timing. A warmer kitchen shortens the window; a cooler one extends it.
- To bake with a levain, mix a small separate portion of your starter with fresh flour and water — typically 20–30% of the recipe’s total flour weight — 4–8 hours before mixing the dough.
- Mark the levain jar and let it ferment until it peaks. Use it in your recipe at peak, then return your untouched main starter to its regular feeding schedule.
- Your starter (or levain) is ready to use when it has doubled, domes at the top, and smells clean and tangy — not harsh or alcoholic.
Long-Term Storage, Travel, and Vacation Care
For absences longer than a week or two, there are three reliable options for keeping your starter alive: refrigeration, freezing, and drying.
Refrigeration works well for two to four weeks. Before leaving, feed the starter with a stiffer hydration (less water than usual) to slow fermentation, then store it in the coldest part of the fridge. Freezing puts the starter in suspended animation for several months. Feed it, let it peak, then transfer a portion to a freezer-safe container. Thaw overnight in the refrigerator and give two or three room-temperature feedings before expecting full activity. Drying is the most indefinite option. Spread a thin layer of fed starter onto parchment paper, let it air dry completely (24–48 hours), then break it into flakes and store it in an airtight container in a cool, dry place.
- Use stiffer hydration before refrigerating to extend the storage window
- Store frozen starter in small, pre-portioned amounts so you only thaw what you need
- Label dried starter flakes with the date for easy tracking
- Allow two to three room-temperature feedings to fully reactivate any stored starter before baking
Reviving an Old or Neglected Starter
- Assess before you begin. If there’s any fuzzy, colored mold (pink, orange, green, or black), discard everything and start fresh — it can’t be saved. If the starter looks gray, separated, or smells like alcohol or sharp vinegar, it’s almost certainly worth reviving.
- Day 1 — Wake-up feed. Discard all but 20 grams. Feed at 1:2:2 with lukewarm water and a blend of bread flour and whole wheat. Place in a warm spot (74–78°F) and observe for any activity over the next 12–24 hours. Don’t expect a significant rise on day one.
- Day 2 — Build on any activity. If you see any bubbles, discard and feed again at 1:2:2. If there’s still zero activity after 24 hours, add a small amount of rye flour to this feeding to boost microbial nutrients.
- Days 3–5 — The feeding ladder. Continue feeding once or twice daily. Bubbles should appear faster with each feeding, followed by a modest rise and early doming.
- Confirm readiness. The starter is fully recovered when it doubles reliably within 6–8 hours at room temperature and smells pleasantly tangy rather than harsh or alcoholic. Some heavily neglected starters can take up to two weeks to fully recover — consistent feeding matters more than speed.
Your Starter, Your Rules
Sourdough starter care comes down to three things: consistency, attention, and a little patience. Feed on a regular schedule, use good unbleached bread flour, and learn when your starter peaks. Nail those basics and everything else falls into place.
Struggling starter? Adjust the temperature, tweak your feeding ratio, or try a few days of peak-to-peak feeding. Almost every problem is fixable.
Even a neglected starter can bounce back — mold is the only true dealbreaker. And don’t toss that discard. Pancakes, crackers, pizza dough — it makes everything better. The more you observe your starter, the more natural it all feels.
FAQs – Sourdough Starter Care
How should I maintain my sourdough starter?
Feed your starter daily at room temperature if you bake regularly, or weekly if you store it in the fridge. Each feeding, discard all but 20–50 grams, then add equal parts flour and water by weight. Keep feedings consistent, use unbleached bread flour, and track when your starter peaks to build a reliable routine.
What is the biggest mistake you can make with your sourdough starter?
Inconsistent feeding is the most damaging thing you can do. Skipping feedings — or feeding at random intervals — stresses the culture, causes acid buildup, and weakens yeast activity over time. A neglected starter develops off smells, stops rising reliably, and produces dense, poorly fermented bread. A simple daily schedule prevents most starter problems before they start.
What is the 1:3:3 rule for sourdough starter?
The 1:3:3 feeding ratio means combining 1 part existing starter with 3 parts flour and 3 parts water by weight. This dilutes the culture more than a standard 1:1:1 feed, slowing fermentation and reducing acidity. It’s particularly useful for bakers who need a longer peak window, want a milder flavor, or are correcting an overly sour starter.
Related Articles:
 50+ Creative Sourdough Starter Name Ideas
![Easy recipes using sourdough starter [with step by step guide]](https://www.mydailysourdoughbread.com/wp-content/uploads/2025/05/10-Recipes-Using-Sourdough-Starter-Beyond-Basic-Bread-120x120.jpg "10 Recipes Using Sourdough Starter (Beyond Basic Bread!) 3") 10 Recipes Using Sourdough Starter (Beyond Basic Bread!)
10 Recipes Using Sourdough Starter (Beyond Basic Bread!)
 Sourdough Cinnamon Coffee Cake Recipe: 9 Steps to Irresistible Bakery-Style Results
 Strawberry Cinnamon Rolls Recipe: A Sweet Twist on a Classic Favorite
 Sourdough Cinnamon Banana Bread: Easy, Moist & Delicious Recipe
