
Last updated on July 28th, 2026
Cheddar sourdough is way more achievable than it looks. The secret is understanding why each step matters, from nailing your fermentation timing to getting that cheese incorporated just right. Get those details down, and you’re looking at a crackling, golden loaf with bold cheddar flavor woven through every single bite. This covers everything you need — ingredients, equipment, dough prep, shaping, baking, and storage — with clear, practical steps that deliver real results.

What Is Cheddar Sourdough?
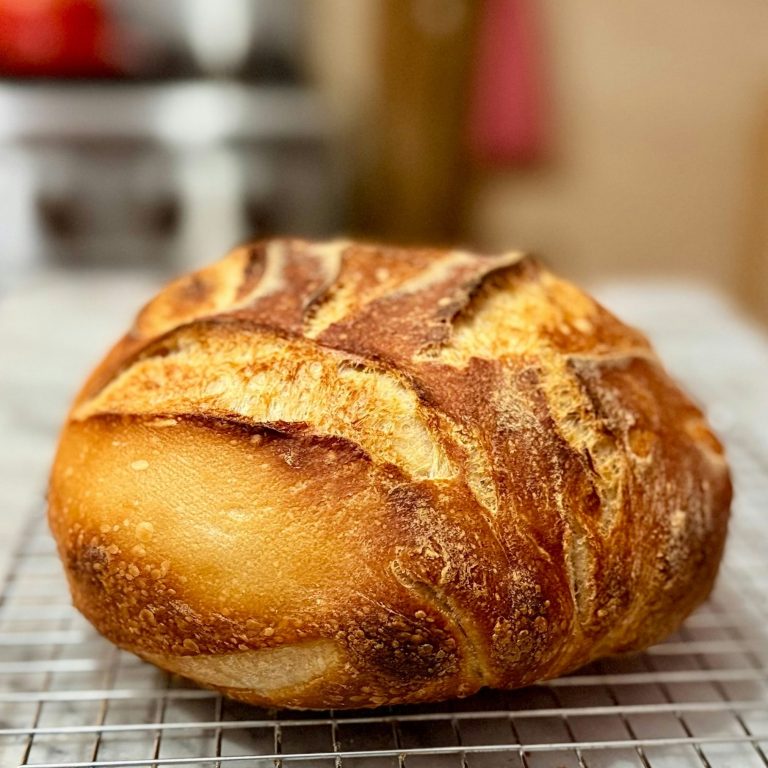
Cheddar sourdough is a naturally leavened artisan bread where wild yeast and lactic acid bacteria do the heavy lifting — no commercial yeast needed. What sets it apart from a standard sourdough loaf is the addition of sharp cheddar cheese woven through the crumb, creating a flavor that’s tangy, savory, and deeply satisfying. The fermentation process actually amplifies the cheese flavor, while the crust develops those irresistible caramelized cheese bits on the outside. It’s rustic, bold, and completely homemade.
Ingredients
- 450g bread flour
- 50g whole wheat flour
- 375g filtered water (75% hydration)
- 100g active sourdough starter
- 10g non-iodized salt
- 200g freshly shredded sharp cheddar cheese
- 1 tbsp olive oil (optional, for a softer crumb)
Equipment Required
You don’t need a professional setup, but these tools make a real difference. A Dutch oven is essential — it traps steam and drives that signature oven spring. A banneton basket supports your dough during the cold proof and leaves those beautiful crust patterns. A digital scale keeps your hydration level and baker’s percentages accurate every time. Finally, a bread lame lets you score the dough cleanly, controlling where it opens up in the oven.
Preparing the Dough
- Autolyse first. Combine your bread flour, whole wheat flour, and water in a large bowl and mix until no dry flour remains. Cover it and walk away for 30–60 minutes. This rest period — called autolyse — lets the flour fully hydrate and kickstarts gluten development on its own, no kneading required. Think of it as giving your dough a head start before the real work begins. You’ll notice the texture transforms from shaggy and rough to smoother and more cohesive just from resting. That’s gluten doing its thing quietly in the background.
- Add starter and salt. Once autolyse is done, add your active sourdough starter and non-iodized salt. Work them into the dough by squeezing it through your fingers until everything is fully incorporated — it’ll feel a little slippery at first, but it comes together. Make sure your starter is at peak activity before it goes in: bubbly, doubled in size, and ready to go. A sluggish starter here means sluggish fermentation later, and no amount of patience will fully fix that downstream.
- Stretch and fold for strength. Instead of traditional kneading, you’ll build dough strength through four sets of stretch and folds, performed every 30 minutes over the first 2 hours. For each set, grab one side of the dough, stretch it upward as far as it’ll go without tearing, then fold it over the center. Rotate the bowl a quarter turn and repeat — four folds per set. With each round, you’ll feel the dough get noticeably tighter, more elastic, and easier to handle. That’s the gluten network developing exactly as it should.
- Laminate in the cheddar. On the final stretch and fold, it’s time to add your shredded sharp cheddar. Wet your work surface lightly, then stretch the dough out into a thin rectangle. Scatter the cheese evenly across the surface, then fold the dough over itself like a letter — left side in, right side over, then top and bottom. This lamination method distributes the cheese evenly throughout the crumb without overworking the dough or breaking down the gluten structure you’ve spent two hours building.
Related: How to Get a Crispy Crust Sourdough
Bulk Fermentation
- Let it ferment low and slow. Once your stretch and folds are complete, cover the bowl and leave the dough to bulk ferment at room temperature — ideally between 75–78°F — for 4 to 6 hours. Temperature is everything here. Think of yeast activity like a dimmer switch: cooler kitchens (below 70°F) will push that timeline closer to 8 hours, while warmer ones (above 80°F) can cut it down to 3. Neither is wrong — you’re just reading the environment and adjusting. Rushing this stage by parking the dough somewhere too warm tends to produce over-fermented, overly acidic bread that spreads flat and bakes up gummy.
- Watch for the visual cues. As bulk fermentation progresses, you’re looking for a 50–75% increase in volume, a smoothly domed top, and a network of bubbles visible along the sides and surface of the dough. The dough should look alive — and honestly, it is. The wild yeast and Lactobacillus bacteria are actively producing carbon dioxide and lactic acid, which is what gives sourdough its structure and that signature tangy depth of flavor. A flat, dense dough with no visible activity after several hours is a sign your starter wasn’t quite ready.
- The jiggle test. Give the bowl a gentle shake. A properly fermented dough will wobble and jiggle like a bowl of Jell-O — loose, airy, and relaxed. If it moves as one stiff, dense mass, it needs more time. This test is surprisingly reliable and becomes second nature after a few bakes.
- Confirm with the poke test. Press a lightly floured finger about half an inch into the dough. If it springs back quickly and completely, fermentation isn’t done yet. If it springs back slowly and leaves a slight indent, you’re in the sweet spot — ready to shape. If the indentation doesn’t spring back at all, the dough is over-fermented, and you’ll want to move quickly to shaping to salvage the structure.
![Bulk fermentation sourdough explained [easy guide]](https://www.mydailysourdoughbread.com/wp-content/uploads/2023/01/CD-blog-images-2023-01-05T180406.105-840x473.jpg "Cheddar Sourdough: The Complete Guide To Making Flavorful Cheese Bread 65")
Shaping and Proofing
After bulk fermentation, tip the dough onto an unfloured surface and pre-shape it into a rough round. Let it bench rest for 20–30 minutes — this relaxes the gluten and makes final shaping much easier.
For the final shape, drag the dough gently across the surface in a circular motion to build surface tension, creating a tight, taut outer skin. This is what gives the loaf height rather than letting it spread flat in the oven.
Place the shaped dough seam-side up into your floured banneton, cover it, and transfer to the fridge for an overnight cold proof — 8 to 16 hours. The cold slows fermentation right down, developing deeper flavor and making the dough easier to score cleanly. It also means you bake on your schedule, not the dough’s.
Baking Cheddar Sourdough
- Preheat your Dutch oven inside the oven at 500°F for at least 45–60 minutes.
- Remove the dough from the fridge and score the top with a bread lame.
- Carefully lower the dough into the hot Dutch oven and bake covered for 20 minutes.
- Remove the lid, reduce the temperature to 450°F, and bake for another 20–25 minutes until deeply golden.
- Cool on a wire rack for at least 1–2 hours before slicing.
Tips for a better bake:
- Score straight from the fridge — cold dough holds its shape and cuts more cleanly
- Don’t skip the full preheat; a cold Dutch oven kills oven spring
- Look for caramelized cheese bits on the crust as a sign of a great bake
- Use an oven thermometer — home ovens often run hotter or cooler than the dial suggests
Serving Suggestions
Cheddar sourdough is one of those breads that shines with minimal effort. Here are some of the best ways to enjoy it:
- Grilled cheese sandwich — The cheese already baked into the bread gives you a built-in flavor boost. Add Gruyère or extra sharp cheddar, butter the outside with cultured butter, and toast until golden.
- With tomato soup — The tangy sourdough and acidic tomato bisque echo each other beautifully. Dunking a thick slice is simple, comforting, and deeply satisfying.
- Breakfast toast — Lightly toasted with avocado, a fried egg, and a pinch of chili flakes. The cheese flavor intensifies when toasted, making plain toast feel like a downgrade.
- Charcuterie boards — Slice them thick and serve alongside cured meats, cornichons, and whole grain mustard. It holds its own against bold flavors.
- Butter and nothing else — Honestly, a warm slice with good salted butter needs no introduction.
Storage and Freezing
Once fully cooled, store your cheddar sourdough cut-side down on a wooden board or loosely wrapped in a clean kitchen towel. A bread box is ideal — it balances airflow and moisture without turning the crust soft. Avoid plastic bags at room temperature; they trap moisture and ruin the crust fast. The loaf is best within the first 2–3 days, though the flavor actually deepens a little on day two.
For freezing, slice the loaf first so you can pull individual pieces without thawing the whole thing. Wrap slices tightly in plastic wrap, then place them in a freezer-safe zip bag — this double layer prevents freezer burn. Slices go straight from the freezer into the toaster, no thawing needed. For a whole loaf, wrap in plastic, then foil and freeze for up to 3 months. To revive it, thaw at room temperature and warm in a 350°F oven for 10–15 minutes to bring the crust back to life.
Related: How to Freeze Sourdough Bread
Ready to Bake the Best Loaf of Your Life?
Now that you’ve got the full picture — from building dough strength through stretch and folds, to nailing bulk fermentation, to that final crackling bake in a screaming hot Dutch oven — there’s really nothing standing between you and an incredible homemade cheddar sourdough loaf.
The result is a bold, golden, cheese-loaded loaf with a crackly crust and chewy crumb that store-bought bread simply can’t compete with — whether you’re dunking it in tomato soup, building the ultimate grilled cheese, or just enjoying a warm slice straight off the cutting board. Get that starter out, shred some sharp cheddar, and go make something worth bragging about.
FAQs – Cheddar Sourdough
How does cheddar affect sourdough?
Cheddar adds a bold, savory depth that complements sourdough’s natural tang beautifully. The fat content in the cheese softens the crumb slightly, while the salt enhances overall flavor. Sharp or extra-sharp cheddar works best because its intensity holds up against the acidity of the fermented dough, and those caramelized cheese bits on the crust add an irresistible texture contrast.
How to add cheddar to sourdough?
The best method is lamination — during your final stretch and fold, stretch the dough out flat on a damp surface, scatter freshly shredded cheddar evenly across it, then fold the dough back over itself. Adding cheese too early can interfere with gluten development, so always wait until the last set of stretch and folds before incorporating it.
What cheese is good in sourdough?
Sharp cheddar is the classic choice, but sourdough is incredibly versatile when it comes to cheese. Gruyère adds a nutty, slightly sweet flavor; Parmesan delivers a salty, umami punch; and Gouda brings a creamy, mild richness. Whatever you choose, always opt for freshly shredded over pre-packaged — the anti-caking agents in bagged cheese affect how it melts and incorporates into the dough.
Cheddar Sourdough
Cheddar sourdough is a naturally leavened artisan bread where wild yeast and lactic acid bacteria do the heavy lifting — no commercial yeast needed.
Ingredients
- 450g bread flour
- 50g whole wheat flour
- 375g filtered water (75% hydration)
- 100g active sourdough starter
- 10g non-iodized salt
- 200g freshly shredded sharp cheddar cheese
- 1 tbsp olive oil (optional, for a softer crumb)
Instructions
- Preparing the Dough: Combine flours and water; autolyse 30–60 minutes. Add starter and salt, working in until incorporated. Build strength with 4 sets of stretch and folds every 30 minutes over 2 hours. On the final fold, laminate in shredded cheddar by stretching the dough thin, scattering cheese, and folding it like a letter.
- Bulk Fermentation: Rise at 75–78°F for 4–6 hours, adjusting for kitchen temperature. Look for a 50–75% volume increase, a domed top, and visible surface bubbles. Confirm readiness with the jiggle test and poke test — a slow spring-back with a slight indent means it’s ready to shape.
- Shaping and Proofing: Pre-shape, bench rest 20–30 minutes, then final-shape by dragging to build tension. Place seam-side up in a banneton and cold proof overnight, 8–16 hours.
- Baking: Preheat Dutch oven to 500°F for 45–60 minutes. Score, bake covered for 20 minutes, then uncovered at 450°F for 20–25 minutes until golden. Cool 1–2 hours before slicing.
Notes
- Score straight from the fridge — cold dough holds its shape and cuts more cleanly
- Don’t skip the full preheat; a cold Dutch oven kills oven spring
- Look for caramelized cheese bits on the crust as a sign of a great bake





