
Last updated on December 10th, 2025
Every sourdough baker needs to know what should sourdough starter look like when it’s healthy and ready to bake. That creamy, bubbly mixture in your jar should have a specific appearance, texture, and smell that signals it’s thriving – but those visual cues aren’t always obvious at first. Understanding the difference between normal fermentation signs (like that gray liquid on top) and actual problems makes all the difference in your baking success. You’ll discover the exact visual markers of an active starter, from color and consistency to bubble patterns and aroma, plus simple solutions for common issues that’ll keep your starter performing beautifully every single time.
The Basics of a Healthy Sourdough Starter
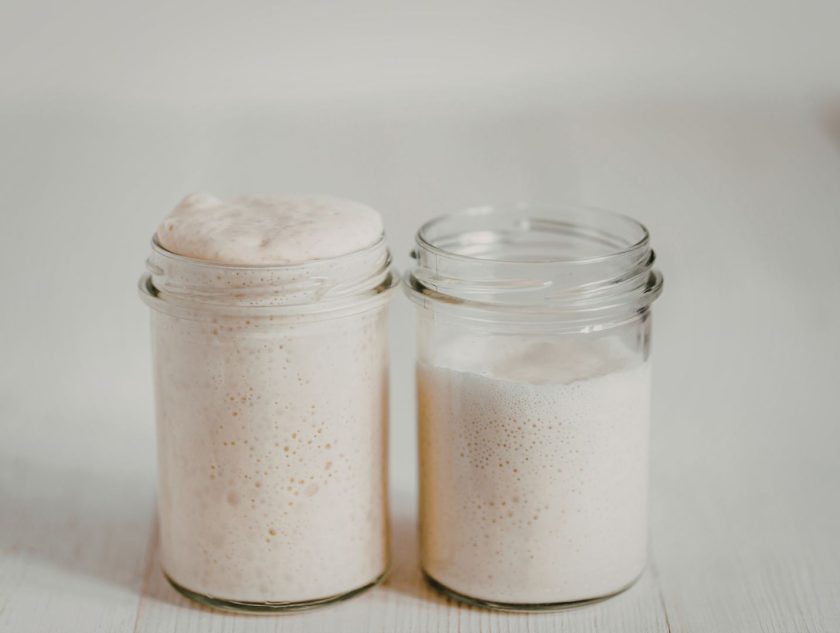
Think of your starter like a living pet – when it’s thriving, you’ll know it just by looking and smelling. A well-maintained sourdough starter has this beautiful creamy appearance, somewhere between the color of pancake batter and warm peanut butter. If you’re working with white flour, expect a milky-white color; however, whole wheat or rye will add a bit of depth.
When your starter’s doing its thing, you’ll spot bubbles throughout – big ones, small ones, creating this gorgeous spongy texture that looks kind of like roasted marshmallows. These CO₂ bubbles are your microbes throwing a party, munching on the flour and water you’ve given them. The texture should be thick but not stiff – aim for something similar to thick pancake batter or yogurt consistency.
The smell’s where things get interesting. A mature starter typically gives off this pleasant, slightly tangy aroma – think yogurt or buttermilk with maybe a hint of fruit. Sometimes you’ll catch sweet or fruity notes as the yeast develops. That’s your lactic acid bacteria working their magic alongside wild yeast, creating the foundation for incredible bread.
Signs Your Starter Is Active
Here’s where you really get to know if your starter’s ready to make bread magic happen. After feeding, an active starter should double or even triple in size, with bubbles popping up on both the surface and along the jar’s sides. I always mark my jar with a rubber band right after feeding – it’s the easiest way to watch that rise.
If your starter’s just bubbling but not rising, that’s not quite enough. You need to see actual vertical growth. The real test of a starter’s strength isn’t whether it has bubbles – it’s whether it can predictably double in size after feeding. This typically happens within 4 to 12 hours, depending on your feeding ratio and room temperature.
The gluten structure in your starter plays a huge role here. As yeast activity ramps up, you’ll notice the mixture becomes lighter and more airy. When it’s at peak activity, the texture becomes fluffy and stretchy, almost like those perfect roasted marshmallows at a campfire.
Keep an eye on your jar markings – they tell the whole story. A mature, healthy starter will have this light, airy texture that’s slightly stretchy when you scoop it. The feeding response matters too. If you’re consistently seeing that doubling action within a reasonable timeframe, you’re golden. Doubling time can vary based on temperature, feeding ratio, and flour type, but consistency is what you’re after.
Related: Why Is My Sourdough Starter Not Rising?
Texture and Consistency
Let’s talk about what your starter should feel like when you’re working with it. The sweet spot is thick pancake batter consistency – not so thick that air can’t circulate, and not so thin that it can’t hold gas. This texture allows proper fermentation while maintaining the gluten structure needed to trap those precious CO₂ bubbles.
If your starter’s too thick, fermentation slows down because there’s not enough airflow. If it’s too runny, the gluten network weakens and can’t trap gas effectively, giving you a weaker rise. Your hydration ratio – that balance between flour and water – directly affects this. Most starters work beautifully at 100% hydration (equal weights of flour and water), but you can adjust based on your needs.
The bubbly texture you’re after should feel elastic when you scoop a spoonful. It should be slightly sticky and stretchy, showing that the gluten’s developed properly. Think about how your dough elasticity changes throughout the feeding schedule – right after feeding, it’s thicker and smoother, but as fermentation progresses, it becomes lighter and more aerated.
If your starter’s consistently too thick or thin, tweak your feeding schedule. A healthy, well-fed starter should have the consistency of warm peanut butter and shouldn’t produce excess liquid when fed regularly. The batter-like consistency is perfect – it means your microbes have the right environment to thrive without drowning or suffocating. Watch how it behaves after each feeding and adjust your flour-to-water ratio accordingly.
Color Indicators
Color’s one of those things that can freak out new sourdough bakers, but most color changes are totally normal. Using all-purpose flour gives you a lighter starter, while whole wheat creates a darker color, and rye can even look grayish. That’s just the natural pigments in different flours coming through.
That gray liquid sitting on top of your starter? That’s hooch – a natural alcohol byproduct of fermentation. It’s basically your starter’s way of saying “hey, I’m hungry!” Hooch can range from clear to gray to even brown or black, especially if your starter’s been in the fridge for a while. You can either stir it back in for a more tangy flavor or pour it off – totally your call.
Now, here’s where color actually matters. Mold on sourdough starter typically shows up as fuzzy patches in white, greenish-brown, yellow, or blue colors. Orange or pinkish streaks are red flags too – these indicate harmful bacteria. If you spot anything fuzzy or see these concerning colors, it’s time to toss the starter and begin fresh. Mold has deep roots that you can’t see, so scraping off the surface won’t cut it.
The key difference? Hooch is a smooth liquid, while mold is at least slightly fuzzy, even if the fuzz is hard to see at first. When in doubt, trust your gut – and maybe get a second opinion from an experienced sourdough baker before throwing out your starter.
The Role of Smell
Your nose is one of your best tools for checking starter health. A healthy starter smells pleasantly tangy with hints of yogurt, mild acidity, or even fruity notes like green apples. These aromas come from lactic acid and acetic acid – the fermentation byproducts that give sourdough its characteristic flavor.
Lactic acid creates that tangy, slightly sour flavor, while some starters develop a distinct cheesy aroma that’s actually a badge of honor. A vinegar or acetone smell – like nail polish remover – usually means your starter’s starving or severely underfed. The good news? It’s fixable with consistent feeding. One smell you absolutely don’t want? A putrid, sewage-like, or rotting odor signals contamination or a starter that’s gone bad.
Troubleshooting Unhealthy Starters
Sometimes starters hit a rough patch, but most issues are totally fixable. Let’s walk through the common problems and what to do about them.
Dealing with Hooch
If your starter consistently produces hooch even after feeding, you need to increase feeding frequency or adjust your feeding ratio. More food equals less hunger signals, which means less hooch formation.
Solution:
- Pour off or stir in the hooch layer
- Increase feeding frequency to every 12 hours instead of every 24 hours
- Use a higher feeding ratio (try 1:2:2 or 1:3:3)
- Feed with more flour relative to the amount of starter you’re keeping
- Ensure you’re keeping your starter in a warm enough spot
Inactivity Issues
If your starter’s sluggish and barely rising, temperature’s usually the culprit. Keep it warm – around 74-76°F works great – and you’ll see fermentation activity pick up.
Solution:
- Move the starter to a consistently warm location (74-76°F)
- Feed with a portion of whole-grain rye flour for extra nutrients
- Give timely feedings right when it peaks rather than waiting too long
- Try twice-daily feedings to build strength
- Use a warm water bath and refresh every 8-12 hours until activity returns
When Discoloration Happens
Dark hooch that’s been sitting for months can look alarming, but it is usually just oxidized alcohol. However, bacterial imbalance or contamination shows up differently.
Solution:
- For dark hooch: Pour it off and resume regular feedings
- For a grayish starter surface: Scrape off the top layer and feed the healthy portion underneath
- For fuzzy mold: Toss the entire batch, as mold has thread-like roots beneath the surface
- Start fresh with clean equipment and a new jar
- If you see orange or pinkish streaks, discard immediately
Mold Prevention
Fuzzy growths in various colors – that’s mold, and it needs to go. Even starters left in the fridge for months can bounce back with a few consistent feedings if there’s no mold present.
Solution:
- Always use a clean jar and utensils
- Keep the starter covered but not airtight to allow oxygen flow
- Feed regularly – don’t let it go weeks without attention
- Store in the fridge if you can’t maintain daily feedings
- Consider switching to fresh, high-quality flour if mold keeps appearing
Related: How Much to Feed Sourdough Starter (Beginner’s Guide)
How to Keep Your Starter Looking Healthy
Prevention’s always easier than troubleshooting, so let’s talk about keeping your starter in prime condition from day one. A common feeding ratio that produces strong, healthy starters is 1:5:5 – that’s 20% ripe starter, 100% water, and 100% flour by weight. This ratio is fed twice daily at 12-hour intervals, providing your microbes with consistent meals without overfeeding. The feeding schedule you choose depends on your flour type and ambient temperature, but consistency matters more than the exact timing.
Keep your starter in that 74-76°F sweet spot if you want optimal activity. Too cold, and fermentation crawls. Too warm, and you’ll get an overly acidic starter. If your kitchen runs cool, find a warm spot – some bakers use their oven with just the light on, though be super careful not to actually turn the oven on!
Many bakers find success using a mix of flours – like 70% white flour and 30% whole rye – for regular feedings. The whole grains add nutrients that keep your microbial population diverse and strong. A well-fed starter at proper hydration shouldn’t need constant adjustments – it should maintain that lovely pancake batter consistency with regular feedings.
Quick tips for a thriving starter:
- Mark your jar with a rubber band after feeding to track the rise
- Feed at consistent times each day to establish a predictable rhythm
- Use room temperature or slightly warm water for feedings
- Keep your starter jar clean and transfer to fresh containers regularly
- Don’t seal the lid too tightly – your starter needs to breathe
- If storing in the fridge, feed once weekly and bring to room temperature before baking
Trust Your Senses, Bake Amazing Bread
You’ve now got the complete playbook for reading your starter like a pro. A healthy starter doubles after feeding, has that perfect pancake batter texture, smells tangy (not funky), and shows off plenty of bubbles. Most issues – hooch, sluggish growth, weird smells – are totally fixable with simple tweaks to your feeding schedule or temperature.
The best part? Once you nail that consistent routine at 74-76°F with regular feedings, maintaining a gorgeous starter becomes effortless. Trust what you see, smell, and feel – your starter will tell you everything you need to know. Now go bake something incredible!
FAQs – What Should Sourdough Starter Look Like?
How do I tell if my sourdough starter is good?
A good sourdough starter doubles in size within 4-12 hours after feeding, shows plenty of bubbles throughout, and has a pleasant tangy aroma like yogurt or buttermilk. It should have a thick pancake batter consistency that’s stretchy and elastic when scooped. The mixture should be creamy with no mold, and it should consistently respond to feedings with predictable rising patterns.
What does a healthy sourdough starter look like?
A healthy sourdough starter has a creamy, bubbly appearance with CO₂ bubbles of various sizes creating a spongy texture. The color ranges from milky-white with all-purpose flour to darker shades with whole wheat or rye. It should have a thick pancake batter consistency, smell pleasantly tangy with fruity notes, and double in size after feeding with a light, stretchy texture.
What consistency should my sourdough starter look like?
Your sourdough starter should have a thick pancake batter or warm peanut butter consistency – not too thick to restrict airflow, and not too runny to hold gas. It should feel slightly sticky and stretchy, showing proper gluten development. Most starters work best at 100% hydration (equal weights of flour and water), creating that perfect elastic, bubbly texture.
What does an unhealthy starter look like?
An unhealthy starter shows fuzzy mold in white, greenish-brown, yellow, or blue colors, or orange and pinkish streaks, indicating harmful bacteria. It may smell putrid, like sewage or rotting food, rather than tangy. Other red flags include failure to rise after multiple feedings, extreme wateriness or excessive hooch production, and a complete lack of bubbles despite consistent feeding.
Related Articles:
![How to freeze sourdough starter [top tips for success]](https://www.mydailysourdoughbread.com/wp-content/uploads/2023/06/storing-starter-in-freezer-120x120.jpg "How To Freeze Sourdough Starter [Top Tips For Success] 2") How to Freeze Sourdough Starter [Top Tips For Success]
How to Freeze Sourdough Starter [Top Tips For Success]
![How to keep sourdough starter warm [best tips]](https://www.mydailysourdoughbread.com/wp-content/uploads/2023/07/a-bubbly-starter-on-a-cooling-rack-120x120.jpg "How To Keep Sourdough Starter Warm [Best Tips And Why You Need To] 3") How to Keep Sourdough Starter Warm [Best Tips and Why You Need To]
How to Keep Sourdough Starter Warm [Best Tips and Why You Need To]
 How to Discard Sourdough Starter – Tips For Disposing Of Your Starter
 How to Tell When Your Sourdough Starter is Ready for Baking
![Easy recipes using sourdough starter [with step by step guide]](https://www.mydailysourdoughbread.com/wp-content/uploads/2025/05/10-Recipes-Using-Sourdough-Starter-Beyond-Basic-Bread-120x120.jpg "10 Recipes Using Sourdough Starter (Beyond Basic Bread!) 6") 10 Recipes Using Sourdough Starter (Beyond Basic Bread!)
10 Recipes Using Sourdough Starter (Beyond Basic Bread!)
