
Last updated on October 28th, 2025
Learning how to bake sourdough without a Dutch oven opens up incredible possibilities for home bakers everywhere. The truth is, stunning loaves with crusty exteriors and airy crumbs are totally achievable with tools already sitting in your kitchen. The real secret isn’t the pot—it’s understanding what creates those perfect conditions and how to recreate them. Your homemade sourdough needs two main things: the ability to trap moisture and steam, plus consistent high heat throughout the bake. Whether you’re just starting, working with a smaller oven, or want to bake multiple loaves simultaneously, mastering these alternative methods will transform your baking game completely.
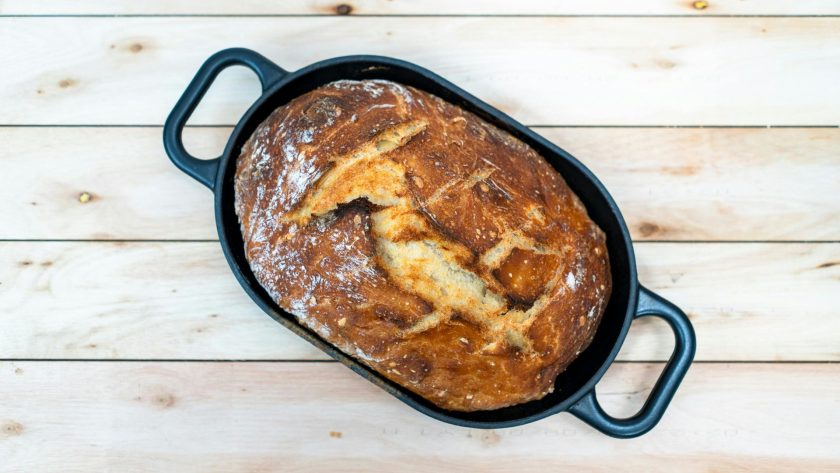
Why Dutch Ovens Are Popular
Dutch ovens became the darling of sourdough baking for good reason. These heavy cast iron pots handle seriously high temperatures—up to 500°F—while their tight-fitting lids trap steam created from water vaporizing inside your dough. This steam is what delivers that jaw-dropping golden blistered crust and dramatic oven spring, keeping the outer layer soft enough to expand like a balloon during baking. The heavy cast iron acts as a heat sink too, negating temperature swings and radiating consistent heat all around your loaf. It’s essentially a workaround that mimics professional steam-injected ovens, creating the perfect high-temperature, steamy environment in your home kitchen.
Key Principles of Baking Sourdough Without One
Master three fundamentals—heat, humidity, and timing—and you’ll bake sourdough that rivals any Dutch oven loaf. Your baking surface needs to absorb and radiate heat evenly, helping your oven recover quickly from temperature drops when you open the door. A baking stone or steel is essential here, providing steady, intense heat from the bottom up.
For moisture, home ovens are designed to remove humidity, which is the opposite of what bread needs. You’ll create steam through various methods—water pans, ice cubes, or spray bottles—to keep that dough surface moist and expandable. Sourdough baking happens in two phases: high heat with high steam for the first 20-25 minutes to achieve oven spring, then high heat without steam so your crust can dry out, firm up, and develop that deep caramel color.
Essential Elements for Success:
- Consistent Heat Source: Baking stone or steel preheated for a minimum of 60 minutes to store and radiate stable heat
- Steam Generation: Multiple methods available—preheated water pan, ice cubes, spray bottle, or combination approach
- Proper Timing: First phase with steam for 20-25 minutes, second phase without steam for crust development
- Temperature Control: Maintain 450-500°F throughout baking for optimal oven spring and crust formation
- Quality Tools: Heavy-duty oven mitts, sharp scoring blade, instant-read thermometer for precision baking
Related: What Size Dutch Oven for Sourdough Bread Should You Use [Complete Guide]
Alternative Baking Methods
Preheated Baking Stone + Water Pan
Preheat your baking stone for one hour on the middle rack with a cast iron skillet on the bottom rack. When you load your scored dough onto the hot stone, immediately pour boiling water into the preheated skillet for a dramatic steam burst. This method allows you to bake multiple loaves simultaneously, making it way more efficient than single-pot baking. Use heavy-duty oven mitts since steam burns are serious business.
Cast Iron Skillet + Metal Bowl
Heat your cast-iron skillet on the stovetop over medium heat while your oven preheats. Transfer your dough onto parchment paper into the hot skillet, add 2-3 ice cubes outside the parchment, and cover with an inverted cake pan or metal bowl. This creates a mini baking chamber that traps steam beautifully. Remove the cover after 20-25 minutes to let the crust develop.
Baking Steel + Aluminum Foil
Place your dough on a preheated baking steel, then drape heavy-duty aluminum foil over the top, tucking edges to trap steam. The steel provides incredible bottom heat while the foil creates that enclosed environment. Remove the foil halfway through for crust development.
Double Loaf Pan Method
Use two loaf pans, inverting the second one over the top to create a sealed chamber. Clip them together with stainless steel bulldog clips for multiple loaves at once—you can fit six in the oven simultaneously. This method delivers sandwich-friendly slices with excellent oven spring.
Enamel Roasting Pan
Turkey roasters work surprisingly well as alternatives. They’re lighter and easier to handle than cast iron, often come in larger sizes, and don’t require preheating since the thin enamel heats quickly. Just ensure your dough has enough room to expand.
Step-by-Step Method (Example: Skillet + Bowl Method)
- Preheat everything. Start preheating your oven to 450°F at least 30 minutes before baking. Place your cast-iron skillet on the stovetop over medium heat simultaneously. Have heavy-duty oven mitts ready and cut parchment paper to size. If using ice cubes or water for steam, get that water boiling.
- Prepare your dough. Remove your perfectly proofed dough from the fridge if cold proofing. Flip it gently onto parchment paper without deflating those air bubbles. Score confidently with a sharp blade, making cuts ½ to 1 inch deep at a slight diagonal. Lightly spray the surface with water right before loading.
- Load and cover. Transfer the parchment with the dough into your blazing hot skillet. Quickly drop 2-3 ice cubes around the dough (not on it), then immediately cover with your inverted bowl or pan. The ice creates a perfect steam bath as it melts. Slide everything into the preheated oven.
- Uncover and finish. Bake covered for 20-25 minutes without peeking. When the timer goes off, carefully remove the cover—your loaf should be beautifully puffed with a pale finish. Continue baking uncovered for another 20-25 minutes until the crust turns deep golden brown. Internal temperature should hit 200-210°F. Transfer to a cooling rack immediately and wait a full hour before slicing, even though it smells incredible.
Related: Best Dutch Oven for Sourdough Bread: The Right One for You
Common Mistakes & Fixes
- Burnt bottom crust: move your rack up one position for more distance from the heat source, or place an additional baking sheet below as a heat shield. Consider reducing the temperature by 25°F after the first 20 minutes.
- Pale, dull crust: not enough steam during the first phase prevents proper caramelization. Spray your dough generously with water before baking, and use multiple steam methods simultaneously—water pan plus ice cubes works brilliantly.
- Dense, heavy crumb: insufficient steam causes the crust to set too quickly, preventing expansion. Generate more moisture in that first baking half and check your proofing using the poke test.
- Loaf spreading outward: shape with better tension, reduce hydration by 5-10% if consistently too loose, and watch for overproofing, which destroys structure.
- Gummy interior: use an instant-read thermometer to ensure 200°F internal temperature. If your crust browns too fast, tent loosely with foil for the last 10-15 minutes. Always wait that full hour before cutting.
Pro Tips for Great Crust & Crumb
Preheat your baking stone or steel for a full hour before baking—these thick surfaces need serious time to store heat for explosive oven spring. Layer your steam methods by combining a water pan with spritzing, or try water plus ice cubes for sustained moisture release. Don’t be shy with that spray bottle—really drench your dough right before it goes in for a glossy, blistered crust. If you’ve got two baking stones or a steel, use both on different racks for even heat distribution all around your loaf. Always use a genuinely sharp blade for scoring—it should glide through effortlessly without deflating your dough. Angle your cuts slightly rather than going straight down, and score with confidence for beautiful ear development. Experiment with rack positions since every oven behaves differently, and take notes on what delivers the best results in your specific setup.
Bake Fearlessly Without the Pot
You’ve got everything you need to create bakery-quality sourdough without spending a dime on fancy equipment. The methods are straightforward, the tools are affordable or already in your kitchen, and the results will blow your mind. Master the principles of heat and steam, choose the method that fits your setup, and trust the process. Your crusty, golden, perfectly-risen loaves are waiting—now get in that kitchen and make some magic happen. The only thing standing between you and an incredible homemade sourdough is that first confident bake.
FAQs – How to Bake Sourdough Without a Dutch Oven
What can I use instead of a Dutch oven for sourdough bread?
You’ve got several excellent options: a cast-iron skillet with an inverted metal bowl creates a perfect steam chamber, or try a preheated baking stone with a water pan below for steam generation. Enamel roasting pans, double loaf pans clipped together, or even a baking steel with an aluminum foil cover all work beautifully. The key is replicating heat retention and steam—any oven-safe vessel that traps moisture will deliver gorgeous results.
Can I bake my sourdough not in a Dutch oven?
Absolutely! Sourdough bakes beautifully without a Dutch oven using alternative methods. Try a cast iron skillet covered with a metal bowl, a baking stone with steam from ice cubes, a water pan, or even two loaf pans stacked together. The essential ingredients are consistent high heat and trapped steam during the first 20-25 minutes of baking. These alternatives often work just as well and let you bake multiple loaves simultaneously.
Can you bake sourdough in a regular pan?
Yes, regular pans work great for sourdough! Use two loaf pans with one inverted over the other to trap steam, or bake in a single loaf pan at 375°F for sandwich-style slices. You can also use a regular baking sheet or cake pan covered with an inverted roasting pan. Just ensure your pan is oven-safe for high temperatures and create steam using water, ice cubes, or a spray bottle for proper oven spring and crust development.
Related Articles:
 Sourdough Starter Jar: The Essential Guide to Choosing and Using a Starter Container
 Best Bread Knife for Sourdough in 2023: Top Picks
 Best Dutch Oven for Sourdough Bread: The Right One for You (Reviews 2023)
 Simple Ways of Baking Sourdough Without a Dutch Oven
![How to use a banneton [easy to follow guide]](https://www.mydailysourdoughbread.com/wp-content/uploads/2023/01/How-to-Use-a-Banneton-120x120.jpg "How To Use A Banneton: Learning Proofing Basics 6") How to Use a Banneton: Learning Proofing Basics
How to Use a Banneton: Learning Proofing Basics
