Last updated on October 16th, 2025
Learning how to rehydrate sourdough starter transforms crusty flakes into a bubbling, living culture ready for baking. This process awakens dormant wild yeast cells and lactobacillus bacteria that have been waiting in their dried state. The moment you add water and flour, these microorganisms spring back to life, hungry and ready to ferment. These hardy organisms are practically indestructible – scientists have successfully revived 5,000-year-old yeast from ancient Egyptian pottery. Your dried starter contains the same resilient cultures that’ll soon fill your kitchen with that distinctive sourdough aroma and create delicious homemade bread.
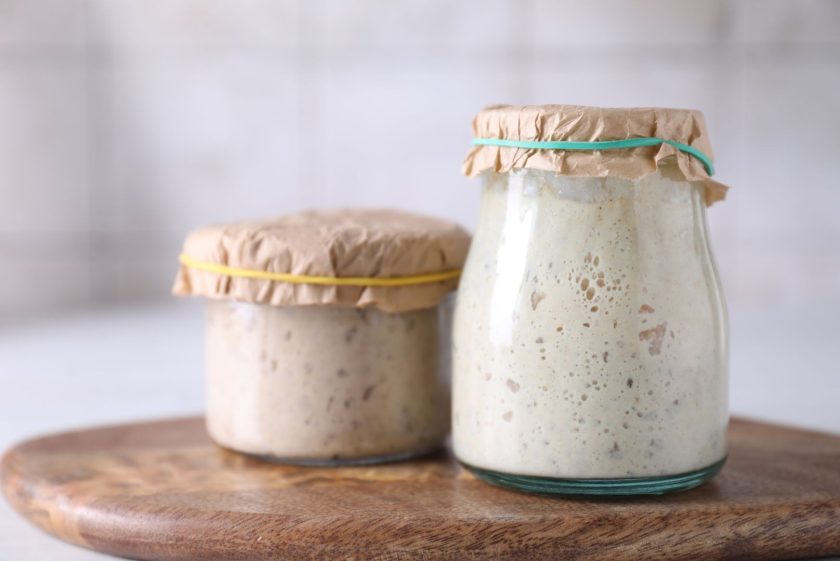
What Is a Dried Sourdough Starter?
Dried sourdough starter is an active culture that’s been dehydrated to remove moisture, putting wild yeasts and bacteria into dormancy. This process transforms the usual pancake-batter consistency into brittle flakes or powder. Dehydration pauses fermentation while preserving all beneficial microorganisms. These cultures remain viable for years when stored in airtight containers, maintaining their unique characteristics and flavor profiles. The dried form allows easy sharing, traveling, and long-term storage without daily maintenance requirements.
Tools & Ingredients Needed
- 5-10 grams dried sourdough starter
- 20-30 grams filtered water
- 20-25 grams unbleached all-purpose flour
- Wide-mouth glass jar (16-ounce)
- Non-metal spoon or spatula
- Digital kitchen scale
Choosing the Right Flour & Water
Flour quality significantly impacts rehydration success. Choose unbleached all-purpose flour or bread flour, as bleached versions contain chemicals that inhibit wild yeast growth. For extra fermentation power, add a tablespoon of whole wheat or rye flour – these nutrient-rich options act like a superfood for your starter.
Water quality matters equally. Tap water often contains chlorine that kills beneficial bacteria. Let tap water sit overnight to allow chlorine evaporation, or use filtered water for guaranteed results. Temperature is crucial – room temperature or slightly warm water (around 80°F) works perfectly. Cold water slows fermentation, while hot water damages delicate microorganisms.
Equal parts flour and water create 100% hydration with pancake-batter consistency that’s reliable and beginner-friendly.
Related: Sourdough Hydration Process – Everything You Need to Know and More
Step-by-Step Rehydration Process
Alright, here’s where the magic happens – let’s bring those sleeping microorganisms back to life! Think of this as performing CPR on your dried starter, except way less dramatic and much more delicious.
Day 1: The Wake-Up Call
Start small – and I mean really small. Take about 5-10 grams of your dried starter (that’s roughly a tablespoon if you don’t have a scale, though I’m still team scale all the way). If your starter came in chunks, don’t worry about crushing it into powder unless you want to. Those bigger pieces will soften and break down just fine.
Drop your dried starter into your clean jar and add 20-30 grams of lukewarm water. Give it a gentle stir and watch as the water starts working its magic, softening those crispy flakes. Let this mixture sit for about 30 minutes to an hour – think of it as letting your starter take a nice, relaxing bath after its long hibernation.
Once your starter has absorbed most of the water and looks more like a chunky paste than dry flakes, stir in 20 grams of flour. You’re aiming for a thick, but stirrable consistency. Cover loosely with a lid (we want airflow, not an airtight seal) and find it a cozy spot at room temperature, ideally around 70-75°F.
Day 2: First Signs of Life
Don’t expect fireworks yet, but you might start seeing tiny bubbles forming on the surface. This is incredibly exciting – it means those wild yeasts are starting to wake up and stretch their little yeast arms! Discard about half of your mixture and feed it with 25 grams each of flour and water.
Days 3-5: Building Momentum
Continue this daily routine of discarding half and feeding with equal parts flour and water. Each day, you should notice more activity – more bubbles, a slight increase in volume, and the development of that distinctive tangy sourdough aroma. By day 4 or 5, your starter should be doubling in size within 4-8 hours of feeding.
The Patience Game
Here’s the thing about sourdough – it operates on its own timeline, not yours. Temperature, humidity, the age of your dried starter, and even the season can all affect how quickly your culture springs back to life. Some lucky bakers see robust activity within 48 hours, while others might need a full week. Don’t panic if yours takes its sweet time; good things come to those who wait.
Recognizing Signs of Activity
Once you know what to look for, you’ll be able to tell at a glance whether your starter is thriving, struggling, or ready to bake bread.
The Bubble Brigade
First up, let’s talk bubbles – they’re your starter’s way of saying “Hey, I’m alive and kicking!” Initially, you might just see a few tiny bubbles scattered across the surface, like little champagne pearls. As your starter gains strength, these bubbles will multiply and grow larger, creating a foamy, almost frothy appearance that looks like a miniature bubble bath.
Pay attention to where the bubbles appear, too. Surface bubbles are great, but bubbles throughout the mixture and along the sides of the jar are even better – they indicate that fermentation is happening throughout your entire culture, not just on top.
The Rise and Shine Test
A healthy, active starter will double in size within 4-8 hours of feeding at room temperature. This is the gold standard test that tells you your starter is ready for baking duty. Mark the level on your jar right after feeding, then check back periodically. You should see a noticeable increase in volume, with your starter climbing steadily up the sides of the jar like it’s on a mission.
Aromatherapy
Your nose is one of your best tools here. A healthy starter develops a distinctive, tangy, slightly sour aroma that’s actually quite pleasant – think along the lines of fresh yogurt or a mild vinegar. As it matures, you might detect hints of apple, wine, or even cheese-like notes. This complex aroma profile is a sign that your lactobacillus bacteria are doing their job, creating the acids that give sourdough its characteristic flavor.
Timing Is Everything
Active starters follow a predictable rhythm. After feeding, they’ll start slowly, then ramp up activity as the yeasts multiply, reach a peak where they’re at maximum volume and bubbliness, then gradually fall back down as they exhaust their food supply. Learning to recognize when your starter hits its peak – usually 4-8 hours after feeding – is crucial for baking success.
Common Mistakes to Avoid
- The biggest mistake is impatience. Your starter will revive on its own timeline, and rushing often backfires. Stick to once-daily feedings until your starter consistently doubles in size. Multiple daily feedings overwhelm the developing culture and slow progress.
- Overfeeding dilutes the existing culture so microorganisms can’t keep up, slowing fermentation dramatically. Use proper ratios rather than massive amounts of flour and water.
- Using bleached flour serves your starter bacteria-killing chemicals. Wild yeasts aren’t fans of chemical treatments. Always choose unbleached varieties for robust activity.
- Heavily chlorinated tap water wreaks havoc on the delicate microbial balance. Let tap water sit overnight before using, or switch to filtered water for best results.
- Temperature extremes spell trouble. Above 85°F risks killing beneficial bacteria while encouraging undesirable microorganisms. Temperatures below 65°F slow fermentation to a crawl. Maintain 70-75°F for optimal results.
- Sealing your starter in airtight containers during active rehydration restricts necessary oxygen flow. Your starter needs to breathe during the crucial early days. Keep lids loose or use coffee filters secured with rubber bands.
Related: High Hydration Sourdough – Everything You Need to Know
First Bake With Rehydrated Starter
Before attempting complex recipes, ensure your starter truly hits its stride. A ready starter should pass the float test – drop a spoonful of peaked starter into water, and it should float like a bubbly life raft. Your starter should consistently double in size within 4-8 hours of feeding for at least two consecutive days.
Start with forgiving recipes like sourdough pancakes, waffles, or crackers for your first bake. These tolerate starters are still finding their footing and provide delicious ways to use accumulated discard. If bread is your goal, choose simple sandwich loaves over artisanal free-form boules – loaf pan breads are more forgiving and don’t require advanced shaping skills.
Time your first bread attempt for weekends when you’re home to monitor progress. Sourdough timing can be unpredictable with newly rehydrated starters, and being present allows necessary adjustments. Use your starter at absolute peak – when it’s doubled in size, full of bubbles, and smelling tantalizingly tangy.
Your first loaf might not be perfect, and that’s completely normal! Rehydrated starters take a few baking cycles to develop full strength. Don’t be discouraged by slightly dense results – each bake strengthens your starter and improves technique. Consider keeping a baking journal tracking peak times, feeding responses, and bread outcomes for future reference.
Storage & Maintenance
Once your starter consistently doubles in size and behaves predictably, move it to the refrigerator to slow fermentation dramatically. This cold environment puts your culture into semi-hibernation, requiring only weekly maintenance instead of daily feedings – much more manageable for busy bakers.
Before refrigerating, give your starter a good feeding and let it sit at room temperature until just starting to peak, then refrigerate. Cool temperatures slow but don’t stop fermentation, keeping your starter happy for about a week between feedings.
Pull your starter from the fridge weekly, discard half, and feed it with fresh flour and water. Let it reach room temperature and show activity (usually 2-4 hours), then either bake with it or return to refrigeration. This weekly routine maintains healthy, strong cultures.
A well-maintained starter develops a predictable rhythm and personality over time. You’ll recognize peak activity times, preferred feeding ratios, and unique aroma profiles. These characteristics become your starter’s distinctive fingerprint.
Always keep dried starter in your pantry as insurance. Life happens – jars break, starters get neglected, or helpful family members might “clean up” your kitchen. Having dried backup means you’re never more than a week away from a fresh, active starter again. Consider dehydrating portions of your newly rehydrated starter once fully active.
From Flakes to Fresh Bread
Rehydrating sourdough starter unlocks a world of endless baking possibilities. Those dried flakes have transformed into a living, breathing culture ready to create countless loaves, pancakes, and treats. With proper care and patience, your rehydrated starter will become a reliable kitchen companion, developing its own unique personality and flavor profile. Remember to maintain that dried backup – it’s your insurance policy for years of successful sourdough adventures ahead. Happy baking, and enjoy the incredible journey you’ve just begun!
FAQs – How to Rehydrate Sourdough Starter
How do I rehydrate my sourdough starter?
Mix 5-10 grams of dried starter with 20-30 grams of filtered water in a clean jar. Let it sit for 30 minutes, then add 20 grams of unbleached flour. Cover loosely and keep at room temperature. Feed daily by discarding half and adding equal parts flour and water until it doubles consistently within 4-8 hours.
How long does it take to reactivate a dehydrated sourdough starter?
Reactivating a dehydrated sourdough starter typically takes 3-7 days with daily feedings. Some starters show bubbling activity within 48 hours, while others need a full week, depending on temperature, humidity, and the age of the dried culture. Consistency is key – your starter is ready when it doubles reliably after feeding.
How do you bring a sourdough starter back to life?
Start by mixing dried starter with lukewarm filtered water until softened, then add unbleached flour to create a thick paste. Feed daily by discarding half the mixture and adding fresh flour and water in equal parts. Keep at room temperature (70-75°F) and maintain a loose cover for airflow until bubbling consistently.
How do you wake up sourdough starter that has been in the fridge?
Remove refrigerated starter and let it come to room temperature for 1-2 hours. Discard any dark liquid (hooch) on top, then remove half the starter. Feed with equal parts unbleached flour and filtered water. It should show bubbling activity within 4-8 hours and be ready to use once doubled in size.

![How to freeze sourdough starter [top tips for success]](https://www.mydailysourdoughbread.com/wp-content/uploads/2023/06/storing-starter-in-freezer-120x120.jpg "How To Freeze Sourdough Starter [Top Tips For Success] 5")