Last updated on October 15th, 2025
Learning how to use sourdough starter is easier than you think. A sourdough starter is a living culture of wild yeast and lactic acid bacteria that transforms flour and water into natural leavening. This bubbly mixture captures wild yeast from the environment and beneficial bacteria that work together through fermentation to make your bread rise and create those complex, tangy flavors you love. Your starter becomes your gateway to delicious artisan bread-making at home.

How a Sourdough Starter Works
Your starter contains wild yeast and lactobacillus bacteria that work together through fermentation. When you feed your starter flour and water, the yeast consumes the sugars and produces carbon dioxide and alcohol. The lactobacillus bacteria produce lactic and acetic acids, which give sourdough its characteristic tang.
The feeding cycles provide fresh food for the yeast and bacteria. They consume the starches in the flour, multiply, and create the byproducts that make your bread rise and taste incredible. The acids produced during fermentation strengthen the gluten network, creating a better texture in your final bread. The slow fermentation also breaks down some proteins, making the bread easier to digest.
This natural yeast culture works differently from commercial yeast. Instead of one dominant strain, you have a complex community of microorganisms working together. The starter activity varies with temperature, feeding ratios, and even the minerals in your water, making each starter unique to its environment. This fermentation process creates an environment that’s perfectly suited for bread making and develops complex flavors over time.
Feeding Your Sourdough Starter
Feeding your starter maintains the right balance of food and microorganisms to keep it active and healthy. Most bakers use simple ratios that work consistently.
Basic Feeding Steps:
- Discard portion of existing starter – Remove all but 50g (or your preferred amount) to keep the culture manageable
- Add flour – Use equal weight of flour to remaining starter (50g flour for 50g starter)
- Add water – Add equal weight of water (50g water), creating a 1:1:1 ratio
- Mix thoroughly – Stir until well combined with no dry flour visible
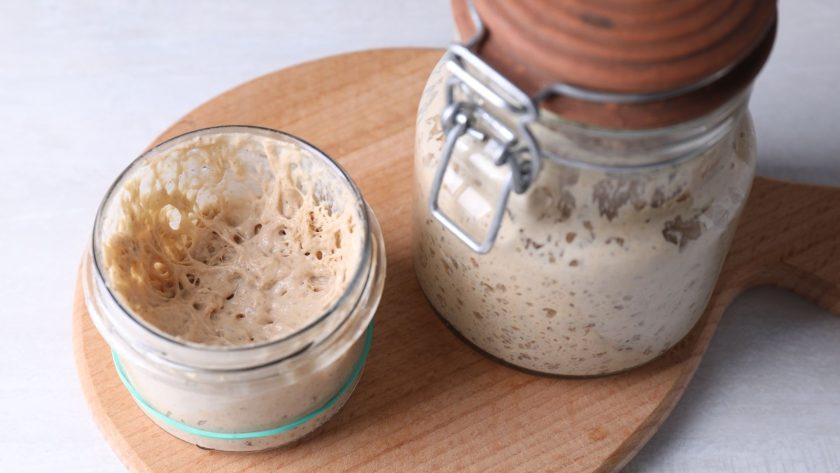
- Mark the jar – Use a rubber band to track rising progress
- Store appropriately – Leave at room temperature if feeding daily, or refrigerate for weekly feeding
A 100% hydration starter (equal weights of flour and water) is versatile and predictable. For more robust feeding when your starter seems sluggish, try a 1:2:2 ratio – keeping less starter but giving it more food.
Your feeding schedule depends on the storage location. Counter-top starters need feeding every 12-24 hours, while refrigerated starters can go a week between feeds. The key is watching for signs that your mature starter is ready: doubled in size, pleasant yeasty aroma, and lots of bubble activity. Discarding keeps your starter population manageable and ensures adequate nutrition for the remaining culture.
Related: Sourdough Starter Jar: The Essential Guide to Choosing and Using a Starter Container
How to Know When Starter is Ready to Use
Reading your starter’s readiness signals becomes easier with practice. An active starter shows clear visual and aromatic cues that indicate peak fermentation power.
Signs of a Ready Starter:
- Doubled in size – should rise to at least twice its original height after feeding
- Abundant bubbles – bubbles throughout the mixture and on the surface
- Pleasant aroma – smells yeasty, fruity, or mildly tangy (not acetone-like)
- Loose consistency – more liquid than when first fed due to fermentation
- Passes the float test – a spoonful floats when dropped in water
The float test works especially well for beginners. Drop a small spoonful of your starter into a glass of water. If it floats, you have enough gas production for bread making.
Timing varies with temperature and starter strength, but most active starters hit their peak within 4-12 hours of feeding. The sweet spot is when your starter is bubbly and risen but not yet starting to deflate. Using a rubber band around your jar at the starting height makes tracking progress super easy.
Using Starter in Bread Recipes
Most sourdough bread recipes call for 50-200g of active starter, depending on loaf size and desired flavor intensity. The starter replaces both yeast and some flour and water in conventional recipes. If your recipe calls for 100g of 100% hydration starter, you’re adding 50g of flour and 50g of water to your dough, so adjust total hydration accordingly.
Bulk fermentation takes much longer with sourdough – typically 4-6 hours at room temperature versus 1-2 hours with commercial yeast. This slow process develops incredible flavor and creates a stronger gluten network. The acids in your starter actually strengthen gluten bonds over time, which is why sourdough recipes often require less kneading.
Temperature management is crucial. Your dough performs best around 75-78°F for bulk fermentation. Many bakers use their oven (turned off) with just the light on to maintain consistent warmth. Too warm speeds fermentation but sacrifices flavor; too cool slows the process significantly.
The final proof often happens overnight in the refrigerator. This cold fermentation slows yeast activity while allowing continued flavor development, giving you better taste and easier dough handling. Use stretch and fold techniques during bulk fermentation instead of traditional kneading to work with the dough’s natural development.
Using Starter for Non-Bread Recipes
Sourdough discard transforms into amazing recipes instead of going to waste. The fermentation adds complexity without overwhelming sourness, making it perfect for various applications.
Pancakes are the most popular discard use. Mix discard with milk, eggs, sugar, and baking soda for incredibly fluffy results. The natural acids react with baking soda, creating superior rise and texture. Make the batter the night before for even better flavor development.
Pizza dough gets a serious upgrade with starter. The fermentation improves flavor and texture while making the dough easier to stretch. Use discard in place of some flour and water in any pizza recipe. Many pizzerias use preferments similar to sourdough for this exact reason.
Crackers are simple and delicious. Roll the dough thin with salt and olive oil, score it into squares, and bake it until crispy. You’ll get artisanal crackers with complex flavor at a fraction of store-bought costs.
Waffles work on the same principle as pancakes, creating tender interiors with crispy exteriors. The sourdough provides perfect pockets for syrup while delivering superior texture.
Other excellent uses include muffins, coffee cake, and quick breads. The fermentation flavor enhances simple recipes, turning basic baked goods into something special. This approach reduces kitchen waste while creating nutritious, flavorful food from ingredients you’d otherwise discard.
Related: How Long Does Sourdough Starter Last?
Common Mistakes & Troubleshooting
- Hooch formation is the most common concern. That liquid layer (clear to dark brown) means your starter is hungry. You can stir it in for a more sour flavor or pour it off for a milder taste. Hooch contains alcohol and organic acids from fermentation.
- Sluggish fermentation usually indicates underfeeding, cool temperatures, or poor flour quality. Feed more regularly, move to a warmer spot (70-75°F), or switch to bread flour or add whole wheat for better nutrition.
- Overfeeding dilutes the culture when you add too much flour and water relative to the starter amount. This creates sluggish fermentation because there aren’t enough microorganisms to process the food. Stick to established ratios.
- Smell issues are important indicators. Healthy starters smell yeasty, fruity, or pleasantly tangy. Acetone or nail polish remover smells mean your starter needs feeding immediately. Temperature problems show up as either killed cultures (too hot over 80°F) or very slow fermentation (too cold under 65°F).
Storage Options
Room temperature storage keeps your starter most active and ready to use. Feed daily (or twice daily in warm weather) for peak performance. This works great for regular bakers who don’t mind the daily routine. Your starter will be stronger and more predictable.
Refrigeration slows fermentation and reduces feeding to once weekly, perfect for weekend bakers or busy schedules. Before refrigerating, give your starter a good feeding and let it show activity. When ready to bake, remove from the fridge, let it reach room temperature, and feed once or twice to reactivate.
Long-term storage offers backup options. Dry your starter by spreading it thin and letting it dehydrate completely. This creates indefinite storage – just rehydrate with water when needed. Many bakers keep dried starter as insurance.
Cold fermentation develops different flavors than room temperature. Refrigerated starters often produce bread with more complex, wine-like flavors due to slower fermentation, allowing different compounds to develop.
The best approach combines methods: maintain a small “mother” starter in the fridge and build portions at room temperature for baking. This provides convenience and performance without constantly maintaining a large, active culture.
Your Sourdough Success Starts Today
Using sourdough starter connects you to thousands of years of baking tradition through a living culture that’s incredibly forgiving and versatile. Your starter can bounce back from neglect, adapt to different flours and schedules, and provide endless opportunities for creative baking. Remember that every starter is unique, shaped by its environment and your care routine. The key to success is consistency and patience – feed regularly, observe the changes, and trust the process. You’re keeping alive a tradition that has nourished people for millennia, one delicious bite at a time.
FAQs – How to Use Sourdough Starter Like a Pro
How much of my starter should I use for a sourdough loaf?
Most sourdough bread recipes use 100-200g of active starter for a standard loaf (around 500-750g flour). Start with 20% of your flour weight – so for 500g flour, use about 100g starter. More starter creates faster fermentation and milder flavor, while less starter means slower rise and more tang.
How much sourdough starter to use for 500g flour?
For 500g of flour, use 100-150g of active starter (20-30% of flour weight). 100g gives you a slower, more flavorful fermentation, taking 6-8 hours for bulk rise. 150g creates faster fermentation with a milder taste, completing bulk rise in 4-6 hours. Adjust based on your schedule and flavor preference.
How do I activate a starter?
Remove your starter from the fridge and let it reach room temperature. Feed it with equal parts flour and water (1:1:1 ratio). For example, keep 50g starter, add 50g flour, and 50g water. Mix well and wait 4-12 hours until it doubles in size and becomes bubbly before using.
How do you prepare sourdough starter before baking?
Feed your starter 4-12 hours before baking using a 1:1:1 ratio (equal parts starter, flour, water). It’s ready when doubled in size, bubbly throughout, and passes the float test. If refrigerated, bring to room temperature first, then feed. Active starter should smell yeasty and pleasant, not sour or acetone-like.

![How to freeze sourdough starter [top tips for success]](https://www.mydailysourdoughbread.com/wp-content/uploads/2023/06/storing-starter-in-freezer-120x120.jpg "How To Freeze Sourdough Starter [Top Tips For Success] 6")