Last updated on July 26th, 2025
Picture this: you’re standing in your kitchen, staring at yet another loaf of sandwich bread, wondering why dinner feels so predictable. Enter lavash bread – the thin, flexible flatbread that’s about to become your new best friend. This Armenian staple isn’t some trendy food fad; it’s been feeding families for centuries, and once you start making it at home, you’ll understand why it has such staying power.
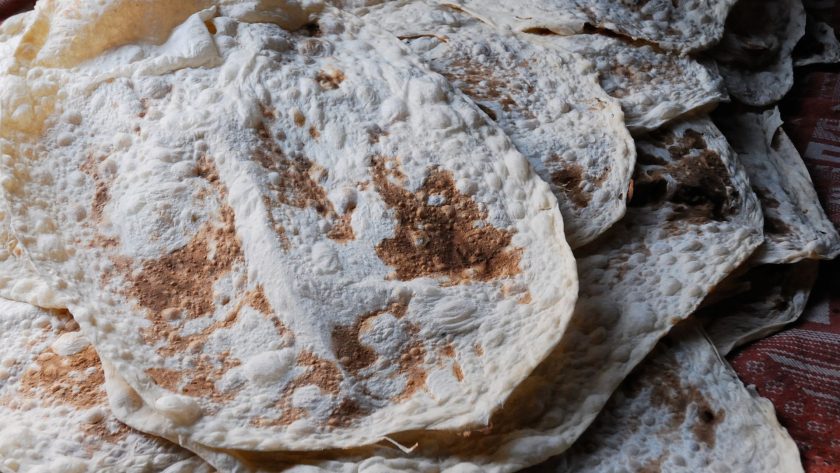
Lavash is essentially a thin, soft flatbread that’s rolled out paper-thin and cooked quickly on a hot surface. Think of it as the canvas of the bread world – neutral enough to complement any flavor, yet distinctive enough to elevate even the simplest meal. You can wrap, roll, tear, dip, or crisp it up depending on your mood.
Making lavash at home gives you control over every ingredient, saves money compared to store-bought versions, and fills your kitchen with an aroma that’ll have everyone who gets a whiff asking what smells so incredible. Plus, there’s something soooo satisfying about rolling out that dough until it’s translucent, watching it puff and bubble on your cooking surface, and knowing you’ve created something both ancient and completely your own.
What Makes Lavash Special
Traditional lavash contains just flour, water, and salt – sometimes a touch of oil. This simplicity means the technique matters more than fancy ingredients. The dough needs to be elastic enough to roll thin without tearing, yet tender enough to stay soft after cooking. Getting that balance right takes a bit of practice, but the results are worth every failed attempt.
The difference between lavash and other flatbreads is its thinness and flexibility. While naan is thick and chewy, and pita forms pockets, lavash stays pliable even after cooling. This makes it ideal for wrapping, layering, and storing – it won’t crack or break when you fold it.
1. Classic Armenian Lavash
Let’s start with the foundation – traditional lavash that’s been perfected over generations. This recipe creates that signature paper-thin bread with just enough chew to hold your fillings without falling apart.
Ingredients
- 3 cups all-purpose flour
- 1 teaspoon salt
- 1 cup warm water
- 2 tablespoons olive oil
How to Make
- Mix flour and salt in a large bowl, creating a well in the center
- Combine warm water and olive oil, then pour into the flour well
- Stir until a shaggy dough forms, then knead on a floured surface for 8-10 minutes until smooth and elastic
- Place dough in an oiled bowl, cover with damp cloth, and rest for 30 minutes
- Divide dough into 8 equal portions and roll each into a ball
- On a well-floured surface, roll each ball as thin as possible – you should almost be able to see through it
- Heat a cast-iron skillet or griddle over medium-high heat
- Cook each lavash for 1-2 minutes per side until light brown spots appear and it puffs slightly
- Stack finished breads under a clean kitchen towel to keep them soft
Tips
- Don’t skip the resting time – it makes rolling much easier
- Keep your work surface well-floured to prevent sticking
- If the dough springs back while rolling, let it rest another 10 minutes
- Store cooled lavash in plastic bags to maintain flexibility
2. Herb-Infused Garden Lavash
This version transforms basic lavash into something special by incorporating fresh herbs directly into the dough. The result is a fragrant, colorful bread that makes even simple cheese and tomato combinations taste gourmet.
Ingredients
- 3 cups all-purpose flour
- 1 teaspoon salt
- 1 cup warm water
- 2 tablespoons olive oil
- 3 tablespoons mixed fresh herbs (parsley, dill, chives), finely chopped
- 1 teaspoon garlic powder
How to Make
- Combine flour, salt, and garlic powder in a mixing bowl
- Mix chopped herbs into the flour mixture, distributing evenly
- Create a well and add warm water mixed with olive oil
- Knead for 10 minutes until the dough is smooth and herbs are well distributed
- Rest covered for 45 minutes (herbs need extra time to soften)
- Divide into 6 portions for slightly thicker herb lavash
- Roll out each portion, being careful not to tear around herb pieces
- Cook on medium heat for 2-3 minutes per side until spotted with brown
- Cool under a towel to maintain moisture
Tips
- Pat herbs dry before chopping to prevent excess moisture
- Use a pizza wheel to cut herbs finely and evenly
- These lavash work beautifully for Mediterranean wraps
- Freeze extras between parchment paper sheets
3. Whole Wheat Rustic Lavash
For those who want more nutritional punch and a nuttier flavor, this whole wheat version delivers without sacrificing the characteristic thinness. The slightly heartier texture makes it ideal for heartier fillings.
Ingredients
- 2 cups whole wheat flour
- 1 cup all-purpose flour
- 1½ teaspoons salt
- 1¼ cups warm water
- 3 tablespoons olive oil
- 1 tablespoon honey
How to Make
- Whisk together both flours and salt in a large bowl
- Dissolve honey in warm water, then add olive oil
- Pour liquid into flour mixture and stir until combined
- Knead for 12-15 minutes until dough becomes smooth (whole wheat needs extra work)
- Let rest for 1 hour covered with damp cloth
- Divide into 8 pieces and shape into balls
- Roll each ball very thin, working patiently as whole wheat can be more resistant
- Cook on a hot, dry skillet for 2 minutes per side
- Stack and cover immediately to prevent drying
Tips
- Whole wheat dough benefits from longer kneading and resting times
- Add water gradually if dough feels too stiff
- These lavash pair excellently with roasted vegetables and hummus
- The honey adds subtle sweetness and helps with browning
4. Sourdough Lavash with Tangy Depth
Using sourdough starter creates lavash with complex flavor and improved digestibility. The fermentation process develops taste layers that complement both sweet and savory applications.
Ingredients
- 1 cup active sourdough starter
- 2 cups all-purpose flour
- ¾ teaspoon salt
- ½ cup warm water (adjust as needed)
- 2 tablespoons olive oil
How to Make
- Mix sourdough starter with olive oil in a large bowl
- Add flour and salt, stirring to combine
- Gradually add warm water until dough comes together (amount varies based on starter hydration)
- Knead for 8-10 minutes until smooth and slightly sticky
- Cover and let rise for 2-3 hours at room temperature until increased by 50%
- Divide into 6 portions and shape into balls
- Roll each portion extremely thin on a floured surface
- Cook on medium-high heat for 1-2 minutes per side until lightly spotted
- Keep warm under clean towels
Tips
- Starter consistency affects water needs – adjust accordingly
- Longer fermentation develops more complex flavors
- These freeze beautifully and reheat well in a dry skillet
- The tanginess pairs wonderfully with sweet spreads or savory meats
5. Sesame Seed Lavash
Adding sesame seeds creates textural interest and nutty flavor that elevates this lavash beyond the ordinary. The seeds also provide visual appeal and extra nutrition.
Ingredients
- 3 cups all-purpose flour
- 1 teaspoon salt
- 1 cup warm water
- 2 tablespoons sesame oil
- 1 tablespoon olive oil
- 3 tablespoons sesame seeds
- 1 egg, beaten (for brushing)
How to Make
- Combine flour and salt in a mixing bowl
- Mix warm water with both oils
- Add liquid to flour and knead for 10 minutes until elastic
- Rest dough covered for 30 minutes
- Divide into 8 portions and roll into balls
- Roll each ball thin, brush lightly with beaten egg
- Sprinkle sesame seeds over surface and gently press in with rolling pin
- Cook seed-side down first for 2 minutes, then flip and cook 1 minute more
- Cool stacked under towels
Tips
- Press seeds firmly into dough to prevent them from falling off during cooking
- Sesame oil can burn easily, so monitor heat carefully
- These work beautifully for Asian-inspired wraps
- Toast extra sesame seeds for garnishing finished dishes
6. Spiced Lavash with Warm Aromatics
This version incorporates warming spices directly into the dough, creating bread that’s fragrant and flavorful enough to eat on its own. The spice blend can be adjusted to personal taste preferences.
Ingredients
- 3 cups all-purpose flour
- 1 teaspoon salt
- 1 teaspoon ground cumin
- ½ teaspoon smoked paprika
- ½ teaspoon ground coriander
- ¼ teaspoon cayenne pepper
- 1 cup warm water
- 3 tablespoons olive oil
How to Make
- Whisk together flour, salt, and all spices in a large bowl
- Make a well in center and add water mixed with olive oil
- Stir until dough forms, then knead for 10 minutes until smooth
- Cover and rest for 45 minutes
- Divide into 8 pieces and shape into balls
- Roll each ball as thin as possible without tearing
- Cook on medium-high heat for 1-2 minutes per side until fragrant and spotted
- Stack under clean towels to maintain moisture
Tips
- Toast whole spices and grind them yourself for maximum flavor impact
- Start with less cayenne and adjust upward to taste
- These lavash complement Middle Eastern and Indian dishes beautifully
- The spices will deepen in flavor as the bread cools
7. Sweet Cinnamon Lavash
Sometimes you want lavash that leans toward dessert territory. This sweet version works beautifully for breakfast wraps, dessert applications, or afternoon snacks with tea.
Ingredients
- 3 cups all-purpose flour
- ½ teaspoon salt
- 2 tablespoons sugar
- 1 teaspoon ground cinnamon
- 1 cup warm milk
- 3 tablespoons melted butter
- 1 egg yolk
How to Make
- Combine flour, salt, sugar, and cinnamon in a bowl
- Whisk together warm milk, melted butter, and egg yolk
- Add wet ingredients to dry and mix until dough forms
- Knead for 8 minutes until smooth and slightly enriched feeling
- Rest covered for 30 minutes
- Divide into 6 portions for slightly thicker sweet lavash
- Roll each portion thin, being gentle with the enriched dough
- Cook on medium heat for 2-3 minutes per side until golden
- Cool on wire racks to prevent steaming
Tips
- The milk and butter make this dough more delicate – handle gently
- These work wonderfully for fruit and cream cheese wraps
- Dust with powdered sugar while still warm for extra sweetness
- Can be made ahead and reheated in a dry skillet
Tips for Making Great Lavash at Home
First, dough consistency matters enormously. Your dough should be soft and pliable but not sticky. If it tears easily when rolling, it needs more kneading time to develop gluten. If it springs back aggressively, it needs more resting time.
Temperature control during cooking is crucial. Too hot, and the outside burns before the inside cooks. Too cool, and you’ll get tough, chewy results. Medium-high heat works for most ranges, but adjust based on your equipment. The lavash should puff slightly and develop light brown spots within 1-2 minutes.
Rolling technique takes practice. Work from the center outward, rotating the dough frequently to maintain a round shape. Keep your surface well-floured, but brush off excess flour before cooking to prevent burning. Don’t worry about achieving perfect circles – rustic shapes add character.
Proper storage keeps lavash flexible for days. Stack cooled bread between clean kitchen towels, then transfer to plastic bags or airtight containers. They’ll stay soft at room temperature for several days or can be frozen for months. To refresh day-old lavash, sprinkle lightly with water and warm in a dry skillet for 30 seconds per side.
Creative Serving Ideas
Lavash shines in applications beyond simple wraps.
Cut into triangles and bake until crispy for homemade chips that pair beautifully with dips and spreads. Layer sheets with cheese and herbs, then bake for an easy flatbread pizza alternative.
For elegant appetizers, brush lavash with olive oil, sprinkle with za’atar or herbs, and bake until golden. Break into irregular pieces for a sophisticated alternative to crackers. The flexibility also makes lavash ideal for pinwheel sandwiches – spread with cream cheese and fillings, roll tightly, then slice for colorful spirals.
Sweet applications work wonderfully too. Brush with butter and cinnamon sugar, then bake until crispy for a quick dessert. Use as a base for fruit and yogurt parfaits, or roll around ice cream for an unusual but delicious treat.
Wrapping Up Your Lavash Adventure
These seven lavash variations give you a solid foundation for exploring this bread. Each recipe offers something different – from the pure simplicity of traditional Armenian lavash to the complex flavors of sourdough or the warming spices of the aromatic version. You can experiment with different flours, add-ins, and flavor combinations.
Remember that practice makes improvement, not perfection. Your first few attempts might not roll as thin as you’d like, or might cook unevenly, and that’s completely normal. Each batch teaches you something about your dough, your equipment, and your technique. Keep notes about what works and what doesn’t – temperature adjustments, timing changes, or ingredient modifications that improve your results.
The real reward comes when you taste your homemade lavash alongside something you’ve made before. The difference in flavor, texture, and satisfaction is remarkable. You’ll find yourself reaching for lavash instead of regular bread, discovering new ways to use it, and probably sharing samples with anyone who’ll try them. That’s the true magic of making bread at home – it connects you to centuries of tradition while creating something uniquely yours.