Last updated on July 26th, 2025
I used to think good keto bread was an oxymoron. After years of biting into dense, crumbly disasters that tasted like sawdust mixed with hope, I was ready to accept that bread and keto just didn’t mix. Then I got stubborn.
Somewhere between my fifteenth failed loaf and my neighbor’s concerned glances at the smoke billowing from my windows, something clicked.
The breakthrough wasn’t a single eureka moment – it was understanding that keto bread isn’t about copying wheat bread. It’s about working with completely different ingredients that have their own personalities, quirks, and demands. Almond flour doesn’t behave like wheat flour. Psyllium husk isn’t just a weird health store ingredient. Coconut flour drinks up moisture like it’s been wandering in the desert for weeks.
Once I stopped fighting these ingredients and started working with them, everything changed. These five recipes represent the survivors – the ones that earned permanent spots in our meal rotation. They’re the breads that made my carb-loving self stop asking when I was giving up this keto thing.

Classic Almond Flour Loaf
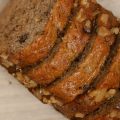
This bread became my gateway drug back into sandwich-making. It has a tender crumb and actually holds together when you slice it, which feels like a minor miracle when you’ve been living off lettuce wraps for months. The texture is reminiscent of a dense whole wheat bread, and it toasts beautifully.
Ingredients
- 2 cups blanched almond flour
- 1/4 cup coconut flour
- 1 tablespoon psyllium husk powder
- 1 teaspoon baking powder
- 1 teaspoon salt
- 6 large eggs
- 1/4 cup melted butter
- 2 tablespoons cream cheese, softened
- 1 tablespoon apple cider vinegar
- 1 teaspoon garlic powder (optional, but adds depth)
How to Make
- Preheat your oven to 350°F and line a 9×5 inch loaf pan with parchment paper
- Whisk together all dry ingredients in a large bowl, making sure to break up any clumps
- In a separate bowl, beat the eggs thoroughly, then mix in melted butter, cream cheese, and apple cider vinegar
- Pour wet ingredients into dry ingredients and stir until just combined
- Let the batter sit for 5 minutes to allow psyllium husk to work its magic
- Pour into prepared loaf pan and smooth the top
- Bake for 45-50 minutes until golden brown and a toothpick comes out clean
- Cool in the pan for 10 minutes before turning out onto a wire rack
Tips
- Don’t overmix the batter or you’ll end up with tough bread
- The psyllium husk is crucial for binding – don’t skip it or substitute it
- Store slices in the refrigerator and toast them for best texture
- Slice with a sharp serrated knife using a gentle sawing motion
Coconut Flour Wonder Bread
This recipe saved my bacon when I realized I’d run out of almond flour but was craving toast for breakfast. Coconut flour behaves completely differently from almond flour – it’s thirsty and absorbs liquid like crazy. But when you respect its quirks, it creates surprisingly fluffy, cake-like bread that’s fantastic for French toast or just eating warm with butter.
Ingredients
- 3/4 cup coconut flour
- 8 large eggs
- 1/2 cup melted coconut oil
- 1/4 cup cream cheese, softened
- 2 tablespoons psyllium husk powder
- 1 tablespoon baking powder
- 1 teaspoon salt
- 1 teaspoon vanilla extract
- 1/2 teaspoon xanthan gum
How to Make
- Preheat oven to 350°F and grease a 9×5 inch loaf pan generously
- Sift coconut flour to remove any lumps – this step matters more than you think
- Combine coconut flour, psyllium husk, baking powder, salt, and xanthan gum in a bowl
- In a large mixing bowl, beat eggs until frothy, about 2 minutes
- Add melted coconut oil, cream cheese, and vanilla to eggs and mix well
- Gradually fold in dry ingredients until smooth
- Let batter rest for 10 minutes – it will thicken considerably
- Pour into prepared pan and bake for 50-55 minutes
- Cool completely before slicing (this is non-negotiable with coconut flour bread)
Tips
- Coconut flour varies by brand, so you might need to adjust liquid slightly
- This bread gets better after sitting overnight – the flavors meld and texture improves
- Don’t be tempted to slice it warm or it will fall apart
- Wrap leftover slices individually and freeze for quick breakfast toast
Psyllium Husk Power Loaf
When I first heard about using psyllium husk in bread, I was skeptical. It’s a fiber supplement, not a baking ingredient, right? Wrong. This stuff is absolute magic for creating chewy, elastic texture that mimics gluten better than anything else I’ve tried. This bread has serious structure and can handle being made into stuffing or bread pudding.
Ingredients
- 1 1/2 cups almond flour
- 1/2 cup coconut flour
- 3 tablespoons psyllium husk powder
- 2 teaspoons baking powder
- 1 teaspoon salt
- 1/2 teaspoon garlic powder
- 5 large eggs
- 1 cup warm water
- 3 tablespoons olive oil
- 1 tablespoon apple cider vinegar
- 1 teaspoon dried herbs (rosemary or thyme work well)
How to Make
- Heat oven to 375°F and line a loaf pan with parchment paper
- Mix all dry ingredients in a large bowl, whisking to combine evenly
- In another bowl, beat eggs, then add warm water, olive oil, and vinegar
- Pour wet ingredients into dry and mix quickly – the psyllium will start thickening immediately
- Work fast to get the mixture into your prepared pan
- Smooth the top and let it sit for 2-3 minutes to set up
- Score the top with a sharp knife for a traditional bread look
- Bake for 60-65 minutes until the crust is deep golden brown
- Cool on a wire rack for at least 30 minutes before slicing
Tips
- Work quickly once you add liquid – psyllium waits for no one
- The dough will look weird and gel-like at first, but trust the process
- This bread actually improves with age, so make it a day ahead if possible
- Use a spray bottle to mist the oven walls for extra crusty crust
Keto Sourdough Starter and Bread
Creating a keto sourdough starter feels like performing alchemy, but the results are worth the patience. This isn’t traditional sourdough – it won’t have that same tangy punch – but it develops complex flavors and has a wonderful chewy texture that regular keto breads can’t match. The starter takes about a week to develop, so plan ahead.
Keto Sourdough Starter Ingredients
- 1/2 cup almond flour
- 1/2 cup coconut flour
- 1 tablespoon psyllium husk powder
- 1 cup filtered water
- 1 teaspoon raw honey (for initial feeding only)
Creating Your Starter
- Mix all ingredients in a clean glass jar
- Cover with cheesecloth and secure with rubber band
- Leave at room temperature for 24 hours
- Discard half and feed with equal parts almond flour, coconut flour, and water
- Repeat daily for 5-7 days until bubbly and active
- Once established, store in refrigerator and feed weekly
Sourdough Bread Ingredients
- 1 cup active keto sourdough starter
- 1 1/2 cups almond flour
- 1/2 cup coconut flour
- 2 tablespoons psyllium husk powder
- 1 teaspoon salt
- 3 large eggs
- 1/4 cup warm water
- 2 tablespoons olive oil
How to Make the Bread
- Remove starter from fridge 2-3 hours before baking to activate
- Combine flours, psyllium husk, and salt in a large bowl
- In another bowl, whisk eggs with warm water and olive oil
- Add starter to wet ingredients and mix well
- Fold wet mixture into dry ingredients until combined
- Cover bowl and let rise in a warm place for 4-6 hours
- Preheat oven to 450°F with a Dutch oven inside
- Carefully remove hot Dutch oven and place dough inside
- Cover and bake for 30 minutes, then uncover and bake 15 more minutes
- Cool completely on a wire rack before slicing
Tips
- Be patient with the starter – it takes time to develop
- The bread won’t rise as much as traditional sourdough, but it will have great flavor
- Experiment with different flours in your starter for varied flavors
- Save some dough to use as starter for your next loaf
Cheesy Herb Focaccia
Sometimes you need bread that’s more than just a vessel for other foods – you need bread that IS the food. This focaccia delivers with its crispy edges, tender center, and loads of savory toppings. It’s what I make when I want to impress guests who don’t even know they’re eating keto.
Ingredients
- 2 cups almond flour
- 3 tablespoons psyllium husk powder
- 1 tablespoon baking powder
- 1 teaspoon salt
- 4 large eggs
- 1/2 cup warm water
- 1/4 cup olive oil, divided
- 1 cup shredded mozzarella cheese
- 2 tablespoons fresh rosemary, chopped
- 1 tablespoon garlic powder
- Coarse sea salt for topping
- Cherry tomatoes, halved (optional)
How to Make
- Preheat oven to 400°F and line a 9×13 inch baking pan with parchment
- Whisk together almond flour, psyllium husk, baking powder, and salt
- Beat eggs in a large bowl, then add warm water and half the olive oil
- Stir dry ingredients into wet until combined
- Fold in mozzarella cheese and half the rosemary
- Press dough into prepared pan, spreading evenly
- Brush top with remaining olive oil and sprinkle with garlic powder
- Top with remaining rosemary, coarse salt, and tomatoes if using
- Use your fingers to make dimples all over the surface
- Bake for 25-30 minutes until golden brown and crispy on edges
- Cool for 10 minutes before cutting into squares
Tips
- Don’t skip the dimpling – it’s what makes focaccia look authentic
- Use the best olive oil you have for drizzling on top
- This is great warm or at room temperature
- Try different cheese and herb combinations for variety
Master Tips for Keto Bread Success
Here’s what I’ve learned through trial and plenty of error:
Ingredient Quality Matters
- Use blanched almond flour, not almond meal – the texture difference is huge
- Fresh baking powder makes a real difference in rise
- Psyllium husk powder works better than whole husks
- Room temperature eggs mix more easily and create better texture
Mixing Techniques
- Don’t overmix once you add wet to dry ingredients
- Let batters rest when recipes call for it – binding agents need time to work
- Work quickly with psyllium-heavy doughs as they set up fast
- Fold in delicate ingredients like cheese gently to avoid breaking them down
Baking Environment
- Always preheat your oven completely before baking
- Use an oven thermometer to verify temperature accuracy
- Don’t open the oven door for the first 30 minutes of baking
- Cool breads completely before slicing unless recipe specifies otherwise
Storage Solutions
- Wrap cooled breads tightly in plastic wrap or store in airtight containers
- Refrigerate most keto breads for best shelf life
- Slice and freeze portions for easy grab-and-go options
- Toast refrigerated slices for best texture and flavor
Creative Serving Ideas
Once you’ve mastered these breads, the real fun begins. Here are my favorite ways to use them:
- Breakfast Champions: French toast made with the coconut flour bread is incredible – it soaks up custard beautifully. The almond flour loaf makes excellent avocado toast, and the focaccia cut into strips is fantastic for dipping in soft-boiled eggs.
- Lunch Box Heroes: All of these breads make solid sandwiches. The psyllium power loaf holds up especially well to juicy fillings. Try grilled cheese made with the sourdough for next-level comfort food.
- Dinner Party Stars: Serve warm focaccia alongside salads or soups. The sourdough makes excellent garlic bread when sliced, buttered, and broiled. Use any of these breads for stuffing – just cube and dry them out first.
- Snack Attack Solutions: Toast slices and top with cream cheese and everything bagel seasoning. Make bread pudding with the coconut flour bread for dessert. Cube and season any of these for homemade croutons.
Navigating Keto Baking Like a Pro
Diving into keto baking while maintaining your low-carb lifestyle takes some strategy, but it’s absolutely doable with the right approach.
- Timing is Everything: Bake your breads on days when you have other activities planned. The smell of fresh bread can trigger cravings, so having distractions helps. I usually bake on Sunday afternoons when I’m meal prepping anyway.
- Portion Control Strategies: Slice your finished loaves and freeze individual portions immediately. This prevents the “just one more slice” spiral and ensures you always have the right amount on hand. Pre-portion your ingredients too – measure out single-recipe amounts and store them together.
- Smart Substitutions: Keep keto-friendly alternatives on hand for traditional bread cravings. When you want garlic bread, try roasted radishes with garlic butter. Craving a sandwich? Lettuce wraps or portobello mushroom caps work great while your fresh bread is in the oven.
- Planning Your Carb Budget: These breads are lower in carbs than regular bread, but they’re not carb-free. Factor them into your daily macros just like any other food. Most of these recipes yield about 12-16 slices with 3-5 net carbs per slice, so plan accordingly.
- Stock Your Pantry Wisely: Keep specialty ingredients like psyllium husk powder and xanthan gum well-stocked. Nothing kills a bread craving like realizing you’re missing a key binding agent. Buy almond flour in bulk if you bake regularly – it’s more economical and ensures you always have it on hand.
Your Keto Bread Adventure Starts Here
The difference between frustrating failure and satisfying success often comes down to small details – the temperature of your eggs, how long you let the batter rest, or whether you remembered to sift your coconut flour.
These five recipes aren’t just formulas to follow blindly. They’re your training ground for understanding how keto ingredients work together. Start with whichever one calls to you most – maybe it’s the straightforward almond flour loaf if you want quick wins, or the focaccia if you’re feeling ambitious. Each recipe will teach you something different about texture, flavor, and technique.
Don’t aim for perfection on your first try. Sometimes I’m still haunted by the loaf that came out so dense we could’ve used it as a doorstop. Those failures are part of the process, and honestly, even a mediocre homemade keto bread beats store-bought cardboard any day, because you tried.
Your relationship with bread doesn’t have to end because you chose keto. It just gets more interesting, more intentional, and surprisingly more rewarding. There’s something deeply satisfying about pulling a golden loaf from your oven, knowing you created it from scratch using ingredients that support your health goals.
So grab your apron, preheat that oven, and prepare to fall in love with baking all over again. Your kitchen might get a little messy, your smoke alarm might go off once or twice, but I promise you – the smell of fresh keto bread filling your house makes every bit of the learning curve worth it.