
Last updated on July 25th, 2025
Few things beat the satisfaction of pulling fresh bread rolls from your oven. The aroma fills your kitchen, the crust gives way to tender crumb, and suddenly your dinner table feels more complete. Making bread rolls at home isn’t rocket science, but it does reward patience and attention to detail.
I’ve spent years making these five recipes, and each one serves a different purpose in my kitchen. Some work well for weeknight dinners when you need something quick and reliable. Others shine during weekend baking sessions when you have time to let flavors develop properly.
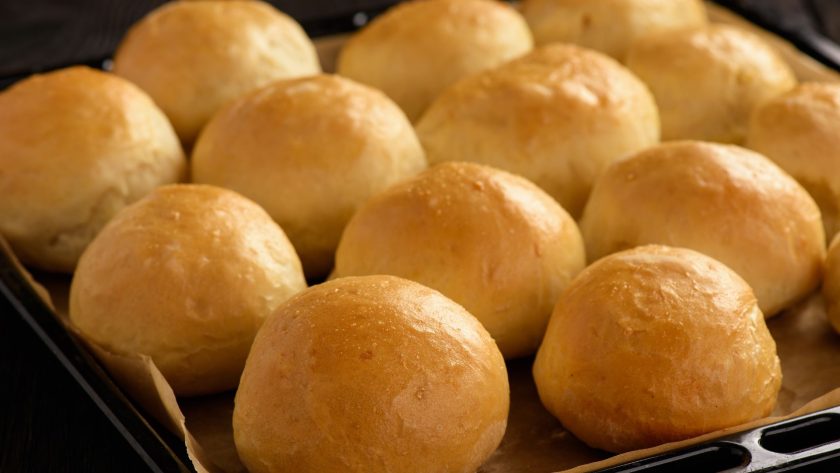
Classic Dinner Rolls
These are the workhorses of bread rolls – soft, slightly sweet, and incredibly versatile. They pair beautifully with everything from roast chicken to hearty stews. The secret lies in the enriched dough, which contains eggs and butter for that tender crumb everyone loves.
Ingredients
- 3½ cups all-purpose flour
- 2¼ teaspoons active dry yeast (1 packet)
- 2 tablespoons sugar
- 1 teaspoon salt
- ¾ cup warm milk (110°F)
- ¼ cup melted butter
- 1 large egg
- 2 tablespoons melted butter for brushing
How to Make
- Combine warm milk, sugar, and yeast in a large bowl. Let stand for 5 minutes until foamy.
- Add melted butter, egg, and salt to the yeast mixture. Stir to combine.
- Gradually add flour, mixing until a soft dough forms.
- Turn dough onto a floured surface and knead for 8-10 minutes until smooth and elastic.
- Place in a greased bowl, cover, and let rise in a warm place for 1 hour until doubled.
- Punch down dough and divide into 12 equal pieces.
- Shape each piece into a ball and place on a greased baking sheet.
- Cover and let rise for 30 minutes until puffy.
- Preheat oven to 375°F.
- Brush rolls with melted butter and bake for 15-18 minutes until golden brown.
Tips
- Check your yeast’s expiration date – old yeast won’t give you the rise you need
- The dough should feel slightly sticky but not wet when properly mixed
- Don’t skip the second rise; it creates the light texture these rolls are known for
- Brush with butter immediately after baking for extra softness
Crusty Artisan Rolls
When you want bread with character, these rustic rolls deliver. The long, slow fermentation develops complex flavors, while the high-heat baking creates that crackling crust. These rolls have substance – they won’t fall apart when you load them with soup or sandwich fillings.
Ingredients
- 4 cups bread flour
- 1¼ teaspoons salt
- ½ teaspoon active dry yeast
- 1⅔ cups room temperature water
- Coarse sea salt for sprinkling
How to Make
- Mix flour, salt, and yeast in a large bowl.
- Add water and stir until a shaggy dough forms. The mixture will look rough and uneven.
- Cover tightly with plastic wrap and let sit at room temperature for 12-18 hours.
- Turn dough onto a heavily floured surface. It will be very sticky.
- Fold dough over itself several times, then divide into 8 pieces.
- Shape each piece into a rough ball using floured hands.
- Place on parchment-lined baking sheets, cover with damp towels, and rise for 2 hours.
- Preheat oven to 450°F with a Dutch oven or heavy pot inside.
- Score tops of rolls with a sharp knife, sprinkle with coarse salt.
- Bake for 25-30 minutes until deep golden brown and hollow-sounding when tapped.
Tips
- The long fermentation time is non-negotiable – it’s what creates the flavor
- Keep your hands well-floured when shaping; this dough stays quite sticky
- Steam helps create the crust, so place a pan of hot water on the oven’s bottom rack
- These rolls taste even better the next day when toasted
Herb and Garlic Rolls
Sometimes you want bread that brings its own flavor to the table. These aromatic rolls are loaded with fresh herbs and roasted garlic, making them ideal alongside simple grilled meats or pasta dishes. The combination of rosemary, thyme, and garlic creates a Mediterranean vibe that transforms any meal.
Ingredients
- 3 cups all-purpose flour
- 2¼ teaspoons active dry yeast
- 1 tablespoon sugar
- 1 teaspoon salt
- 1 cup warm water
- 3 tablespoons olive oil
- 4 cloves garlic, minced
- 2 tablespoons fresh rosemary, chopped
- 1 tablespoon fresh thyme leaves
- 1 teaspoon garlic powder
- Extra olive oil for brushing
How to Make
- Dissolve yeast and sugar in warm water. Let stand for 5 minutes until bubbly.
- Heat 2 tablespoons olive oil in a small pan and sauté minced garlic for 1 minute. Cool slightly.
- Mix flour, salt, garlic powder, rosemary, and thyme in a large bowl.
- Add yeast mixture, sautéed garlic with oil, and remaining olive oil to flour mixture.
- Mix until dough forms, then knead on floured surface for 8 minutes.
- Place in oiled bowl, cover, and rise for 1 hour until doubled.
- Punch down and divide into 10 pieces. Shape into balls.
- Place on greased baking sheet, cover, and rise 45 minutes.
- Preheat oven to 400°F.
- Brush with olive oil and bake for 18-22 minutes until golden.
Tips
- Don’t burn the garlic when sautéing – it will taste bitter in the finished rolls
- Fresh herbs make a huge difference, but dried herbs work in a pinch (use half the amount)
- These freeze beautifully; just wrap tightly and reheat in a 350°F oven
- Try adding grated Parmesan cheese to the dough for extra richness
Whole Wheat Honey Rolls
These rolls prove that whole grain bread doesn’t have to be dense or boring. The honey adds natural sweetness while keeping the crumb moist, and the whole wheat flour provides nutty flavor and extra nutrition. They’re substantial enough for hearty sandwiches but still tender enough for dinner rolls.
Ingredients
- 2 cups whole wheat flour
- 1½ cups all-purpose flour
- 2¼ teaspoons active dry yeast
- 1 teaspoon salt
- ¼ cup honey
- 1 cup warm water
- 3 tablespoons vegetable oil
- 1 egg, beaten (for egg wash)
- Sesame seeds or poppy seeds for topping
How to Make
- Combine warm water, honey, and yeast in a large bowl. Stir and let stand for 5 minutes.
- Add oil and salt to the yeast mixture.
- Mix both flours together, then gradually add to liquid ingredients.
- Knead dough on floured surface for 10 minutes until smooth and elastic.
- Place in greased bowl, cover, and let rise for 1½ hours until doubled.
- Punch down dough and divide into 12 pieces.
- Shape into balls and place on greased baking sheets.
- Cover and let rise for 45 minutes until puffy.
- Preheat oven to 375°F.
- Brush with beaten egg and sprinkle with seeds.
- Bake for 20-25 minutes until golden brown.
Tips
- Whole wheat flour absorbs more liquid, so the dough might seem dry at first – be patient
- Honey can make the rolls brown quickly, so watch them closely in the final minutes
- Store these rolls in an airtight container to maintain their soft texture
- The dough rises more slowly than white flour doughs, so give it extra time
Sweet Potato Rolls
These gorgeous orange rolls bring subtle sweetness and incredible moisture to your bread basket. Sweet potato keeps them fresh for days, while adding vitamins and a beautiful color that makes any table look more festive. They’re particularly good during fall and winter months.
Ingredients
- 1 large sweet potato (about 8 ounces)
- 3½ cups all-purpose flour
- 2¼ teaspoons active dry yeast
- 2 tablespoons brown sugar
- 1 teaspoon salt
- ½ teaspoon cinnamon
- ¾ cup warm milk
- 3 tablespoons melted butter
- 1 egg
- Extra butter for brushing
How to Make
- Roast sweet potato at 400°F for 45 minutes until tender. Cool, peel, and mash until smooth.
- Combine warm milk, brown sugar, and yeast. Let stand for 5 minutes until foamy.
- Mix flour, salt, and cinnamon in a large bowl.
- Add yeast mixture, mashed sweet potato, melted butter, and egg to flour mixture.
- Mix until dough forms, then knead on floured surface for 8-10 minutes.
- Place in greased bowl, cover, and rise for 1 hour until doubled.
- Punch down and divide into 15 pieces. Shape into balls.
- Place on greased baking sheets, cover, and rise for 45 minutes.
- Preheat oven to 375°F.
- Brush with melted butter and bake for 18-20 minutes until golden.
Tips
- Roasting the sweet potato instead of boiling concentrates the flavor and reduces moisture
- The dough will be slightly orange-tinted and stickier than regular bread dough
- These rolls stay moist for several days thanks to the sweet potato
- Try adding a pinch of nutmeg or ginger for extra warmth
Sourdough Rolls
For those who maintain a sourdough starter, these tangy rolls showcase that distinctive flavor beautifully. The natural fermentation creates complex taste and an open, airy crumb. These rolls have character – they’re not trying to be sweet or mild, but rather bold and full of personality.
Ingredients
- 1 cup active sourdough starter (fed and bubbly)
- 2½ cups bread flour
- 1 teaspoon salt
- 1 tablespoon sugar
- ¾ cup warm water
- 2 tablespoons olive oil
- Coarse salt for sprinkling
How to Make
- Mix starter, warm water, and sugar in a large bowl until combined.
- Add flour, salt, and olive oil. Mix until shaggy dough forms.
- Turn onto floured surface and knead for 10 minutes until smooth.
- Place in oiled bowl, cover, and let rise for 3-4 hours until doubled.
- Punch down gently and divide into 10 pieces.
- Shape each piece into a tight ball by pulling the edges to the bottom.
- Place seam-side down on parchment-lined baking sheets.
- Cover and let rise for 2-3 hours until puffy and jiggly when gently shaken.
- Preheat oven to 425°F.
- Score tops with a sharp knife, brush with water, and sprinkle with coarse salt.
- Bake for 20-25 minutes until golden brown and hollow-sounding.
Tips
- Your starter should be active and recently fed for best results
- Sourdough timing varies with temperature and starter strength – be flexible
- The long rise times develop that signature tangy flavor
- These rolls are excellent toasted the next day with butter and jam
Tips for Making Bread Rolls at Home
Temperature matters more than most people realize – your kitchen’s warmth affects rising times, and your oven’s actual temperature might differ from what the dial says. Invest in an oven thermometer and use it.
Measuring flour correctly makes a huge difference. Too much flour leads to dense, dry rolls, while too little creates sticky, hard-to-handle dough. Spoon flour into your measuring cup and level it off rather than scooping directly from the bag.
Don’t rush the rising process. Bread develops flavor during fermentation, and hurrying this step with too much heat often backfires. A warm, draft-free spot works best – I often use my oven with just the light on.
Shaping matters for both appearance and texture. Take time to create tension in each roll by pulling the dough tight as you form it. This helps create a better rise and more even shape.
Steam during the first few minutes of baking helps create crispy crusts. Place a metal pan on the oven floor and add hot water just as you put the rolls in. Remove it halfway through baking.
Store finished rolls properly to maintain freshness. Most rolls stay best in paper bags or loosely covered with clean kitchen towels. Plastic bags make crusts soggy, though they work fine for soft dinner rolls.
Serving Ideas That Make Rolls Shine
Warm dinner rolls alongside roast chicken or beef stew feel both comforting and special. The herb and garlic rolls work beautifully with Italian dishes – tear them apart and use pieces to soak up marinara sauce or olive oil.
Crusty artisan rolls make excellent sandwich bases. Their sturdy structure holds up to hearty fillings like roast beef or grilled vegetables. Split them horizontally and toast lightly before building your sandwich.
Sweet potato rolls pair wonderfully with fall flavors. Serve them warm with honey butter alongside roasted turkey or pork. They also make interesting breakfast treats when toasted and topped with cream cheese.
Sourdough rolls shine when served with cheese and charcuterie. Their tangy flavor complements rich, salty foods. They’re also excellent for mopping up the last bits of soup or stew.
Consider the temperature when serving. Most rolls taste best when still slightly warm, but not hot enough to burn fingers. If you’ve made them ahead, a few minutes in a 300°F oven brings back that fresh-baked feel.
Butter presentation matters too. Room temperature butter spreads easily and tastes better than cold butter. Flavored butters – mixed with herbs, honey, or garlic – turn simple rolls into something special.
Troubleshooting Your Bread Rolls
Everyone will run into issues with bread rolls from time to time. Let’s get to the bottom of what might have gone wrong to help fix problems and improve your technique for next time:
- Dense, heavy rolls usually stem from too much flour or insufficient kneading. Bread flour needs proper gluten development to create that light, airy texture we all want. If your rolls come out like hockey pucks, measure your flour more carefully next time and knead for the full recommended time. The dough should feel smooth and elastic when properly developed.
- Rolls that don’t rise properly often indicate yeast problems. Check your yeast’s expiration date first – old yeast loses potency and won’t give you the lift you need. Water temperature also matters significantly. Too hot kills yeast, while too cool won’t activate it properly. Aim for around 110°F, which should feel barely warm on your wrist.
- Uneven browning frustrates many home bakers. Hot spots in your oven cause some rolls to brown faster than others. Rotate your baking sheets halfway through cooking, and consider using multiple racks with sheets positioned diagonally from each other. An oven thermometer helps identify temperature variations that might affect your results.
- Rolls that collapse after baking usually over-proofed during the final rise. When dough rises too long, the gluten structure weakens and can’t support the roll’s shape once it hits oven heat. Look for rolls that have doubled in size and feel slightly jiggly when gently shaken – that’s your cue to get them into the oven.
- Tough, chewy rolls often result from over-kneading or using the wrong flour type. While bread flour works well for most rolls, all-purpose flour creates more tender results for enriched doughs like dinner rolls. Pay attention to how your dough feels during kneading – it should become smooth and elastic without getting stiff or tight.
- Flat rolls that spread sideways instead of rising up need better shaping technique. Create tension in each roll by pulling the dough tight as you form it. This gives the roll structure and encourages upward rather than outward expansion during baking.
- Salt distribution affects both flavor and texture. Mix salt thoroughly into your flour before adding liquids to ensure even distribution throughout the dough. Uneven salt creates pockets of different flavors and can interfere with proper yeast activity.
Roll With It!
Making bread rolls at home does require time and attention, but the results justify the effort. Each recipe here serves different needs and occasions, giving you options throughout the year. Start with the classic dinner rolls if you’re new to bread making, then branch out as your confidence grows. Soon you’ll find yourself planning meals around which rolls to make, and your kitchen will smell like a proper bakery more often than not.
Related Articles:
 7 Banana Bread Recipes You Should Try Every Day of the Week
 Explore Cozy with These 6 Sweet Bread Recipes
 5 Keto Bread Recipes That Actually Taste Like Bread (No Cardboard Here!)
 7 Lavash Bread Recipes to Master This Ancient Flatbread at Home
 How to Make Quinoa Sourdough Bread (Plus Why You’ll Love It)
