
Last updated on June 4th, 2026
Store-bought bread was fine, until I learned to make sourdough. Now I can’t go back, and honestly, I don’t want to. These five recipes are ones I return to again and again. They all use a wild yeast starter (aka an active sourdough starter), and once you get the hang of how it behaves, you’ll develop an intuitive feel for the dough.
Hopefully you’ll find a little something for everyone here. Though each one is different, the same principles carry through making all of them. Get those things right, and the rest takes care of itself. On to the bread!
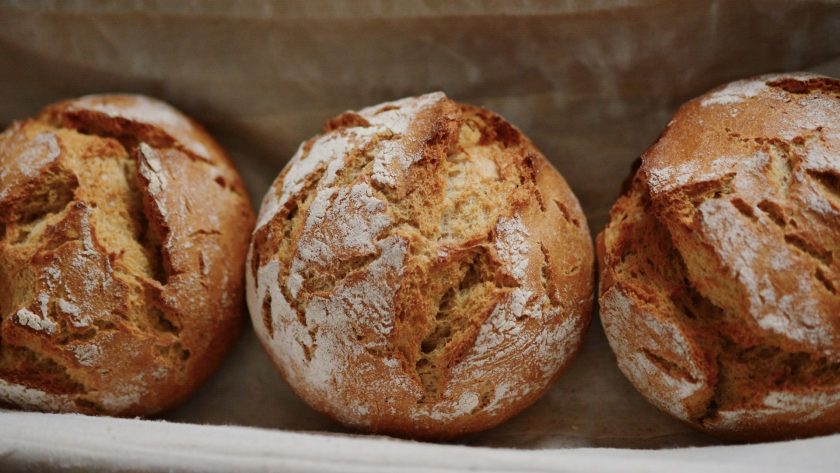
Classic White Sourdough Bread
Ingredients
- 1 cup active sourdough starter
- 1¼ cups warm water
- 3 cups bread flour
- 2 tsp salt
- 1 tbsp olive oil
How to Make
- Mix the flour and warm water (around 75°F) together in a large bowl until no dry flour remains. Cover and let it rest for 30-45 minutes. This gives the flour time to fully hydrate before anything else touches it.
- Add the starter and olive oil, squeezing them into the dough with your hands until fully incorporated. Sprinkle the salt over the top and work it in the same way. The dough will feel slippery at first, keep going, it comes together.
- Cover the bowl and let bulk fermentation begin. For the first 2 hours, do a set of stretch and folds every 30 minutes. Wet your hands, grab one side of the dough, stretch it up and fold it over to the opposite side, then rotate the bowl 90 degrees and repeat three more times. That’s one set.
- After your four sets, leave the dough alone. Continue bulk fermentation for another 2-4 hours at room temperature (70-75°F) until the dough has grown by about 50% and feels airy and jiggly when you shake the bowl gently. Your kitchen temperature and starter strength will determine exactly how long this takes.
- Shape the dough into a round and place it seam-side up in a banneton or a bowl lined with a well-floured cloth. Cover and refrigerate overnight, anywhere from 12 to 24 hours works.
- When you’re ready to bake, preheat your oven to 450°F with a Dutch oven inside. Once it’s fully heated, turn the dough out onto parchment paper, score the top with a sharp knife or lame, and lower it into the Dutch oven. Bake covered for 20 minutes, then remove the lid and bake for another 25 minutes until deep golden brown. Let it cool for at least an hour before cutting.
Tangy Sourdough Bread
Ingredients
- 1 cup mature sourdough starter (fed 12-24 hours ago)
- 1¼ cups room temperature water
- 3 cups bread flour
- 2 tsp salt
- 1 tbsp olive oil
How to Make
- Mix the flour and water together in a large bowl until no dry flour remains. Cover and rest for 45 minutes. This autolyse step lets the flour fully hydrate and gives you a smoother, more extensible dough before fermentation even begins.
- Add the starter and olive oil, working them in with your hands until fully incorporated. Sprinkle the salt over the top and do the same. It will feel messy at first, stick with it.
- Cover the bowl and begin bulk fermentation. For the first 3 hours, perform a set of coil folds every hour. To do a coil fold, slide both hands under the dough, lift it from the center and let both ends hang and fold underneath as you set it back down. Rotate the bowl 180 degrees and repeat once more. That’s one set.
- After your three sets, leave the dough undisturbed. Continue bulk fermentation for another 3-5 hours at 70-75°F. You’re looking for dough that feels smooth, slightly jiggly, and has grown noticeably. The longer fermentation is what builds the complex, tangy flavor this loaf is known for, so don’t rush it.
- Shape gently to avoid knocking out the gas bubbles you’ve spent hours building. Place seam-side up in a well-floured banneton or lined bowl, cover, and refrigerate for 24-48 hours.
- When ready to bake, preheat your oven to 475°F with a Dutch oven inside for at least 45 minutes. Turn the dough out onto parchment, score deeply with a sharp blade, and lower it into the Dutch oven. Bake covered for 20 minutes, then remove the lid, reduce the temperature to 425°F, and continue baking until the crust is a deep, rich brown.
- Cool for at least an hour before slicing.
Related: Homemade Sourdough Bread
Whole Wheat Sourdough Bread
Ingredients
- 1 cup active sourdough starter
- 1½ cups warm water
- 1½ cups whole wheat flour
- 1½ cups bread flour
- 2 tsp salt
- 2 tbsp honey
How to Make
- Mix both flours and the warm water (around 75°F) together in a large bowl until no dry flour remains. Cover and rest for 45-60 minutes. Whole wheat flour needs more time to fully hydrate than white flour, and this extended rest also helps soften the bran so it doesn’t tear the gluten as it develops.
- Add the starter, honey, and salt, working everything in with your hands until fully incorporated. The honey adds a mild sweetness that balances the earthiness of the whole wheat and helps the crust brown beautifully.
- Cover the bowl and begin bulk fermentation. Do a set of stretch and folds every 30 minutes for the first 3 hours, then leave the dough alone. Whole wheat ferments faster than white flour due to higher enzyme activity, so keep a close eye on things. You’re looking for about 50% growth and a slightly domed surface, total bulk time will likely run 5-7 hours at 70-75°F.
- Shape carefully. Whole wheat dough is softer and less forgiving than white dough, so work confidently but gently. Place seam-side up in a well-floured banneton or lined bowl, cover, and refrigerate for 12-24 hours.
- Preheat your oven to 450°F with a Dutch oven inside. Turn the dough out onto parchment, score the surface, and bake covered for 20 minutes. Remove the lid and continue baking until the crust is deep brown, another 20-25 minutes.
- Cool fully before slicing. This loaf is best within the first 3-4 days, as whole wheat bread stales faster than white sourdough.
Gluten-Free Sourdough Bread
Ingredients
- 1 cup gluten-free sourdough starter
- 1 ½ cups warm water
- 2 cups brown rice flour
- 1 cup tapioca starch
- ½ cup potato starch
- 2 tsp xanthan gum
- 1 ½ tsp salt
- 2 tbsp psyllium husk powder
How to Make
- Check that your starter is active before you begin. It should look bubbly, smell pleasantly tangy, and have risen noticeably since its last feeding. Mix it with warm water (around 80°F) in a large bowl. Gluten-free starters do best kept between 75-80°F, so if your kitchen runs cool, find a warm spot to work with.
- In a separate bowl, whisk together the brown rice flour, tapioca starch, potato starch, xanthan gum, psyllium husk powder, and salt until evenly combined. The psyllium husk does the heavy lifting here, providing the elasticity and structure that gluten would normally give. The xanthan gum backs it up with additional binding.
- Add the dry ingredients to the starter mixture and mix thoroughly for 2-3 minutes until completely smooth. Don’t expect this to look like bread dough. It will be thick and batter-like, which is exactly right for gluten-free sourdough.
- Cover and ferment at room temperature for 8-12 hours. The dough won’t rise dramatically the way wheat dough does, but you should see visible bubbles and a modest increase in volume. If your kitchen is warm, check it closer to the 8-hour mark. Over-fermenting gluten-free dough can make the final loaf gummy inside.
- Transfer to a well-greased 9×5-inch loaf pan and smooth the top with wet fingers. Let it rise for 2-3 hours until slightly domed above the rim of the pan. Bake at 425°F for 15 minutes, then reduce to 375°F and continue baking for 40-50 minutes. Internal temperature is your most reliable indicator here, pull it when it hits 205°F.
- Let the loaf cool completely in the pan before slicing, at least 2 hours. Cutting too soon will give you a gummy crumb regardless of how well it baked.
Related: How to Make Gluten Free Sourdough Bread
Sourdough Focaccia
Ingredients
- 1 cup active sourdough starter
- 1 ½ cups warm water
- 3 ½ cups bread flour
- 2 tsp salt
- ¼ cup olive oil (divided)
- Fresh rosemary sprigs
- Coarse sea salt for topping
How to Make
- Mix the flour and warm water (around 75°F) together in a large bowl until no dry flour remains. Cover and rest for 30-45 minutes to let the flour hydrate.
- Add the starter, salt, and 2 tablespoons of olive oil, working everything in with your hands until fully incorporated. The dough will be very wet and sticky. That’s intentional. Resist adding more flour.
- Cover the bowl and begin bulk fermentation. Do a set of stretch and folds every 30 minutes for the first 2-3 hours, then leave the dough alone. Continue bulk fermentation for 4-6 hours total at room temperature until the dough feels airy and has grown noticeably.
- Pour the remaining olive oil into a 9×13-inch pan and coat it generously, including the sides. Transfer the dough into the pan, turn it once to coat in oil, and let it relax uncovered for 30 minutes. Gently stretch it toward the edges of the pan without forcing it. Cover and refrigerate overnight.
- The next day, take the pan out and let it come to room temperature for 1-2 hours. The dough should look puffy and fill the pan. Drizzle a little more olive oil over the top, then use oiled fingertips to press deep dimples across the entire surface. Scatter fresh rosemary and a generous pinch of coarse sea salt over everything.
- Bake at 425°F for 25-30 minutes until the top is deeply golden and the edges are crispy. Let it cool in the pan for 10 minutes before transferring. Best eaten the same day, though it reheats well in a hot oven for a few minutes the next morning.
Tips for Homebaking
A few things worth keeping in mind as you work through them:
- Your starter is everything. If it isn’t active and healthy, nothing else matters. Feed it regularly, watch how it behaves, and only bake with it when it’s at or near peak activity — bubbly, doubled in size, and smelling pleasantly tangy. A sluggish starter means a sluggish loaf.
- Temperature runs the show. Fermentation slows down in a cold kitchen and speeds up in a warm one. The timing ranges in these recipes assume 70-75°F. If your home runs cooler or warmer, adjust your expectations accordingly and learn to read the dough rather than the clock.
- Hydration takes practice. Wetter doughs produce more open, airy crumbs but are harder to handle. If you’re newer to sourdough, it’s perfectly fine to pull back the water slightly until you get comfortable with how the dough moves and feels.
- Don’t skip the cold ferment. Refrigerating overnight does two things: it slows fermentation to build deeper, more complex flavor, and it firms the dough up so it’s much easier to score cleanly before baking. It’s one of the easiest ways to get a noticeably better loaf.
- A Dutch oven is worth it. The enclosed, steamy environment it creates in those first 20 minutes is what gives sourdough its crackling crust and good oven spring. A baking stone with a pan of water underneath can work in a pinch, but nothing quite replicates it.
- Cool the loaf completely before cutting. It’s the hardest part. The crumb continues setting as the bread cools, and slicing too early gives you a gummy, undercooked-looking interior even when the bake was perfect.
Practice with These 5 Sourdough Recipes
These five recipes cover a lot of ground, but they all come back to the same fundamentals: a healthy starter, enough time, and the patience to let fermentation do its job. The rest falls into place.
Don’t be discouraged if your first loaf isn’t perfect. Keep baking, adjust as you go. Before long you’ll find your rhythm…and bake even MORE sourdough!
FAQs
What is the secret to making homemade bread?
The secret lies in three key elements: using an active, bubbly starter that’s doubled in size, maintaining proper hydration levels for your desired crumb structure, and allowing sufficient fermentation time. Temperature control (70-75°F) and the stretch-and-fold technique develop gluten without overworking. Cold fermentation overnight creates complex flavors that separate exceptional bread from ordinary loaves.
What are the 7 common bread-making mistakes and how do you prevent them?
The biggest mistakes include using an inactive starter, incorrect hydration ratios, rushing fermentation, improper shaping, inadequate cold fermentation, poor scoring technique, and baking without steam. Prevent these by ensuring your starter is bubbly and doubled, measuring ingredients by weight, allowing 4-8 hours for bulk fermentation, practicing gentle shaping, cold fermenting overnight, using a sharp blade for scoring, and creating steam with a Dutch oven.
Is homemade bread healthier?
Yes, homemade sourdough is significantly healthier than store-bought bread. The wild yeast fermentation process breaks down phytic acid and gluten proteins, making nutrients more bioavailable and easier to digest. You control every ingredient – no preservatives, artificial additives, or excess sugar. The long fermentation also creates beneficial prebiotics and lactic acid, supporting gut health while delivering superior flavor and nutrition.




Do you think that you’re using too much yeast. Once I read that for 500g flour half a teaspoon is sufficient to raise that amount of flour given eough time. It results in tastier bread.
I am trying the Hobz tal-Malti asap. Sugar and oil is not used by professional bakers. I know. I am Maltese.
Hey Joe! We dont mention yeast in the recipes, the “wild yeast” refers to the sourdough starter. How was your Maltese bread?